West End Workbench
Moderators: 52D, Tom F, Rlangham, Atlantic 3279, Blink Bonny, Saint Johnstoun, richard
- Chas Levin
- GER D14 4-4-0 'Claud Hamilton'
- Posts: 300
- Joined: Fri Apr 10, 2015 11:54 am
- Location: London
Re: West End Workbench
Nice work as Dave says and likewise, I have that booklet as a pdf if you'd like a copy Jonathan. It's nowhere near as nice as reading a paper copy - no sense of time and place - but just for reference, it's very interesting, especially for info about how different types of loads were secured.
Chas
-
jwealleans
- LNER A4 4-6-2 'Streak'
- Posts: 4302
- Joined: Wed Oct 25, 2006 8:46 am
Re: West End Workbench
Thanks, Chas: I've been provided with an online copy of both editions (!) which was very generous. It is a worthwhile read if you take an interest in wagon loads and securing them.
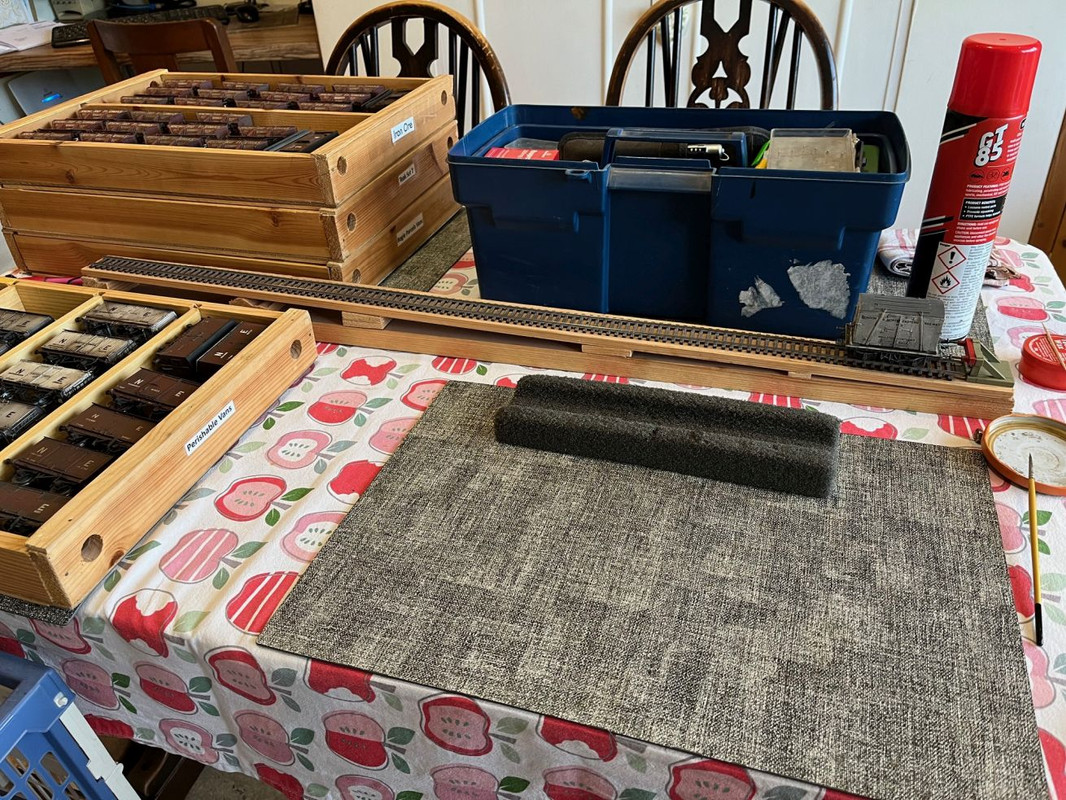
I've been beavering away with loco cleaning and stock testing over the weekend and up to last night. Checking stock for free running and obvious damage - not overly onerous but there's a lot to cover.
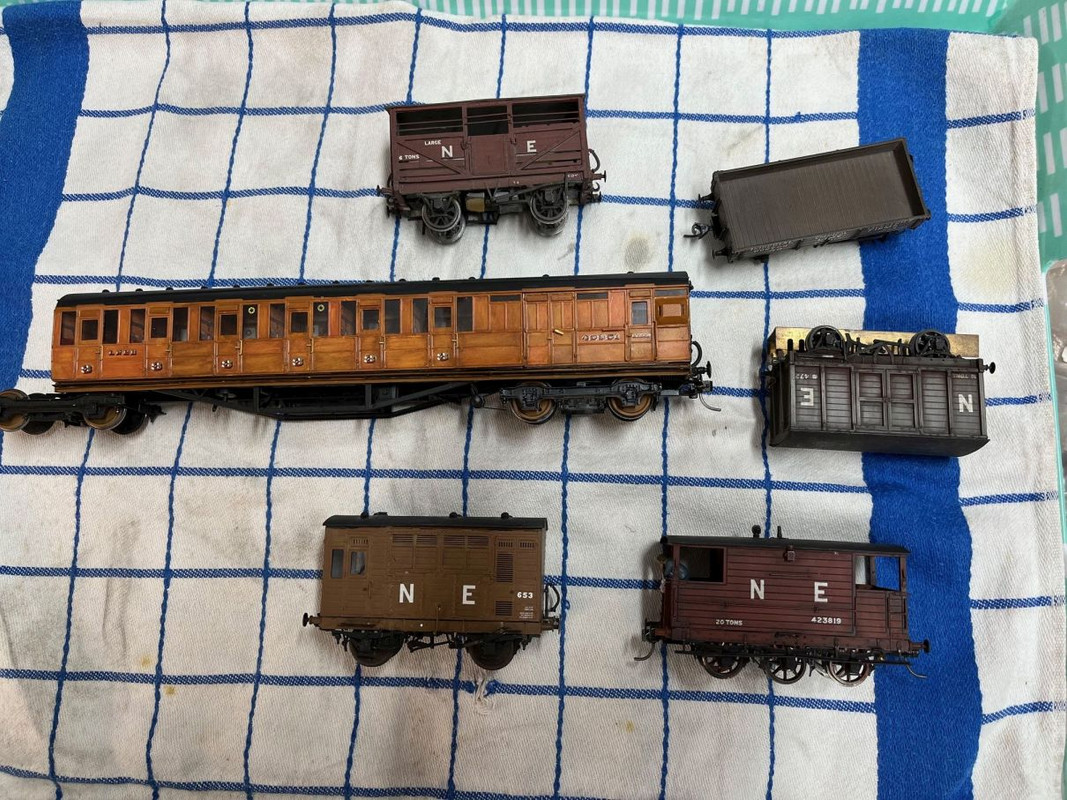
There was the usual round of repairs too: the cattle wagon had lost its couplings at both ends, the RTR wagon was tight on the wheelsets and needed a bearing recessing a little, the carriage didn't roll well and turned out to still have the masking tape on the wheels from when the bogie was sprayed (it's done 3 shows like that), the H & B van lost an axle when I was taking the wheels out to oil them and I had to glue the W iron back on again. The GN horsebox had lost the door controller and the brake van had a cracked gearbox (which is what they call the Kadee mounting block).
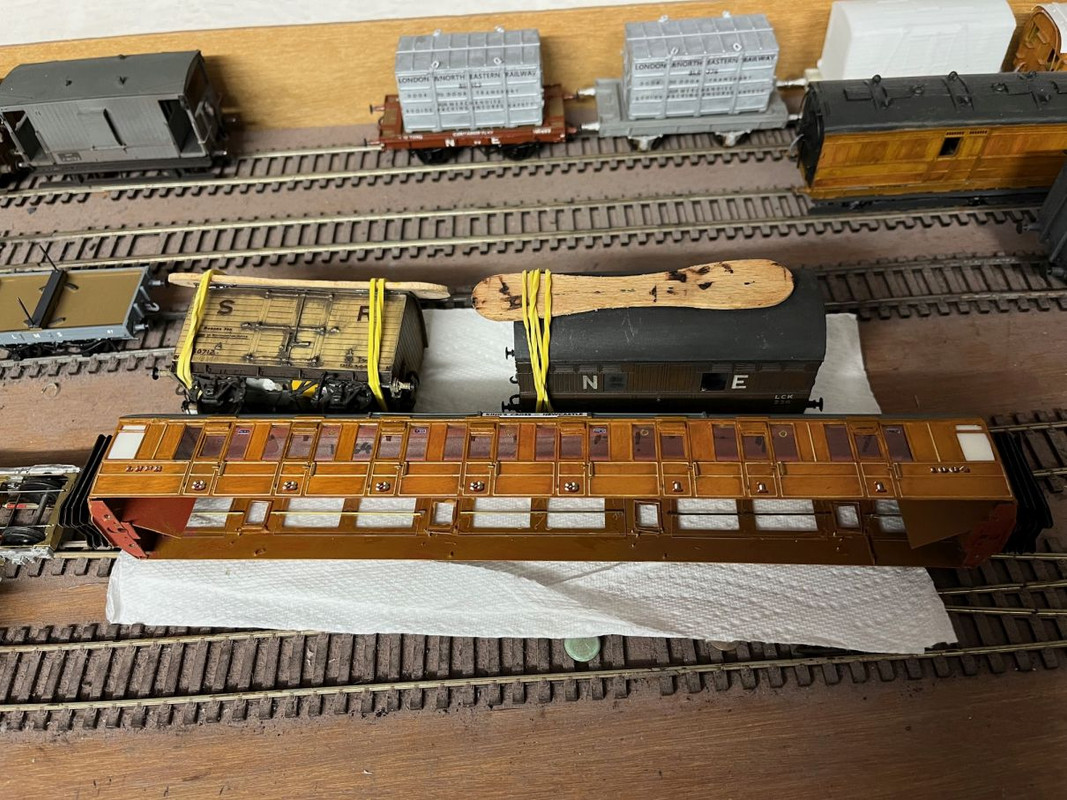
I also had two roofs coming adrift in the Scotch Goods stock and a corridor handrail fallen off one of the carriages. We've come back from shows with much worse. Loco-wise I had a couple of failed solder joints on loco-tender connections but that was about all. One of them was on a Hornby pacific, which is unusual. I'm back up to Grahams this weekend for some more testing so we ought to be in fair shape for Bristol.

I've been beavering away with loco cleaning and stock testing over the weekend and up to last night. Checking stock for free running and obvious damage - not overly onerous but there's a lot to cover.

There was the usual round of repairs too: the cattle wagon had lost its couplings at both ends, the RTR wagon was tight on the wheelsets and needed a bearing recessing a little, the carriage didn't roll well and turned out to still have the masking tape on the wheels from when the bogie was sprayed (it's done 3 shows like that), the H & B van lost an axle when I was taking the wheels out to oil them and I had to glue the W iron back on again. The GN horsebox had lost the door controller and the brake van had a cracked gearbox (which is what they call the Kadee mounting block).

I also had two roofs coming adrift in the Scotch Goods stock and a corridor handrail fallen off one of the carriages. We've come back from shows with much worse. Loco-wise I had a couple of failed solder joints on loco-tender connections but that was about all. One of them was on a Hornby pacific, which is unusual. I'm back up to Grahams this weekend for some more testing so we ought to be in fair shape for Bristol.
-
jwealleans
- LNER A4 4-6-2 'Streak'
- Posts: 4302
- Joined: Wed Oct 25, 2006 8:46 am
Re: West End Workbench
I have had a request from a young Australian reader to show how I make up loco boxes for my kit built locos. I don't think this is terribly revolutionary, but no-one knows everything and maybe it'll be of help to someone, so here we go. Given that my stock travels a fair bit, it's important that it's protected and not too badly shaken about in transit. I try to have this kind of arrangement for all my exhibition stock. RTR locos usually travel in their original boxes, unless these become damaged or unusable for some other reason.
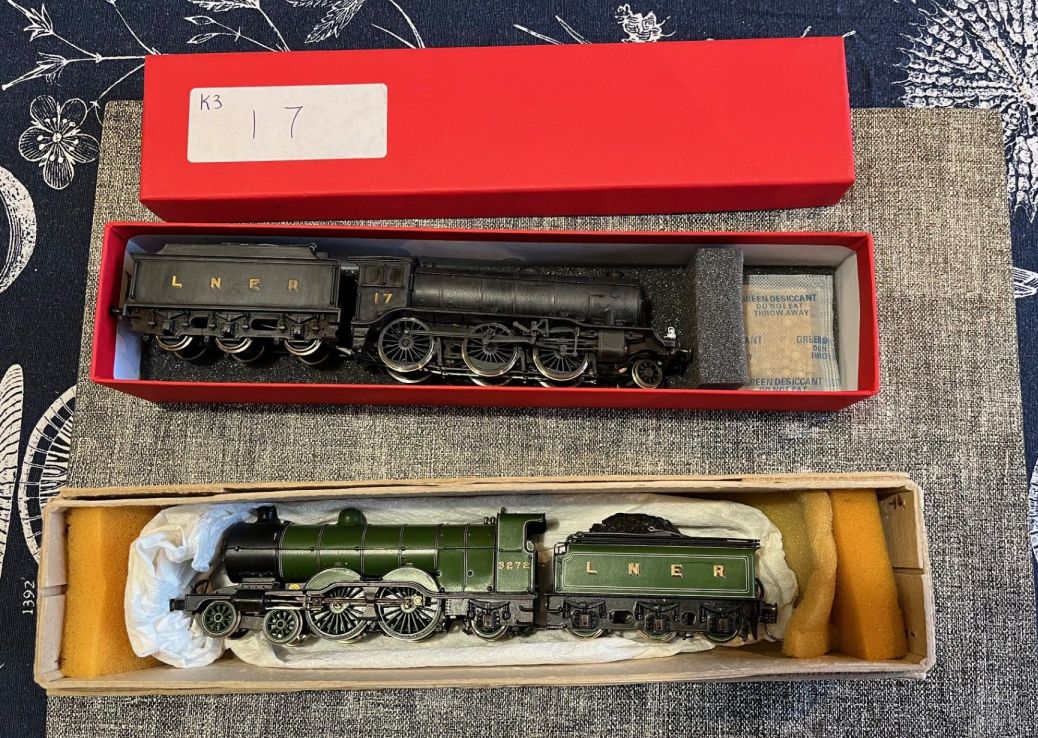
These are tonight's subjects, K3 17 (Bachmann/Wright) and C1 3272 (scratchbuilt, Mike Shepard). 17 came to me from Tom Foster and 3272, by the good offices of Roy Mears, from Hitchin.
I buy boxes at shows from Cheltenham Model Centre if I need any, although other retailers sell similar ones. 17 has one such box which came with it from Tom. 3272 is in the box it came in, which is that from an ABS V4 kit. These are a deeper box, so the engine can stand upright rather than lie on its side. Coopercraft used to do this size of box in dark blue and white and I have quite a few like that. NuCast and SEF boxes are very similar. I'm not sure upright or prone makes much difference if the box is properly padded.
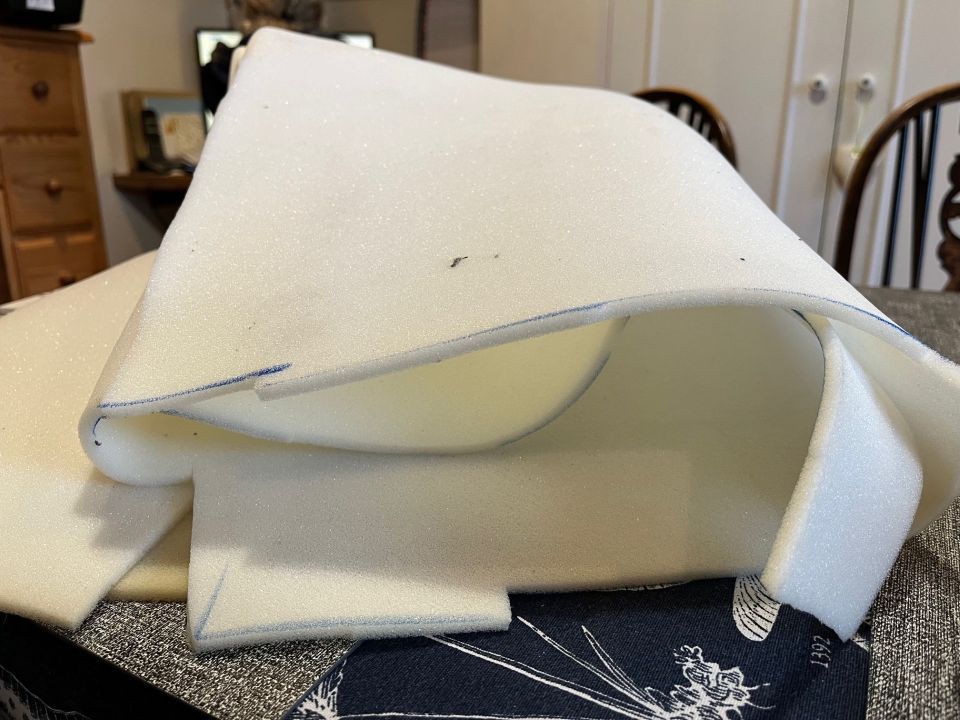
I use upholstery foam as the basic material. 1/4" or 3/8" are equally good. I used to get it from a local upholsterer but they have since closed so I ordered this last lot online. You can buy it by the metre and it's not expensive. From memory this piece was 2m x 3m originally and it's lasted several years.
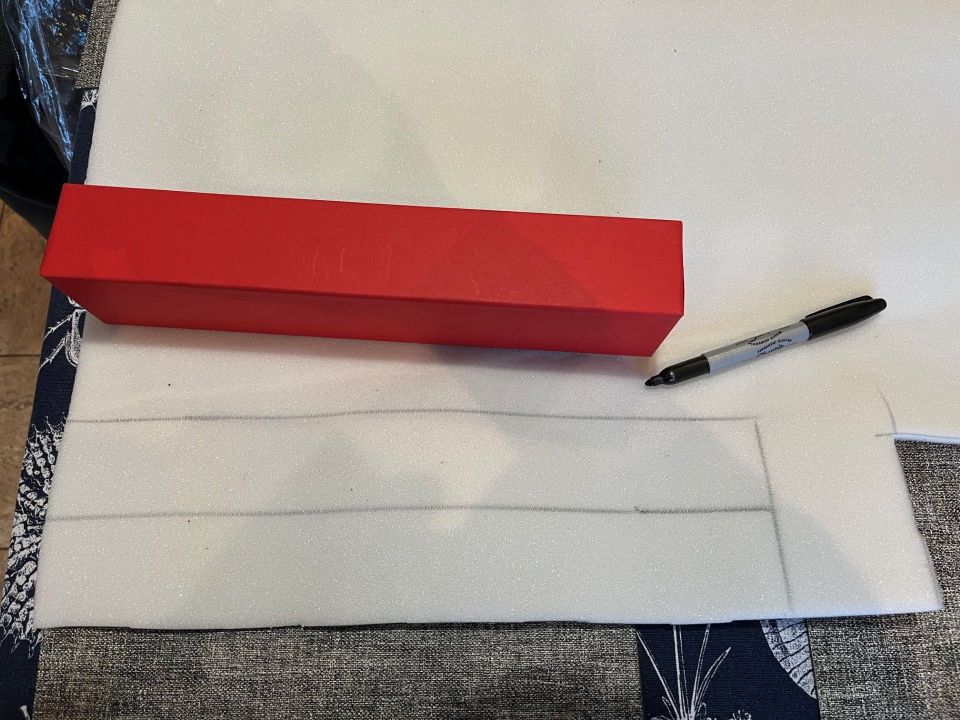
The Cheltenham boxes come with a foam bottom insert so I keep this. It's easy enough to make one by this method if your box doesn't have one.
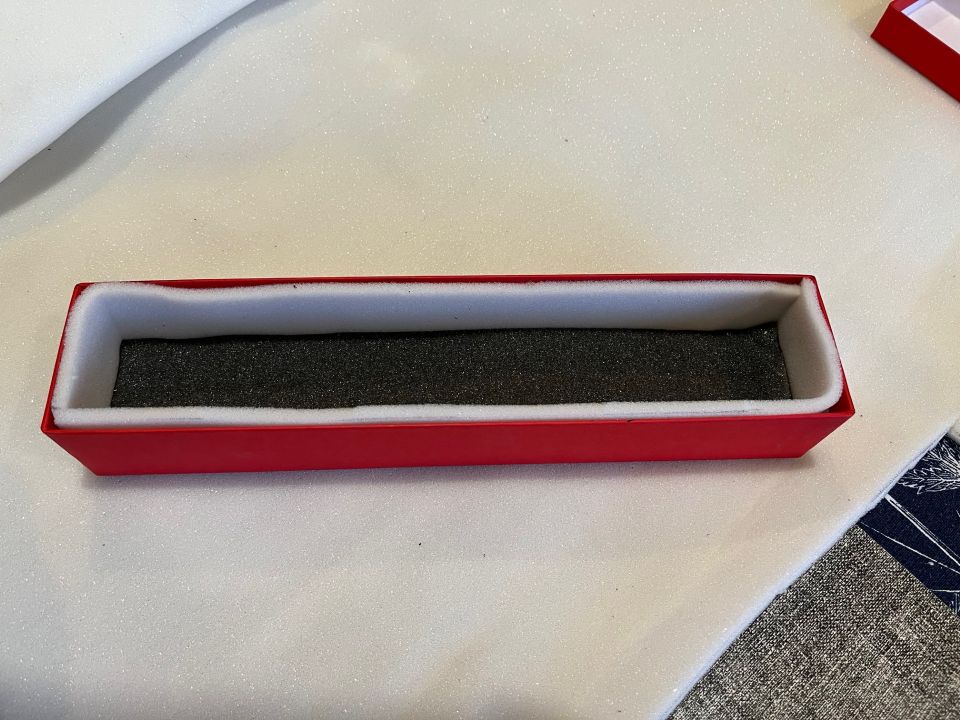
This part is as simple as drawing round the box and cutting it out. Make each side piece long enough to do side and end so you don't have any fiddly little bits. Put the side pieces in and use the bottom piece to hold them in place. You can use double sided tape or tape loops to hold everything in place if you're especially tidy minded, but the idea is that the box will end up so full that nothing can really move about.
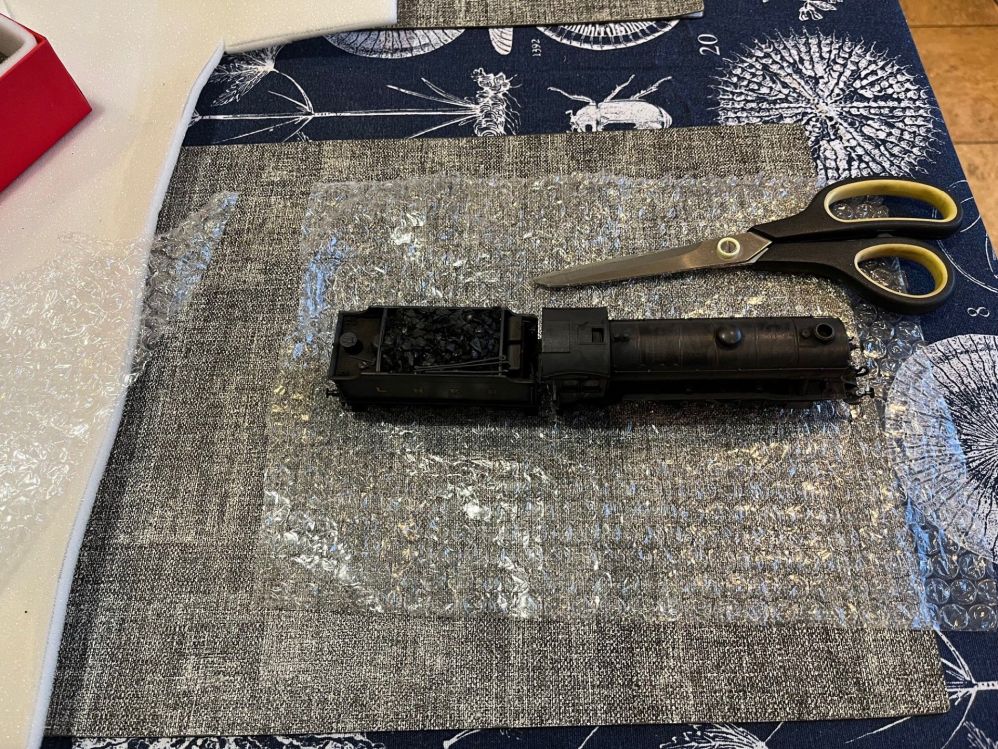
One of the problems with snugly packed locos is getting them out of the box. I make a cradle of bubblewrap longer than the loco and wide enough to allow me to pick it up out of the box. Now, I have heard of paintwork being marked by bubblewrap if left in contact with it for a long time, so although that has not happened to me to date, another layer is needed. I keep the acid free tissue which kit etches come in for this purpose, or you can just use kitchen roll.
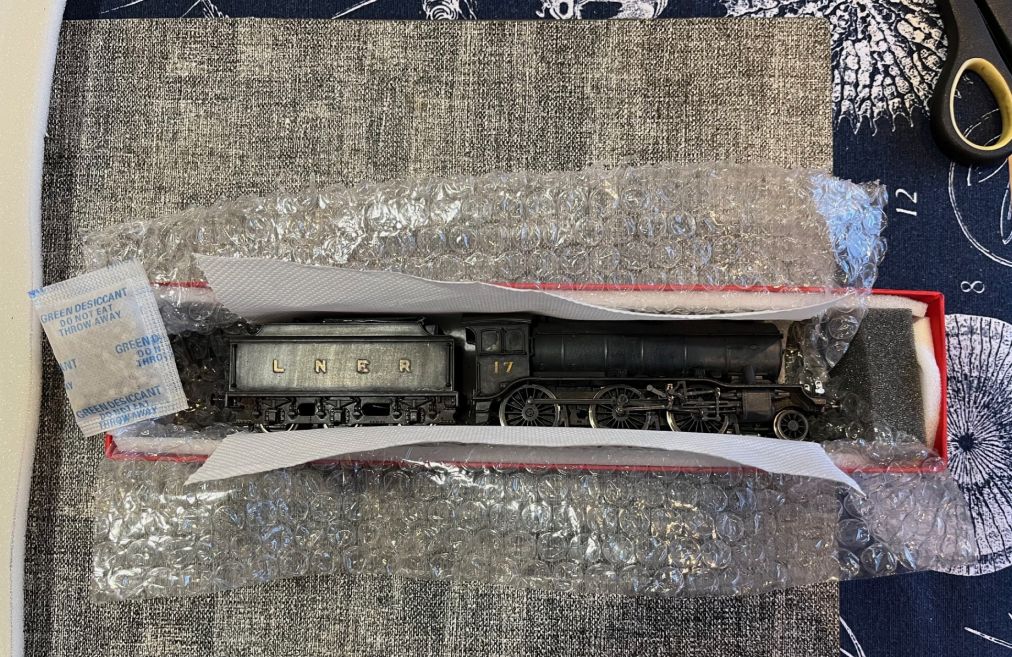
17 snugly packed away. I have kept the larger foam pieces which came with the box to prevent it sliding lengthways. These are easily made from packaging or even rolled up kitchen roll or offcuts of your thin foam. I also always keep the little desiccant packets which seem to be included in everything these days and slip one of those in.
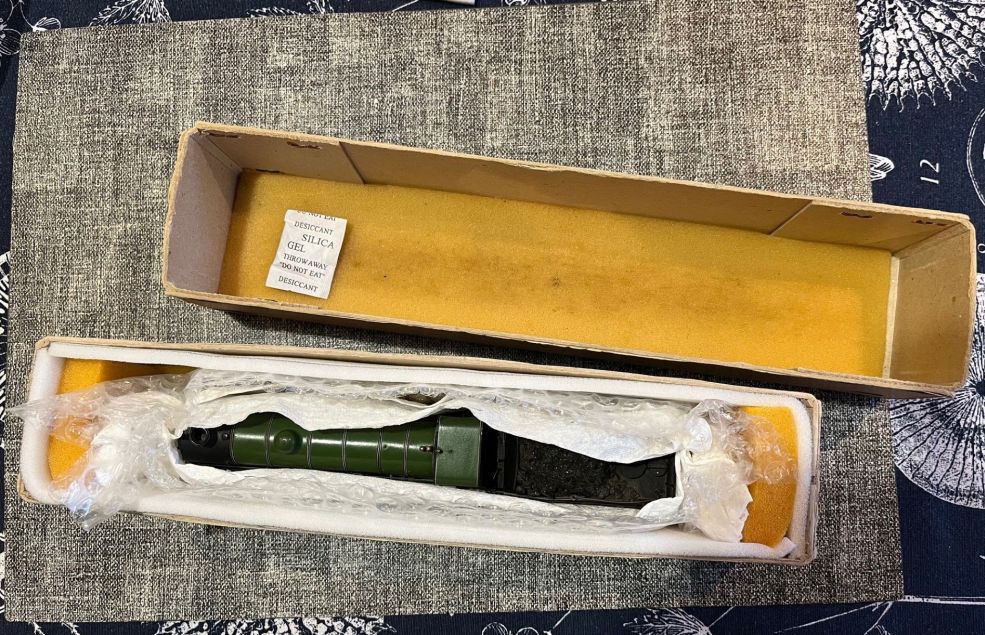
3272 equally snugly packed showing that it stays upright. Again I've kept the existing packing in the lid, the larger pieces at each end and a desiccant packet In each case just pulling up the bubblewrap at each side of the engine makes a cradle to lift it from the box and packing it away again is the reverse operation.

These are tonight's subjects, K3 17 (Bachmann/Wright) and C1 3272 (scratchbuilt, Mike Shepard). 17 came to me from Tom Foster and 3272, by the good offices of Roy Mears, from Hitchin.
I buy boxes at shows from Cheltenham Model Centre if I need any, although other retailers sell similar ones. 17 has one such box which came with it from Tom. 3272 is in the box it came in, which is that from an ABS V4 kit. These are a deeper box, so the engine can stand upright rather than lie on its side. Coopercraft used to do this size of box in dark blue and white and I have quite a few like that. NuCast and SEF boxes are very similar. I'm not sure upright or prone makes much difference if the box is properly padded.

I use upholstery foam as the basic material. 1/4" or 3/8" are equally good. I used to get it from a local upholsterer but they have since closed so I ordered this last lot online. You can buy it by the metre and it's not expensive. From memory this piece was 2m x 3m originally and it's lasted several years.

The Cheltenham boxes come with a foam bottom insert so I keep this. It's easy enough to make one by this method if your box doesn't have one.

This part is as simple as drawing round the box and cutting it out. Make each side piece long enough to do side and end so you don't have any fiddly little bits. Put the side pieces in and use the bottom piece to hold them in place. You can use double sided tape or tape loops to hold everything in place if you're especially tidy minded, but the idea is that the box will end up so full that nothing can really move about.

One of the problems with snugly packed locos is getting them out of the box. I make a cradle of bubblewrap longer than the loco and wide enough to allow me to pick it up out of the box. Now, I have heard of paintwork being marked by bubblewrap if left in contact with it for a long time, so although that has not happened to me to date, another layer is needed. I keep the acid free tissue which kit etches come in for this purpose, or you can just use kitchen roll.

17 snugly packed away. I have kept the larger foam pieces which came with the box to prevent it sliding lengthways. These are easily made from packaging or even rolled up kitchen roll or offcuts of your thin foam. I also always keep the little desiccant packets which seem to be included in everything these days and slip one of those in.

3272 equally snugly packed showing that it stays upright. Again I've kept the existing packing in the lid, the larger pieces at each end and a desiccant packet In each case just pulling up the bubblewrap at each side of the engine makes a cradle to lift it from the box and packing it away again is the reverse operation.
-
Jim de Griz
- H&BR Q10 0-8-0
- Posts: 176
- Joined: Thu Apr 01, 2021 8:47 pm
Re: West End Workbench
Certainly of help and interest to myself!jwealleans wrote: ↑Tue Apr 23, 2024 9:15 pm I have had a request from a young Australian reader to show how I make up loco boxes for my kit built locos. I don't think this is terribly revolutionary, but no-one knows everything and maybe it'll be of help to someone, so here we go.
Jim de Griz
-
jwealleans
- LNER A4 4-6-2 'Streak'
- Posts: 4302
- Joined: Wed Oct 25, 2006 8:46 am
Re: West End Workbench
It's been a busy few weeks, trip to Bristol, holidays and dealing with things generally. There has been some modelling as well, though. This evening I tried to clear some bench space by putting some of the BR era stock for Wickham Market into the stock boxes. After the last running session I came away with a list of things we needed to provide and I've managed to get through a few of them.
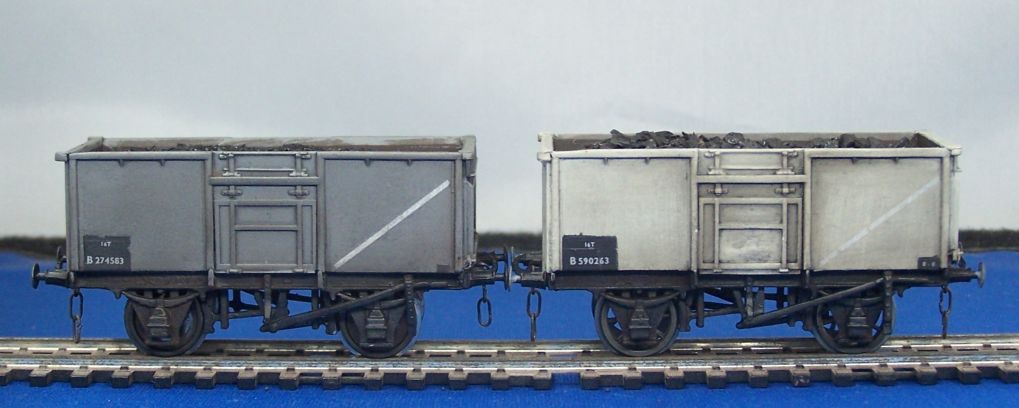
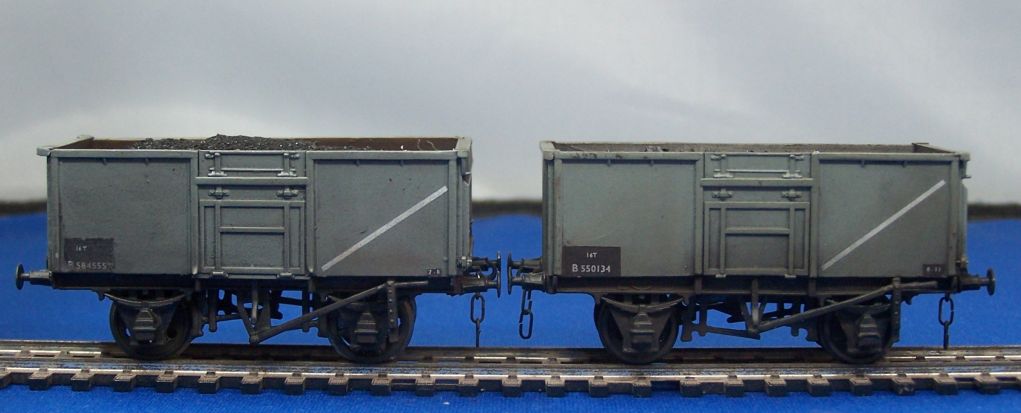
Some of the mineral wagons are now running on Shap, so I needed to make up some more. With the demise of the Warley show I don't have any wagon building demonstrations in the diary any more, so I finished off some of the part built ones I used in the display. The Airfix 16 tonner stands up well against the competition IMO: all of these were bought for a couple of quid or less out of rummage bins at shows and they've had the Geoff Kent treatment. Buffers from Lanarkshire Models and transfers from CCT.
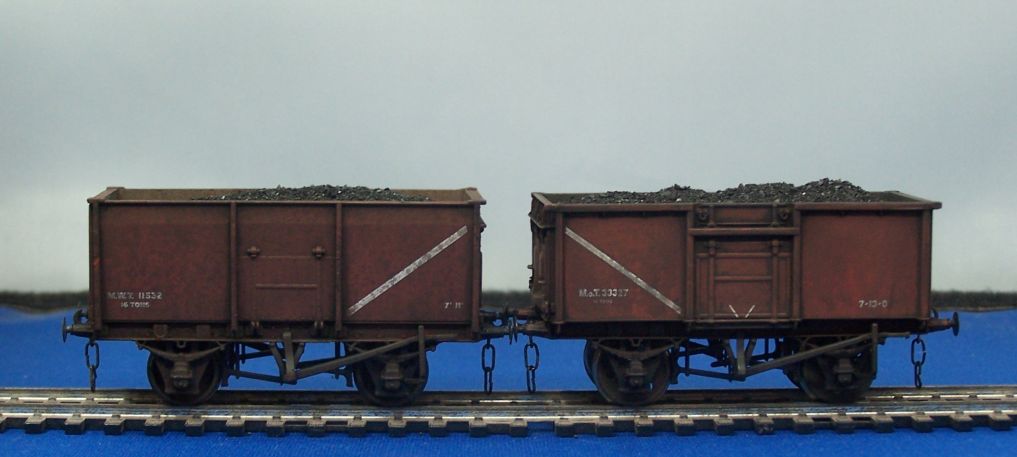
There were still a number of wartime builds running into the early 1950s and these two came my way, one Ministry of Wartime Transport and the other just MoT. I have a brown LMS steel 16 tonner as well, the change of colour breaks up the rake nicely.
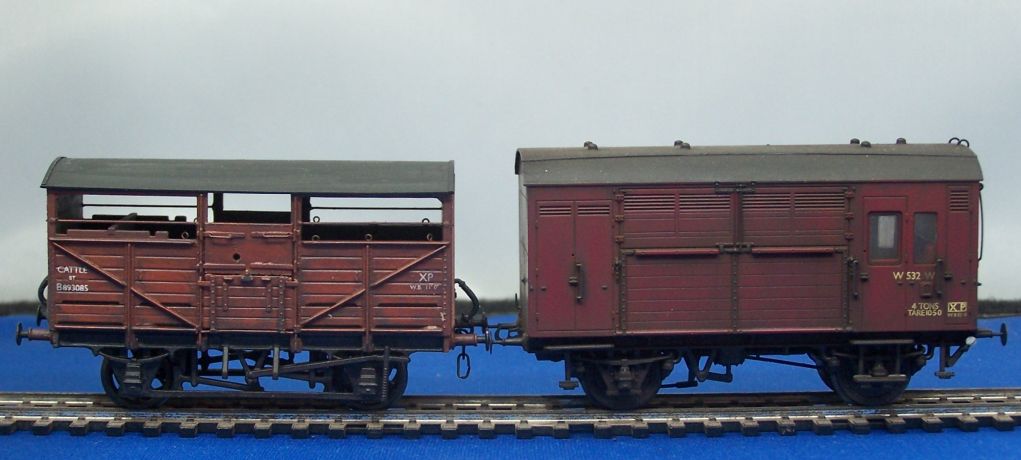
I decided a couple of additional coupling adaptor vans would be handy. I use the Bill Bedford coupling for my vestibuled coaches, so you need an adaptor to couple to a screw link loco. These both made suitable head traffic for stopping trains; the horsebox I think was a Hattons sale item, the Mex came in in a job lot and has been kicking around for a while. Plenty of weight in both and they should be useful.
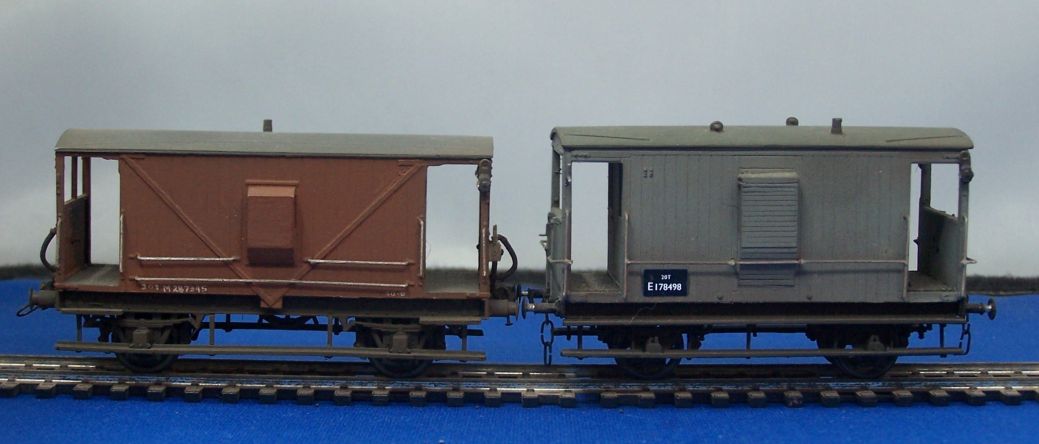
The other thing we were short of were brake vans and as I was looking at what might be appropriate, I had the chance of a couple from the Peter Lawson collection thanks to Graham Nicholas. Neither needs much doing although I have used a transfer I had hanging about to overlay the hand lettering on the LNER one. I will obtain a couple of guards for these as and when I order some figures.
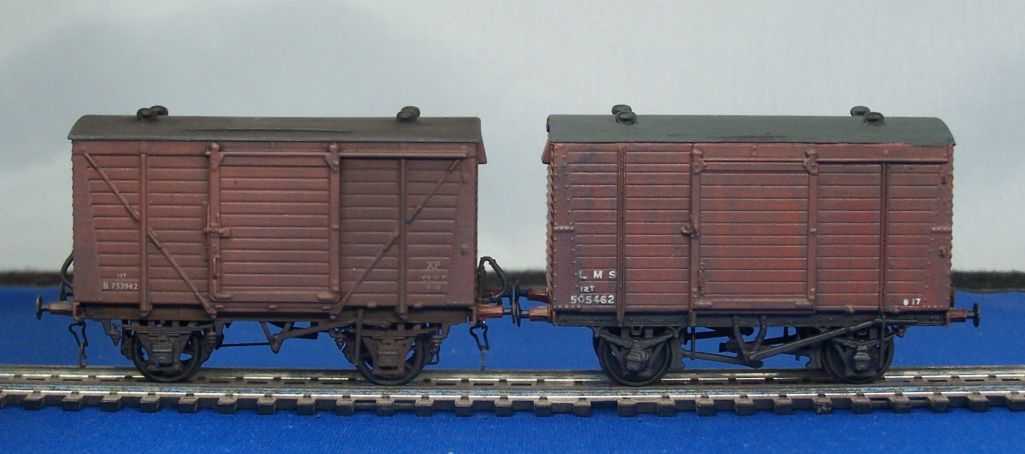
Over and above what I felt we needed for the layout, I've knocked up some other vehicles which I either fancied doing or thought were appropriate. These both came to me in a deceased collection: the lefthand one is an Airfix body which with a replacement PD underframe makes a BR diagram 1/204 (I think) van. The right hand one is Ratio.
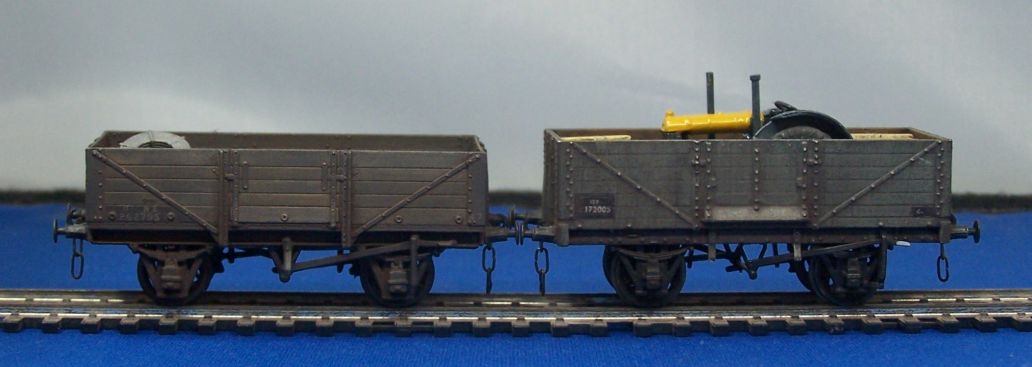
Lastly a Cambrian D178 open, loaded with steel coils and an Oxford Rail LNER 6 plank with an RAF tractor and a couple of crates.


Some of the mineral wagons are now running on Shap, so I needed to make up some more. With the demise of the Warley show I don't have any wagon building demonstrations in the diary any more, so I finished off some of the part built ones I used in the display. The Airfix 16 tonner stands up well against the competition IMO: all of these were bought for a couple of quid or less out of rummage bins at shows and they've had the Geoff Kent treatment. Buffers from Lanarkshire Models and transfers from CCT.

There were still a number of wartime builds running into the early 1950s and these two came my way, one Ministry of Wartime Transport and the other just MoT. I have a brown LMS steel 16 tonner as well, the change of colour breaks up the rake nicely.

I decided a couple of additional coupling adaptor vans would be handy. I use the Bill Bedford coupling for my vestibuled coaches, so you need an adaptor to couple to a screw link loco. These both made suitable head traffic for stopping trains; the horsebox I think was a Hattons sale item, the Mex came in in a job lot and has been kicking around for a while. Plenty of weight in both and they should be useful.

The other thing we were short of were brake vans and as I was looking at what might be appropriate, I had the chance of a couple from the Peter Lawson collection thanks to Graham Nicholas. Neither needs much doing although I have used a transfer I had hanging about to overlay the hand lettering on the LNER one. I will obtain a couple of guards for these as and when I order some figures.

Over and above what I felt we needed for the layout, I've knocked up some other vehicles which I either fancied doing or thought were appropriate. These both came to me in a deceased collection: the lefthand one is an Airfix body which with a replacement PD underframe makes a BR diagram 1/204 (I think) van. The right hand one is Ratio.

Lastly a Cambrian D178 open, loaded with steel coils and an Oxford Rail LNER 6 plank with an RAF tractor and a couple of crates.
-
jwealleans
- LNER A4 4-6-2 'Streak'
- Posts: 4302
- Joined: Wed Oct 25, 2006 8:46 am
Re: West End Workbench
More wagon therapy this last few days. I'm building up for something else once I've cleared a few jobs off the bench.
Our recently returned colleague Rob Bergin very generously sent me some wagons he felt were out of his chosen era. As I'm working on wagons for Wickham Market at the moment, they've been added to the pool for that layout. That means early BR paint and lettering.

PC12, LNER plywood sided fruit van. This kit is no longer in the Parkside range. They just need the wheels painting and couplings, then they're ready for weathering. Having looked at a couple of photographs and other builds, I might well add some chalkboards to these. All these wagons have had my usual detailing - solebar body brackets and bits if wire all over the brake gear.

LNER D5 horsebox (PC 83). A familiar and deservedly popular kit. I've added the usual wire to the undergubbins and brass door handles, but the real change with this kit is to replace the horribly overthick opening lav window frame with 20 x 20 thou Evergreen strip. For me it transforms the look of the side. Most or all of the others I have are in crimson, so I did this one in a transition livery. This was also one of those not allocated to a specific trainer, so no 'Return to..' lettering.
Now a couple of things I have built myself: when our colleague Andrew (Woodcock29) was in these parts and helping us at Bristol Show, he gave me a small box of wagon kits he'd decided were surplus to requirement. This is one of them, a Cotswold Pipefit.

It was not quite complete, but the missing bits were underneath and out of sight, so easy to replace. I've also ditched the rather crude brake shoes and used the Mainly Trains etches instead. It only took a couple of hours to put together, with an overnight rest to allow the epoxy securing body to underframe to set. I'm very grateful to Andrew and hope he likes what I've done with it.

Lastly the Flatrol ELL/Warwell B I started at Warley. I've been dragging my feet on this because I didn't fancy the microscopic HMRS BR lettering. In the end it wasn't as bad as it might have been and I did the other side in LNER lettering, so i only had to endure the BR sheet once. This is riding about .75 mm too high, which I think is down to my mixing parts from two different manufacturers. I don't think I have any scope to lower it furtherso it will have to stay like this. It's got that squat appearance which the real thing had, but the gap above the axleboxes is a giveaway. It will have deck rings and chains in due course.
Our recently returned colleague Rob Bergin very generously sent me some wagons he felt were out of his chosen era. As I'm working on wagons for Wickham Market at the moment, they've been added to the pool for that layout. That means early BR paint and lettering.

PC12, LNER plywood sided fruit van. This kit is no longer in the Parkside range. They just need the wheels painting and couplings, then they're ready for weathering. Having looked at a couple of photographs and other builds, I might well add some chalkboards to these. All these wagons have had my usual detailing - solebar body brackets and bits if wire all over the brake gear.

LNER D5 horsebox (PC 83). A familiar and deservedly popular kit. I've added the usual wire to the undergubbins and brass door handles, but the real change with this kit is to replace the horribly overthick opening lav window frame with 20 x 20 thou Evergreen strip. For me it transforms the look of the side. Most or all of the others I have are in crimson, so I did this one in a transition livery. This was also one of those not allocated to a specific trainer, so no 'Return to..' lettering.
Now a couple of things I have built myself: when our colleague Andrew (Woodcock29) was in these parts and helping us at Bristol Show, he gave me a small box of wagon kits he'd decided were surplus to requirement. This is one of them, a Cotswold Pipefit.

It was not quite complete, but the missing bits were underneath and out of sight, so easy to replace. I've also ditched the rather crude brake shoes and used the Mainly Trains etches instead. It only took a couple of hours to put together, with an overnight rest to allow the epoxy securing body to underframe to set. I'm very grateful to Andrew and hope he likes what I've done with it.

Lastly the Flatrol ELL/Warwell B I started at Warley. I've been dragging my feet on this because I didn't fancy the microscopic HMRS BR lettering. In the end it wasn't as bad as it might have been and I did the other side in LNER lettering, so i only had to endure the BR sheet once. This is riding about .75 mm too high, which I think is down to my mixing parts from two different manufacturers. I don't think I have any scope to lower it furtherso it will have to stay like this. It's got that squat appearance which the real thing had, but the gap above the axleboxes is a giveaway. It will have deck rings and chains in due course.
-
Woodcock29
- GNR C1 4-4-2
- Posts: 712
- Joined: Tue Nov 27, 2012 8:59 am
- Location: South Australia
Re: West End Workbench
Looks good Jonathan. I'm curious as to what was missing as I had 2 kits in the one box and I simply split the parts into 2 equal sets of parts. I built 2 myself back in the 80s but there didn't appear to be anything missing when compared to those.
Andrew
Andrew
-
jwealleans
- LNER A4 4-6-2 'Streak'
- Posts: 4302
- Joined: Wed Oct 25, 2006 8:46 am
Re: West End Workbench
It was missing one of the whitemetal end bolsters (just behind the buffer beam). That was no big deal - replacing it with a double thickness piece of brass strip made fitting the buffers easier. I think there should also be a transverse whitemetal piece under the plastic floor for the vac cylinder to plug into? I'd stopped reading the instructions by then and just glued and soldered it in place
-
jwealleans
- LNER A4 4-6-2 'Streak'
- Posts: 4302
- Joined: Wed Oct 25, 2006 8:46 am
Re: West End Workbench
Another donation from Rob today: a Parkside long CCT. I haven't worked on one of these since about 2008 and didn't expect to again after the Hornby one came out. It's a good kit in its own right, but there's plenty you can do to enhance it. I've photographed it unpainted so you can see what I've done.


From the top: oil lamp covers (two discs of 10 thou punched out of plastikard), cornices (some seem to have had them, some not), replacement roof vents, wire handrails and door handles, replacement steps for some which were missing and brake rigging. The brake rigging is much easier to drill out when the kit is in the flat, but it is possible to do it to assembled models with care. I did try to get it complete for the photograph, but I've forgotten to add the dangly vac pipe. This one will also be in a brown transition livery as the other two we have on Wickham Market are both crimson.


From the top: oil lamp covers (two discs of 10 thou punched out of plastikard), cornices (some seem to have had them, some not), replacement roof vents, wire handrails and door handles, replacement steps for some which were missing and brake rigging. The brake rigging is much easier to drill out when the kit is in the flat, but it is possible to do it to assembled models with care. I did try to get it complete for the photograph, but I've forgotten to add the dangly vac pipe. This one will also be in a brown transition livery as the other two we have on Wickham Market are both crimson.
-
jwealleans
- LNER A4 4-6-2 'Streak'
- Posts: 4302
- Joined: Wed Oct 25, 2006 8:46 am
Re: West End Workbench
Picking up where we left off, LLCK and Longfit are now lettered and varnished.

There were two steel highs in the pack Rob sent me; I have worked on one but the other is on hold. The buffers on these had the extended lugs like those on end door minerals. I've used the slightly shorter unfitted buffers as I think the lugs are more apparent than the different length, but I'm all out now so the second one will have to wait until I put an order in to LMS. There are also plates from the solebar to the verticals each side of the door. I did add the door springs but two have already fallen off, so I'll make those from brass strip and pin them.

The cattle wagon was in the pile of built wagons to work on and looked as though it wouldn't need much. Whoever built it knew enough to build an unfitted one, but didn't paint it, just lettered directly onto the plastic. I had to replace a missing spring/axlebox and put 20" buffers onto it. I also added the roof laths. I can't get the roof off so the inside will stay unpainted - hopefully it won't be too apparent.
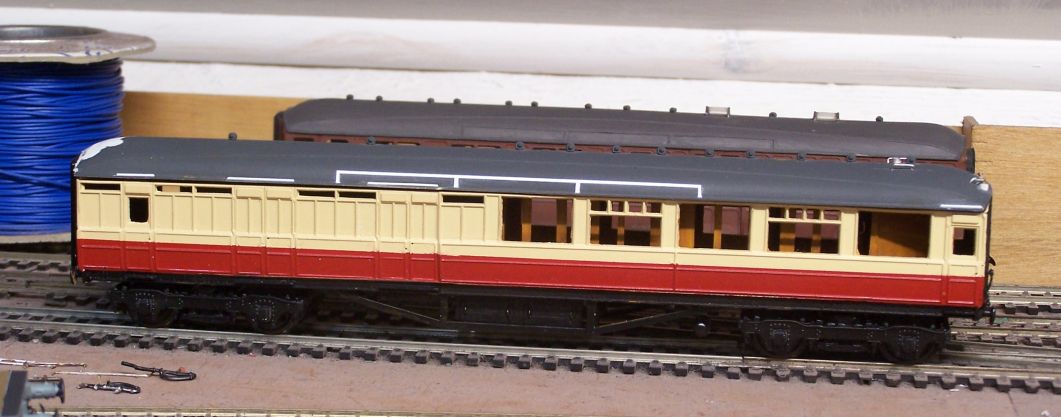
I have a couple of BT(4)s on the go: the Kirk one above will run in the Hunt Special once complete. I need to finish off the body and then close it all up. This came to me via Ebay from the collection of the late and much lamented John Fozard.

The other is the rear brake for the Easterling set. I've built this so we can run it as a coherent set: there's one more carriage to build but I may not have that one done by the time the layout goes out. This is an MJT kit.

That leads me to the other critical part of the Easterling, the motive power. I've been told that this was a Stratford B1 turn, but the Hornby B1 I have wouldn't move the set. I picked up this NuCast one part built for south of £50. Someone had done quite a bit of detailing work on it and replaced a lot of the NuCast bits.

I'm just working out how to fit a big High Level motor into it and then I can crack on and get it complete and painted. I have a picture of 61236 on the Easterling, so that is probably the identity it will take.

There were two steel highs in the pack Rob sent me; I have worked on one but the other is on hold. The buffers on these had the extended lugs like those on end door minerals. I've used the slightly shorter unfitted buffers as I think the lugs are more apparent than the different length, but I'm all out now so the second one will have to wait until I put an order in to LMS. There are also plates from the solebar to the verticals each side of the door. I did add the door springs but two have already fallen off, so I'll make those from brass strip and pin them.

The cattle wagon was in the pile of built wagons to work on and looked as though it wouldn't need much. Whoever built it knew enough to build an unfitted one, but didn't paint it, just lettered directly onto the plastic. I had to replace a missing spring/axlebox and put 20" buffers onto it. I also added the roof laths. I can't get the roof off so the inside will stay unpainted - hopefully it won't be too apparent.

I have a couple of BT(4)s on the go: the Kirk one above will run in the Hunt Special once complete. I need to finish off the body and then close it all up. This came to me via Ebay from the collection of the late and much lamented John Fozard.

The other is the rear brake for the Easterling set. I've built this so we can run it as a coherent set: there's one more carriage to build but I may not have that one done by the time the layout goes out. This is an MJT kit.

That leads me to the other critical part of the Easterling, the motive power. I've been told that this was a Stratford B1 turn, but the Hornby B1 I have wouldn't move the set. I picked up this NuCast one part built for south of £50. Someone had done quite a bit of detailing work on it and replaced a lot of the NuCast bits.

I'm just working out how to fit a big High Level motor into it and then I can crack on and get it complete and painted. I have a picture of 61236 on the Easterling, so that is probably the identity it will take.
-
jwealleans
- LNER A4 4-6-2 'Streak'
- Posts: 4302
- Joined: Wed Oct 25, 2006 8:46 am
Re: West End Workbench
Mission accomplished tonight - make up the gearbox (Road Runner plus) and make sure it fits sensibly into the frames.

I usually prefer to drive on the centre axle, but it shouldn't make a huge amount of difference and the original builder meant it to be driven on the rear axle (he's filed a flat on there). I can now plan pickups and where I can add ballast to the chassis. There'll be room for some along the top of the boiler as well.

Had to nibble a little bit off the rear of th ebackhead mount, but it's all satisfyingly hidden away now.

I usually prefer to drive on the centre axle, but it shouldn't make a huge amount of difference and the original builder meant it to be driven on the rear axle (he's filed a flat on there). I can now plan pickups and where I can add ballast to the chassis. There'll be room for some along the top of the boiler as well.

Had to nibble a little bit off the rear of th ebackhead mount, but it's all satisfyingly hidden away now.
-
Mersey508138
- NBR J36 0-6-0
- Posts: 114
- Joined: Sun Aug 14, 2016 1:22 am
Re: West End Workbench
Veey nice work there, I'll have to get round to attempting a OO gauge kitbuild someday. I have recently rebuilt a hornby britannia chassis ( loco driven version ) and with a gearing swap inside have fitted a Bachmann motor into the loco.
The loco runs but due to the plastic body will only haul 5 coaches comfortably ( 6 with a lot of wheel slipping ), I tried adding extra weight last night but found very little room for adding lead to increase the weight although I am thinking that if I remove the original weight, that should give me extra room for adding lead to increase the locos weight, the only other option is to try and find a white metal britannia locomotive body either unbuilt or even part built and requiring finishing.
The loco runs but due to the plastic body will only haul 5 coaches comfortably ( 6 with a lot of wheel slipping ), I tried adding extra weight last night but found very little room for adding lead to increase the weight although I am thinking that if I remove the original weight, that should give me extra room for adding lead to increase the locos weight, the only other option is to try and find a white metal britannia locomotive body either unbuilt or even part built and requiring finishing.
-
jwealleans
- LNER A4 4-6-2 'Streak'
- Posts: 4302
- Joined: Wed Oct 25, 2006 8:46 am
Re: West End Workbench
There are two ways of looking at that problem; how easily do your coaches roll? We ran a Britannia on Thurston and it would take 9 Hornby Gresleys or Bachmann Mk1s. If we ran the approximation of the North Country Continental it had two kit built dining cars at the head. I'd be looking at whether you have draggy wheelsets anywhere and see what a bit of cleaning and lubrication can do, I think.
-
Mersey508138
- NBR J36 0-6-0
- Posts: 114
- Joined: Sun Aug 14, 2016 1:22 am
Re: West End Workbench
Many thanks for your reply, I will certainly give that a go
-
Hatfield Shed
- LNER A4 4-6-2 'Streak'
- Posts: 1728
- Joined: Fri Dec 23, 2011 3:34 pm
Re: West End Workbench
Regarding free rolling, in the first illustration within this post:
The can of GT85 is possibly all that's required, if the stock has pinpoint bearings. Over 20 years on since I started using it and it does beautifully on pinpoints running in both turned brass and RTR plastic mouldings. (I am told there's a yet more slippy plastics compatible lube used by drone enthusiasts, but am only halfway down my can of GT85 at present, and what with being mean and all...)
The current Hornby model introduced in 2006? That's good - loco alone - for a 2.5kg load (GT85'd) on level track. Rather less if you attach the tender. Hornby's materials combination of tyre and pick up wiper is not good, and degrades with running time for yet more dragginess. I've had models stopped by the tender pick ups, and now always remove them from new purchases.Mersey508138 wrote: ↑Mon Jun 17, 2024 9:10 pm ...I have recently rebuilt a hornby britannia chassis ( loco driven version ) and with a gearing swap inside have fitted a Bachmann motor into the loco...