West End Workbench
Moderators: 52D, Tom F, Rlangham, Atlantic 3279, Blink Bonny, Saint Johnstoun, richard
-
jwealleans
- LNER A4 4-6-2 'Streak'
- Posts: 4303
- Joined: Wed Oct 25, 2006 8:46 am
Re: West End Workbench
Ray, that would be very good of you. i had an equally kind offer from someone else but it hasn't come to fruition.
Probably the best way would be to attach them to a PM or even to a post on here, then other people can benefit?
Probably the best way would be to attach them to a PM or even to a post on here, then other people can benefit?
-
jwealleans
- LNER A4 4-6-2 'Streak'
- Posts: 4303
- Joined: Wed Oct 25, 2006 8:46 am
Re: West End Workbench
My grateful thanks to Ray for the J6 instructions which will help enormously.
Apologies if you were awaiting further tender updates, I had to shift to some other jobs which need finishing off. There has been some progress, though:
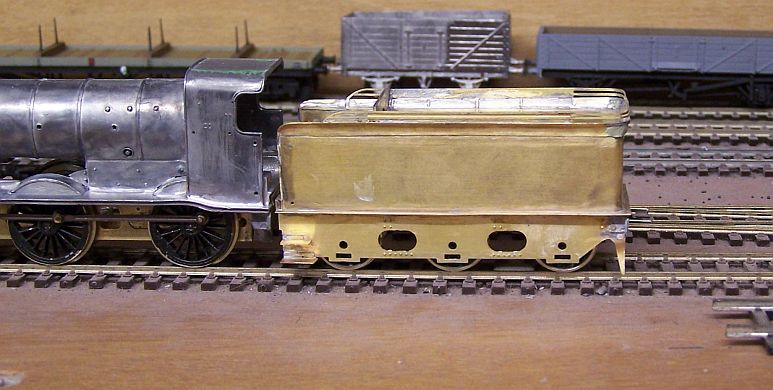
Flare, coal rails, guard irons and some Milliput to make good the corner. The curve is formed with a set of fingers which you flood with solder and then use filler to form the final shape.
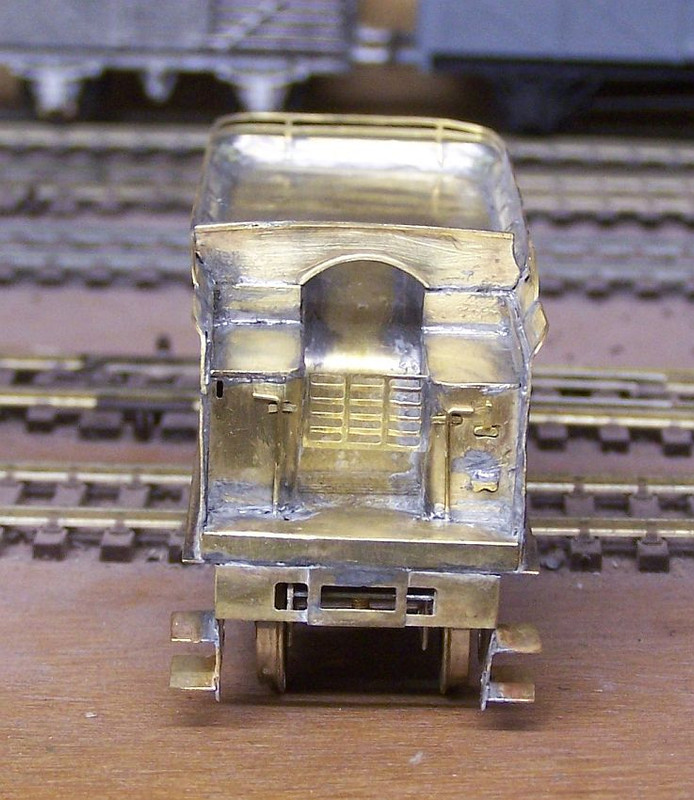
The vexed question of the front. I mainly relied on Rob Pulham's photos here and not having found a picture of 3554 as yet I haven't proceeded with toolboxes and the like. It may end up being an (un)educated guess.
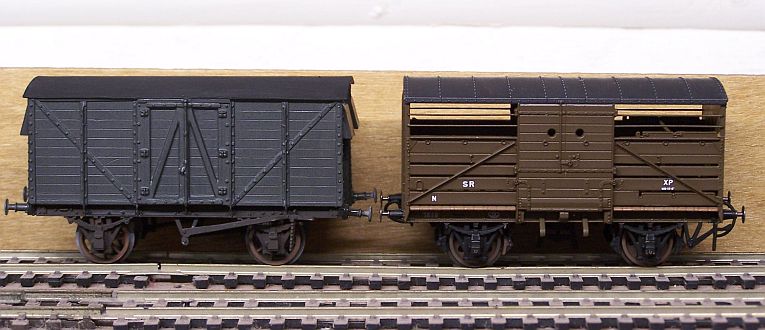
GE van has been painted and it almost ready for lettering. The Hornby SR cattle wagon is a nice model - i found this one cheap somewhere (can't recall where now) but it doesn't seem to be terribly widely available, so I assume it's sold well.
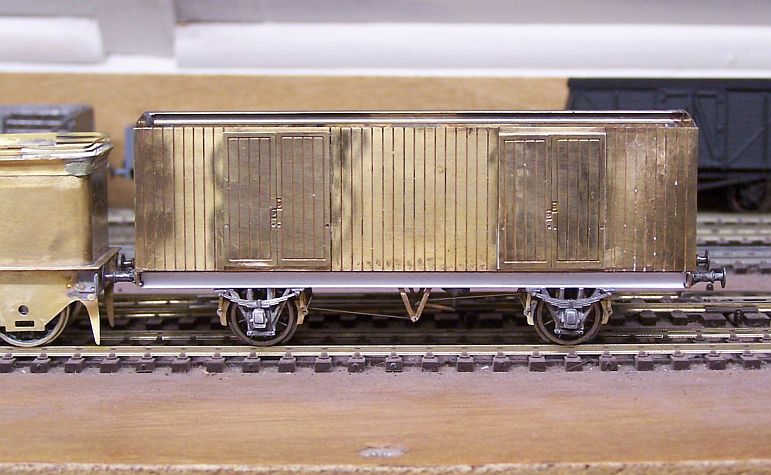
This was a major distraction once my attention wandered onto it - Jidenco, I assume and one of a job lot I acquired last year. It had been nicely made but was scruffy and when it went into the paint stripper it turned out to be another glued construction. It's now been soldered up, brake gear from MJT and I've made a start on putting the brass bits back on. Much of the side detail is made up in plastic and so vanished in the stripper. I see a couple of evenings fiddling with tiny bits of Evergreen and Archer rivets ahead.
Apologies if you were awaiting further tender updates, I had to shift to some other jobs which need finishing off. There has been some progress, though:

Flare, coal rails, guard irons and some Milliput to make good the corner. The curve is formed with a set of fingers which you flood with solder and then use filler to form the final shape.

The vexed question of the front. I mainly relied on Rob Pulham's photos here and not having found a picture of 3554 as yet I haven't proceeded with toolboxes and the like. It may end up being an (un)educated guess.

GE van has been painted and it almost ready for lettering. The Hornby SR cattle wagon is a nice model - i found this one cheap somewhere (can't recall where now) but it doesn't seem to be terribly widely available, so I assume it's sold well.

This was a major distraction once my attention wandered onto it - Jidenco, I assume and one of a job lot I acquired last year. It had been nicely made but was scruffy and when it went into the paint stripper it turned out to be another glued construction. It's now been soldered up, brake gear from MJT and I've made a start on putting the brass bits back on. Much of the side detail is made up in plastic and so vanished in the stripper. I see a couple of evenings fiddling with tiny bits of Evergreen and Archer rivets ahead.
Last edited by jwealleans on Tue Oct 01, 2019 6:10 pm, edited 1 time in total.
- Atlantic 3279
- LNER A4 4-6-2 'Streak'
- Posts: 6660
- Joined: Fri Jun 26, 2009 9:51 am
- Location: 2850, 245
Re: West End Workbench
I haven't kept a note of the page but did you see the bit in Malcolm Crawley's text about front coal plates being moved in front of the tool boxes after a certain date?
Most subjects, models and techniques covered in this thread are now listed in various categories on page1
Dec. 2018: Almost all images that disappeared from my own thread following loss of free remote hosting are now restored.
Dec. 2018: Almost all images that disappeared from my own thread following loss of free remote hosting are now restored.
Re: West End Workbench
Horse box? Tsh tsh Mr W...jwealleans wrote: ↑Tue Oct 01, 2019 7:42 am
... The Hornby SR horsebox is a nice model - i found this one cheap somewhere (can't recall where now) but it doesn't seem to be terribly widely available, so I assume it's sold well.
I think they're great. I'm particularly impressed that they did both the Maunsell and Bulleid variants, quite a few differences within the same basic outline
Ian Fleming
Now active on Facebook at 'The Clearing House'
Now active on Facebook at 'The Clearing House'
-
jwealleans
- LNER A4 4-6-2 'Streak'
- Posts: 4303
- Joined: Wed Oct 25, 2006 8:46 am
Re: West End Workbench
Can't believe it's taken all day for someone to spot that. It was early.
-
jwealleans
- LNER A4 4-6-2 'Streak'
- Posts: 4303
- Joined: Wed Oct 25, 2006 8:46 am
Re: West End Workbench
As we're into October already, a slight thread diversion to mention that I shall be demonstrating wagon building at Hartlepool Show on the 19th and 20th. My colleague Mr. King of this parish will also be there demonstrating resin casting.
We are due to make a repeat appearance at Warley on the 23rd and 24th of November.
We are due to make a repeat appearance at Warley on the 23rd and 24th of November.
-
jwealleans
- LNER A4 4-6-2 'Streak'
- Posts: 4303
- Joined: Wed Oct 25, 2006 8:46 am
Re: West End Workbench
I haven't yet trawled the GNR tenders volume for that information about moving the coal plate forward. I did find these two photos this morning, though which gave me pause for thought.
This photo of 3550 taken after 1928 made me think that the coal plate must be well forward given where the pile of coal is.
I then found this picture of J4 (3)353 which to me looks as though the coal plate is buried in the heap of coal and it's flowed over the top and forward of it, onto where the toolboxes would be.
This picture of 3542 clearly has the coal plate moved forward and toolboxes placed behind it.
-
john coffin
- LNER V2 2-6-2 'Green Arrow'
- Posts: 1101
- Joined: Mon Sep 19, 2011 12:24 am
Re: West End Workbench
jonathan,
firstly the link to RM web did not work for me.
secondly, I am pretty sure that the instructions suggest the "coal plate actually goes over the
shovelling plate rather as far back as you have placed it. Most of the photos that I have studied
show the toolboxes resting on the tank side fronts, and the coal plate at the front. Otherwise it
is likely given the shape of the self trimming part that the footplate staff would have been overwhelmed
by coal if they braked sharply. I know that is an oxymoron for steam engines engaged in shunting,
however express goods would need tall heaps of coal which stopped from 60 and above would cause the
coal to shift.
As I have said before one of the reasons that Malcolm did not want photos in the book was the difficulty
of determining the type of tender from side views, what with wheelbase variations and those at the front end.
However, I am pretty sure the so called coal plate should be directly above the coal gate and shovelling plate.
Paul
-
jwealleans
- LNER A4 4-6-2 'Streak'
- Posts: 4303
- Joined: Wed Oct 25, 2006 8:46 am
Re: West End Workbench
It seems churlish to say that the coal plate is where it is on your drawing, Paul, but it's also where the instructions show it graphically and where the slots and tabs indicate it should go. I do concur that it really ought to be further forward. I've found the relevant piece of text in the GNRS tender book which states that they were moved forward on all tenders built after 1903 and that the modification was applied to existing tenders. For any LNER modeller, therefore, the overwhelming likelihood must be that it's in the forward position.
John Edgson's drawing shows it in the forward position. He has it sloped backwards with the toolboxes apparently in mid air (I assume they were fixed to the tender sides). I'm not sure about the arrangement below it - is there a solid plate across the front of the coal space, or two plates and a central gap? Both the coal plates in the kit have a central arched cutout as if there's a gap below them. John's drawing appears to show the whole of this area as plated in, which the kit doesn't seem to cater for.
I haven't gone any further with the body, I'm saving it for a day when I have plenty of time and no distractions.
-
john coffin
- LNER V2 2-6-2 'Green Arrow'
- Posts: 1101
- Joined: Mon Sep 19, 2011 12:24 am
Re: West End Workbench
Jonathan,
now you know why the book took Malcolm Crawley almost 17 years, and me about 10 years to do all the drawings,
and they say computers speed work up!!!!!!!!!!
A major delay was in finding all the small details that are now so important to modellers. None of the GA's show much
of toolbox detail, and that goes all the way back to R4 up to around R57.
However, in answer to your question There were angle irons attached to the side of the tender on both sides, and across the
front, lower part of the front coal plate . But I also am pretty sure that they were fitted on top of the two arms of the self
trimming part of the tender. I have seen by careful looking, some toolboxes fitted sideways, but most seem to be longitudinal.
The saga of toolboxes on the GNR is very weird, to say the least. Starting in the early years when they appear all to be on the
rear of the tenders, but somewhere in the 1880's after some accidents, it appears that the Board of Trade introduced an rule
that all toolboxes should be at the front. it is easy to understand how dangerous it would have been even for a skilled and young
fireman to clamber over the coal back to the tool box when in motion.
Stirling tenders often seem to have the toolbox across the tender with the staple and padlock at the front It seems that some were
"portable" and stayed with the driver/fireman team, so were removed at the end of shift, during the time that engines started to have
more than a designated driving team. The other thing which is pretty unsure is where the fire irons and prickers etc were stored,
certainly nothing like the facility offered on Robinson tenders.
Paul
-
jwealleans
- LNER A4 4-6-2 'Streak'
- Posts: 4303
- Joined: Wed Oct 25, 2006 8:46 am
Re: West End Workbench
I started working through the Yeadon of the D1-4s this morning and I reckon I've seen enough to convince me that this coal plate runs all the way across the top of the coal gate and bends part of the way up so the upper part of the plate is angled backwards. Toolboxes are behind it and usually buried under coal, which must have been practical. I'll go through the rest of the volume tonight to see whether any more light can be shed. It looks as though I'll have to make it as there's noting in the kit the right shape.
-
Woodcock29
- GNR C1 4-4-2
- Posts: 713
- Joined: Tue Nov 27, 2012 8:59 am
- Location: South Australia
Re: West End Workbench
Jonathan
I had the same dilemma when I built an Ivatt tender for my D2 earlier this year using the old Nucast D2 tender. I ended up adding a scratch-built front coal plate to the tender. I did consult with Paul Craig on this matter during the process as well. I also have the Malcolm Crawley's GNR tender book.
Andrew
-
jwealleans
- LNER A4 4-6-2 'Streak'
- Posts: 4303
- Joined: Wed Oct 25, 2006 8:46 am
Re: West End Workbench
Tenders aside, I've been working on wagons this week. Jidenco GC van making progress:
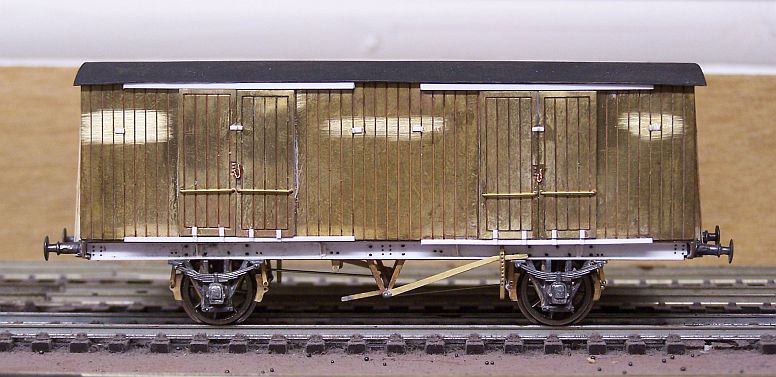
Unfortunately there's a chip out of the roof so I'm going to have to replace it.
This was a job from Ely Show - part of the club shunting stock but not very well built. The footsteps were incomplete, the handrails were all wrong and the inner ends had been scratchbuilt for some reason. No-one seems to know who put it together. I've remade the footsteps out of brass as they will need to be sturdier than the plastic originals. The handrail holes still look a bit messy but once painted and weathered it'll do a job on the layout.
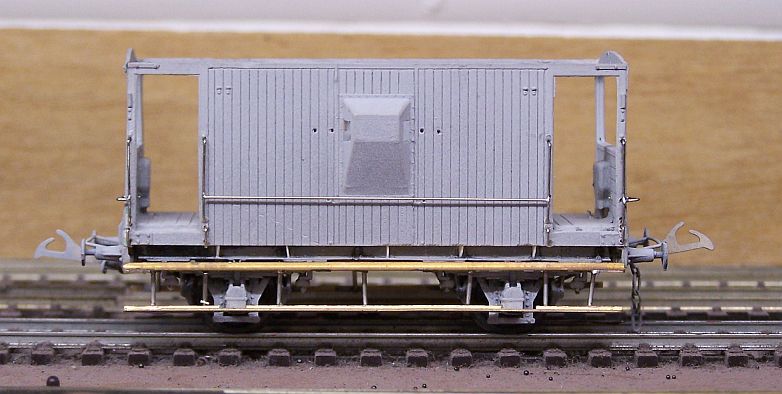
It still needs handrails on the other side. You can only do so many in one day.
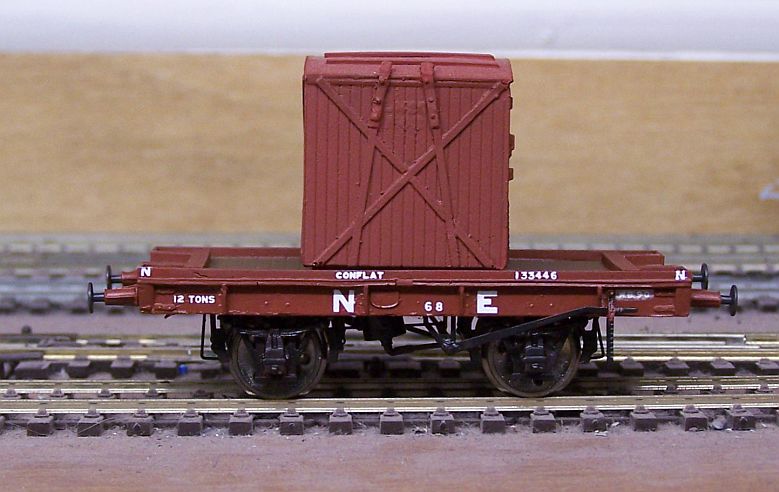
Finally I shall have this on the stand at Hartlepool: Conflat V and A type container, both by Graeme King. I made the master for the conflat, the container is by Caroline Middleditch of this parish. The conflat was put together at Warley last year and stalled awaiting suitable lettering. I found one picture of a very grubby example labelled 'conflat' recently, most of the others seem to have carried 'Container Flat' and also been lettered in a Gill Sans script which I'll need to try to make up myself, I suspect.

Unfortunately there's a chip out of the roof so I'm going to have to replace it.
This was a job from Ely Show - part of the club shunting stock but not very well built. The footsteps were incomplete, the handrails were all wrong and the inner ends had been scratchbuilt for some reason. No-one seems to know who put it together. I've remade the footsteps out of brass as they will need to be sturdier than the plastic originals. The handrail holes still look a bit messy but once painted and weathered it'll do a job on the layout.

It still needs handrails on the other side. You can only do so many in one day.
Finally I shall have this on the stand at Hartlepool: Conflat V and A type container, both by Graeme King. I made the master for the conflat, the container is by Caroline Middleditch of this parish. The conflat was put together at Warley last year and stalled awaiting suitable lettering. I found one picture of a very grubby example labelled 'conflat' recently, most of the others seem to have carried 'Container Flat' and also been lettered in a Gill Sans script which I'll need to try to make up myself, I suspect.

-
drmditch
Re: West End Workbench
I hope to see the above at Hartlepool on Sunday.
Will you still be there about lunchtime-ish?
For comparison (all in your favour) here is the Conflat V I made last year using the underframe from a 9' wheelbase cattle wagon.(True to prototype!)
(Ref Tatlow 4B Page 208). The lettering is assembled from various parts of an HMRS Sheet.
Interesting that mine is 6cwt heavier than yours!
-
jwealleans
- LNER A4 4-6-2 'Streak'
- Posts: 4303
- Joined: Wed Oct 25, 2006 8:46 am
Re: West End Workbench
Unless they've invited me to leave by then, I shall be there all weekend building wagons. I don't know where we're being placed, though (last year we were slightly right of straight ahead when you walked in, along a wall).
Can you bring that with you? I'd be interested to see how you've tackled certain bits of it.
Can you bring that with you? I'd be interested to see how you've tackled certain bits of it.