West End Workbench
Moderators: 52D, Tom F, Rlangham, Atlantic 3279, Blink Bonny, Saint Johnstoun, richard
Re: West End Workbench
Jonathan,
I could not get the link to work, EDIT - NOW WORKING.
Have a good time.
John
I could not get the link to work, EDIT - NOW WORKING.
Have a good time.
John
Last edited by JASd17 on Wed Jul 24, 2019 6:01 pm, edited 1 time in total.
-
jwealleans
- LNER A4 4-6-2 'Streak'
- Posts: 4303
- Joined: Wed Oct 25, 2006 8:46 am
Re: West End Workbench
That seems to be last year's show, John and it's no good looking for me there - I was at LB getting sunstroke.
Venue and opening hours are the same, though.
Venue and opening hours are the same, though.
-
jwealleans
- LNER A4 4-6-2 'Streak'
- Posts: 4303
- Joined: Wed Oct 25, 2006 8:46 am
Re: West End Workbench
Well, weeks of inactivity and then three posts in a day. Just like buses.
I've been hanging on awaiting a new product which finally emerged last week. Some months ago - last year sometime, in fact, I conceived of a desire to model A3 2580 Shotover for Grantham. Not only because it's something of a forgotten loco (it worked the up service to 4472's down on the day the non-stop Flying Scotsman first ran and was first to carry that headboard) but because in our era it was one of two a1/3s to be fitted with an ACFI feed water heater similar to that used on 2001.
When I started researching it I found that Al Turner (you may have seen his Bridge at Remagen layout) had done the very similar device fitted to 2576 The White Knight at more or less the same time. He kindly pointed me to the best drawings available and I began work, using an NRM edition 4472 as a base and scratchbuilding the pump and associated fittings.
Al then let me know that he was working on a 3D print, so I stopped work to see what he came up with. Well, it was worth the wait. This is the sort of thing 3D printing should be ideal for - small scale production of components to a far higher level of accuracy and detail than most of us can manage.
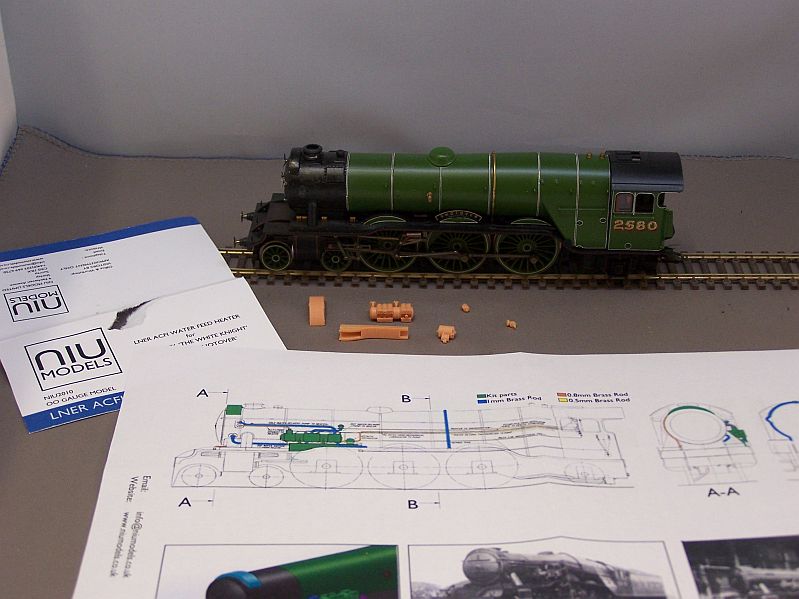
Here you can see the donor loco and the work I'd already done, along with the parts from the kit and the supplied instructions. I was emailed some revised instructions after the package arrived but I mainly worked from photographs. There is an excellent drawing in O S Nock's The Gresley Pacifics, Isinglass also do a drawing which is less helpful and there are pictures in the RCTS volume, in Yeadon and also online.

The kit contains the pump base, the heater itself, the Zenith separator (which goes on the front), the pump (which goes at the back) and the mixer (which sticks out of the smokebox). The boiler clack is also supplied but I'd fitted a Gibson one so I didn't try to remove that.
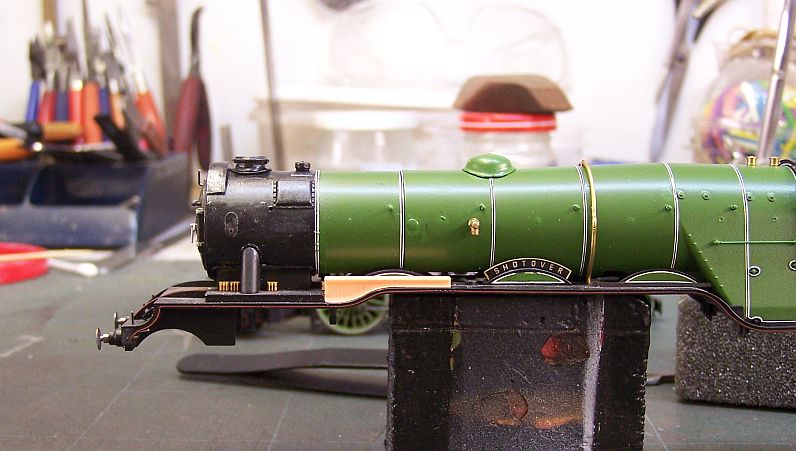
Step one is to remove part of the valve cover to allow the base to fit. Easier than I thought as it's a separate part on the Hornby body. Here the base is being trial fitted.
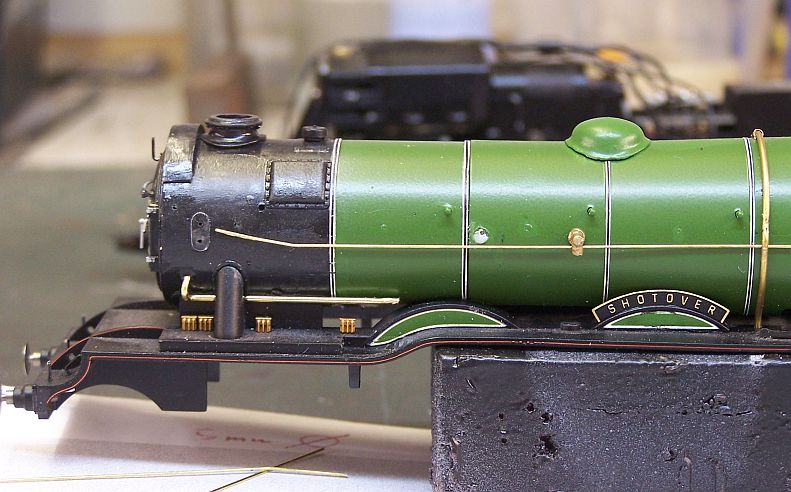
I made up the pipe runs which go behind the pump as they wouldn't be so easy once it was in place. Different photos show the pies fitted slightly differently and I ended up reshaping the one which runs along the boiler.
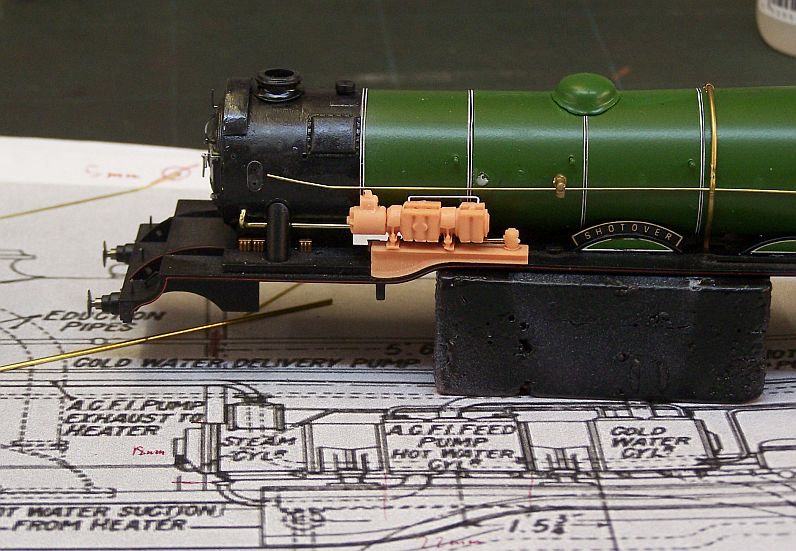
The pump was assembled and stuck to the base then checked again for fit.
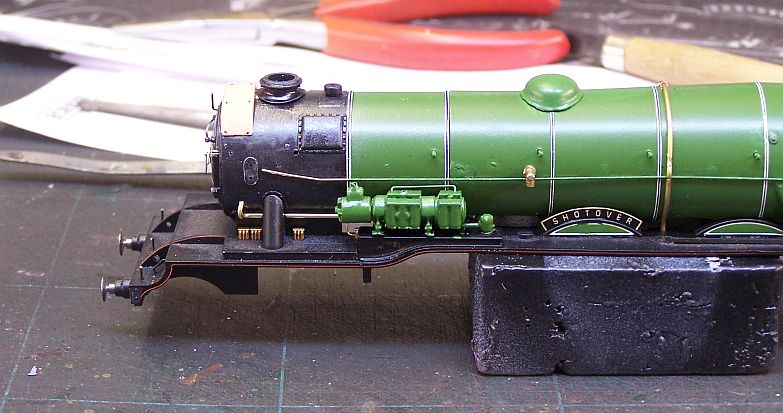
It was painted off the loco and then stuck in place. By then I'd also decided to use the supplied mixer, adding some Archer rivets to match the photo I was using.
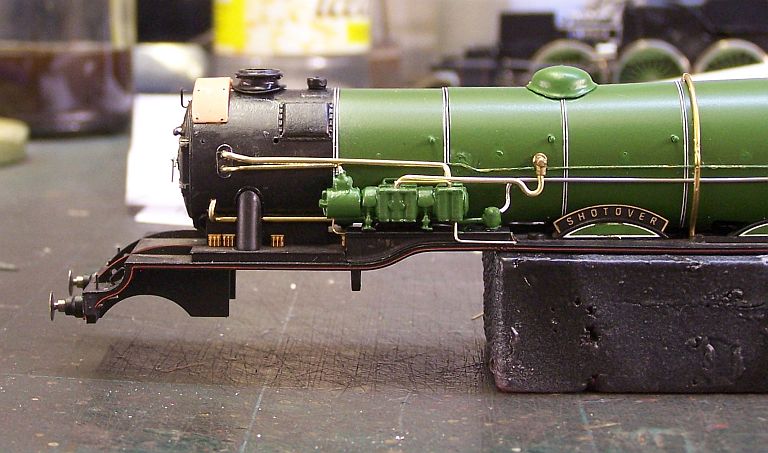
A fiddly hour or so was then spent getting the different pipes into place. Again, photos are indispensable and some thought about the order in which to fit doesn't come amiss.
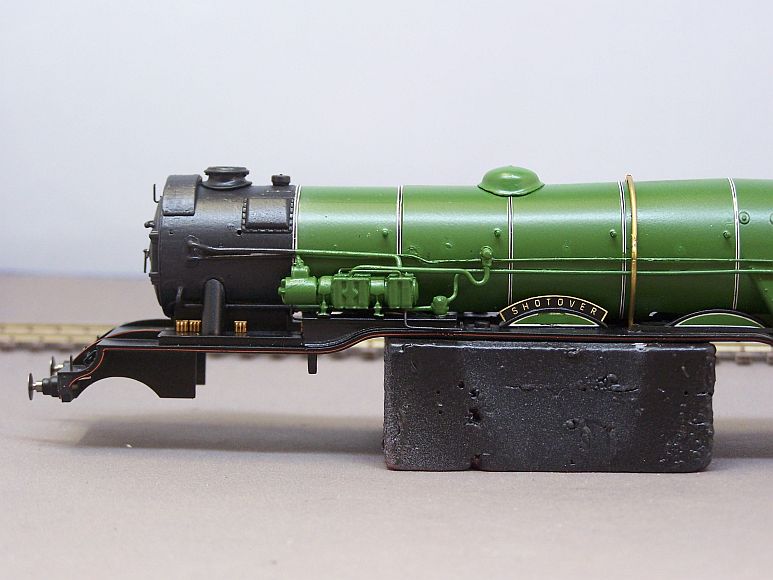
Finally it's all blended in and ready for weathering in due course.
Al sells these as 'Niu Models' and you can find them on Ebay, RMWeb and Facebook among other places. If you fancy one of these, it's certainly made the job a whole lot easier and I'm pleased with mine.
I've been hanging on awaiting a new product which finally emerged last week. Some months ago - last year sometime, in fact, I conceived of a desire to model A3 2580 Shotover for Grantham. Not only because it's something of a forgotten loco (it worked the up service to 4472's down on the day the non-stop Flying Scotsman first ran and was first to carry that headboard) but because in our era it was one of two a1/3s to be fitted with an ACFI feed water heater similar to that used on 2001.
When I started researching it I found that Al Turner (you may have seen his Bridge at Remagen layout) had done the very similar device fitted to 2576 The White Knight at more or less the same time. He kindly pointed me to the best drawings available and I began work, using an NRM edition 4472 as a base and scratchbuilding the pump and associated fittings.
Al then let me know that he was working on a 3D print, so I stopped work to see what he came up with. Well, it was worth the wait. This is the sort of thing 3D printing should be ideal for - small scale production of components to a far higher level of accuracy and detail than most of us can manage.

Here you can see the donor loco and the work I'd already done, along with the parts from the kit and the supplied instructions. I was emailed some revised instructions after the package arrived but I mainly worked from photographs. There is an excellent drawing in O S Nock's The Gresley Pacifics, Isinglass also do a drawing which is less helpful and there are pictures in the RCTS volume, in Yeadon and also online.

The kit contains the pump base, the heater itself, the Zenith separator (which goes on the front), the pump (which goes at the back) and the mixer (which sticks out of the smokebox). The boiler clack is also supplied but I'd fitted a Gibson one so I didn't try to remove that.

Step one is to remove part of the valve cover to allow the base to fit. Easier than I thought as it's a separate part on the Hornby body. Here the base is being trial fitted.

I made up the pipe runs which go behind the pump as they wouldn't be so easy once it was in place. Different photos show the pies fitted slightly differently and I ended up reshaping the one which runs along the boiler.

The pump was assembled and stuck to the base then checked again for fit.

It was painted off the loco and then stuck in place. By then I'd also decided to use the supplied mixer, adding some Archer rivets to match the photo I was using.

A fiddly hour or so was then spent getting the different pipes into place. Again, photos are indispensable and some thought about the order in which to fit doesn't come amiss.

Finally it's all blended in and ready for weathering in due course.
Al sells these as 'Niu Models' and you can find them on Ebay, RMWeb and Facebook among other places. If you fancy one of these, it's certainly made the job a whole lot easier and I'm pleased with mine.
- Atlantic 3279
- LNER A4 4-6-2 'Streak'
- Posts: 6660
- Joined: Fri Jun 26, 2009 9:51 am
- Location: 2850, 245
Re: West End Workbench
Looks good, although it's a little odd at first to see authentic "natural" lines to the pipework on an otherwise geometrically regular RTR model - but let's not repeat here a recent discussion elsewhere about ripples in panels etc.
Is there no hint of any lining on the pump and separator in any of the photographs? Maybe only 2001 had such luxuries.
Is there no hint of any lining on the pump and separator in any of the photographs? Maybe only 2001 had such luxuries.
Most subjects, models and techniques covered in this thread are now listed in various categories on page1
Dec. 2018: Almost all images that disappeared from my own thread following loss of free remote hosting are now restored.
Dec. 2018: Almost all images that disappeared from my own thread following loss of free remote hosting are now restored.
Re: West End Workbench
Graeme,
I would say lining 'not proven' at best.
John
I would say lining 'not proven' at best.
John
-
jwealleans
- LNER A4 4-6-2 'Streak'
- Posts: 4303
- Joined: Wed Oct 25, 2006 8:46 am
Re: West End Workbench
As John said. There don't seem to be any surviving 'officials' of the fitting, they're all in traffic pictures and if there is any lining it's obscured.
- Dave
- LNER A4 4-6-2 'Streak'
- Posts: 1733
- Joined: Sat Nov 13, 2010 9:33 pm
- Location: Centre of the known universe York
Re: West End Workbench
Very nice Jonathan.
Are you bringing it to Thirsk on Sunday ?.
I fancy doing that conversion myself.
Are you bringing it to Thirsk on Sunday ?.
I fancy doing that conversion myself.
-
jwealleans
- LNER A4 4-6-2 'Streak'
- Posts: 4303
- Joined: Wed Oct 25, 2006 8:46 am
Re: West End Workbench
Matthew 7: 7-8.
Re: West End Workbench
The sermon on the mount.
Goodness Dave, I hope you have the garden layout plans sorted.
The grim JW is on your case!
Still trying to grasp those officials here??
John
Goodness Dave, I hope you have the garden layout plans sorted.
The grim JW is on your case!
Still trying to grasp those officials here??
John
-
Paul_sterling
- GER D14 4-4-0 'Claud Hamilton'
- Posts: 332
- Joined: Fri May 10, 2013 12:50 pm
- Location: Durham
Re: West End Workbench
I'm hoping to get down to that show, so i may well come and say hello.jwealleans wrote: ↑Wed Jul 24, 2019 10:41 am Shocking lack of updates on here, but I am still with you all and will be demonstrating wagon building at Thirsk on Sunday, Rob Pulham will also be demonstrating 7mm wagon building and Graeme King will be casting resin. Thirsk Town Hall, 10:30 to 16:30.
http://www.expo-thirsk.co.uk/
Cheers, Paul.
-
jwealleans
- LNER A4 4-6-2 'Streak'
- Posts: 4303
- Joined: Wed Oct 25, 2006 8:46 am
Re: West End Workbench
I gather you didn't make it, Paul? It was very nice to meet a few new faces as well as seeing the familiar ones I was expecting.
Thirsk is always an enjoyable day out and as a bonus I managed to achieve something as well. None of it was LNER, unfortunately. Before the show, though, I did manage to finish this which has been hanging around the bench for far too long.

This is an NB bogie bolster (also used as a boplate) built by Hurst Nelson. It started life as a Parkside Quad and is based on the drawing in John Hooper's book. The bogies aren't quite right, but I'm sure I've seen some which are much closer - it's just a matter of remembering where.
This weekend, a bonus due to the weather, I've started preparing for an upcoming Grantham running weekend. This has involved going back to my notes from January when we were last out (Stevenage, for those who were there). I recall that there were more failures and damage than usual and I spent much of yesterday and today working through the list.
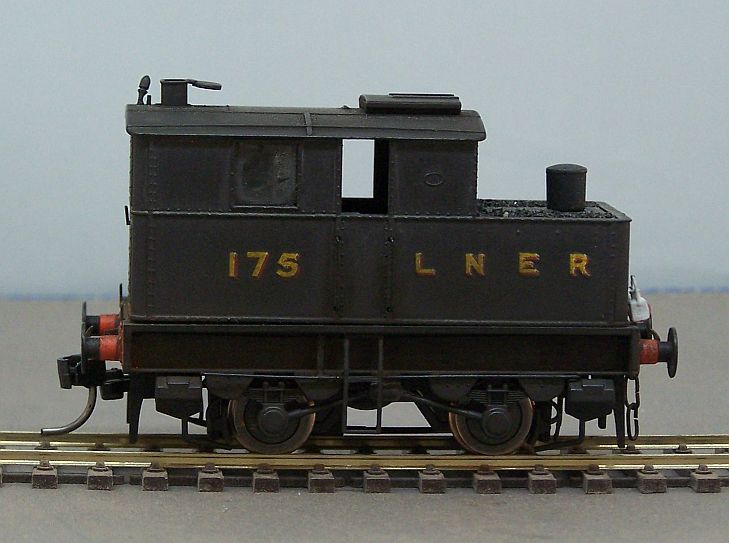
The Ruston Hornsby shunter had been unreliable at Wakefield and packed up altogether at Stevenage. Fortunately it seems to have been nothing more than crud, but removing it called for removal of the wheelsets to clean out the bearing cups and pinpoints (which serve as pickups). Not what you'd do at a normal wheel clean. It seems to be behaving now which is just as well as it will have to do until Red Leader stops messing about with pink engines and gets on with his promised scratchbuild of the actual machine.
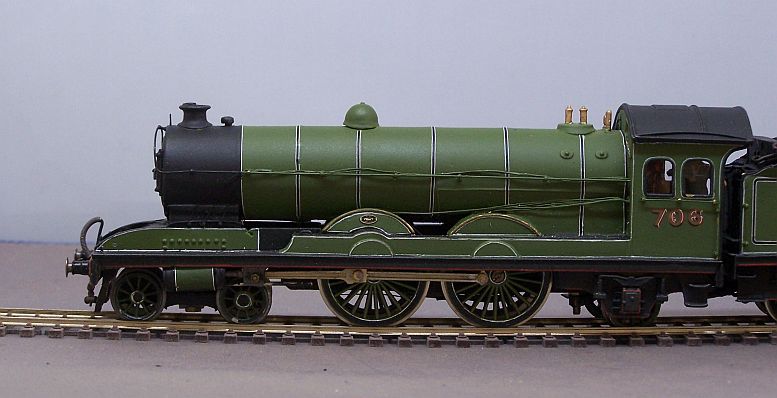
C7 706 had been parted from its bogie in a manner which I have not been able to establish. I added a plate to hold the captive nut and resoldered the whole thing in place. You can't tell here, but the bogie pivot is ahead of the front axle because of the restricted clearances around the cylinders. It works very well. The pipe runs on this machine really were that messy at the time, honest.
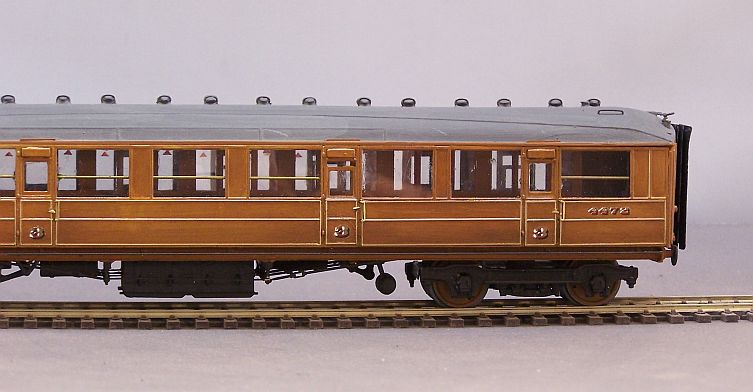
TK 4472 had had several windows punched out and a few commode handles missing as well. The windows have been replaced (glue marks to remove) but I have no .7 brass wire, so the handrail will have to wait. This is an MJT kit built by Dave Scott in the approved MJT manner which does make glazing awkward.

BG 4034 is the one from the Leeds set. I cant remember what I established with this vehicle except that it derailed regularly in the fiddle yard and my note said to raise it. It's had about .75 mm added under each bogie and while I was on the rattle it made was also diagnosed - a captive nut had come adrift - and rectified. These are MJT bogies on a paxolin floor in a Kirk body, so it may be that my original height setting was out.
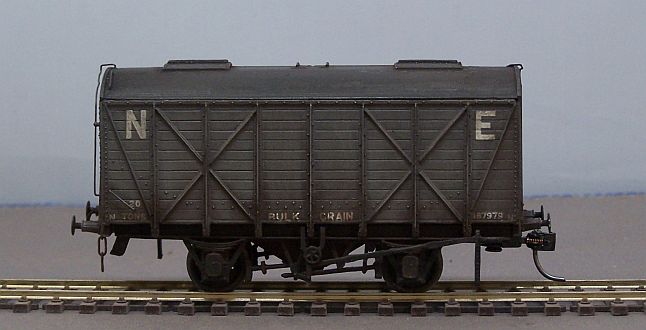
I didn't photograph the bent pickups and loose lamp irons I sorted, but I did reattach a brake lever to a grain wagon. I understand this kit is to be retooled and it certainly needs it.
Lastly some other jobs which I picked up as I had time:
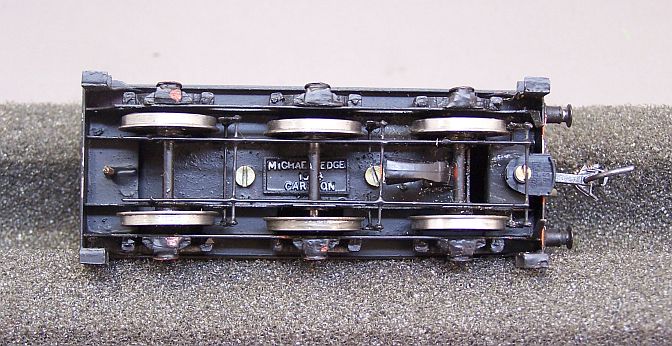
When I acquired my Valour, Mike Edge confirmed that he had built it but there was no plate on it. He kindly made me another which he gave me at York and I've attached it today. I also painted over the Kadee mounting I'd added to the tender chassis. For the record, the loco was built in 1988.


Finally I made a start on weathering the two new A1/3s I intend to have running by Spalding. They've both been road tested, so we're safe to go ahead with this now.
I'm told that someone came to Ormesby Hall asking for me recently. Unfortunately the lady who spoke to the people concerned didn't think to ask their names so I'm none the wiser. If they are a reader here, I only operate on the first Sunday of each month these days. If anyone is planning a visit which coincides then by all means let me know.
If all goes well i hope to have something new and exciting to show this week, but please don't anyone hold your breath.
Thirsk is always an enjoyable day out and as a bonus I managed to achieve something as well. None of it was LNER, unfortunately. Before the show, though, I did manage to finish this which has been hanging around the bench for far too long.

This is an NB bogie bolster (also used as a boplate) built by Hurst Nelson. It started life as a Parkside Quad and is based on the drawing in John Hooper's book. The bogies aren't quite right, but I'm sure I've seen some which are much closer - it's just a matter of remembering where.
This weekend, a bonus due to the weather, I've started preparing for an upcoming Grantham running weekend. This has involved going back to my notes from January when we were last out (Stevenage, for those who were there). I recall that there were more failures and damage than usual and I spent much of yesterday and today working through the list.

The Ruston Hornsby shunter had been unreliable at Wakefield and packed up altogether at Stevenage. Fortunately it seems to have been nothing more than crud, but removing it called for removal of the wheelsets to clean out the bearing cups and pinpoints (which serve as pickups). Not what you'd do at a normal wheel clean. It seems to be behaving now which is just as well as it will have to do until Red Leader stops messing about with pink engines and gets on with his promised scratchbuild of the actual machine.

C7 706 had been parted from its bogie in a manner which I have not been able to establish. I added a plate to hold the captive nut and resoldered the whole thing in place. You can't tell here, but the bogie pivot is ahead of the front axle because of the restricted clearances around the cylinders. It works very well. The pipe runs on this machine really were that messy at the time, honest.

TK 4472 had had several windows punched out and a few commode handles missing as well. The windows have been replaced (glue marks to remove) but I have no .7 brass wire, so the handrail will have to wait. This is an MJT kit built by Dave Scott in the approved MJT manner which does make glazing awkward.

BG 4034 is the one from the Leeds set. I cant remember what I established with this vehicle except that it derailed regularly in the fiddle yard and my note said to raise it. It's had about .75 mm added under each bogie and while I was on the rattle it made was also diagnosed - a captive nut had come adrift - and rectified. These are MJT bogies on a paxolin floor in a Kirk body, so it may be that my original height setting was out.

I didn't photograph the bent pickups and loose lamp irons I sorted, but I did reattach a brake lever to a grain wagon. I understand this kit is to be retooled and it certainly needs it.
Lastly some other jobs which I picked up as I had time:

When I acquired my Valour, Mike Edge confirmed that he had built it but there was no plate on it. He kindly made me another which he gave me at York and I've attached it today. I also painted over the Kadee mounting I'd added to the tender chassis. For the record, the loco was built in 1988.


Finally I made a start on weathering the two new A1/3s I intend to have running by Spalding. They've both been road tested, so we're safe to go ahead with this now.
I'm told that someone came to Ormesby Hall asking for me recently. Unfortunately the lady who spoke to the people concerned didn't think to ask their names so I'm none the wiser. If they are a reader here, I only operate on the first Sunday of each month these days. If anyone is planning a visit which coincides then by all means let me know.
If all goes well i hope to have something new and exciting to show this week, but please don't anyone hold your breath.
- Dave
- LNER A4 4-6-2 'Streak'
- Posts: 1733
- Joined: Sat Nov 13, 2010 9:33 pm
- Location: Centre of the known universe York
Re: West End Workbench
Shotover is looking good mate, got my bits to do that conversion now.
Scottiedogs TK looks nice, did you paint it or did he.
Thirsk seems a long time ago, it was a good larf.
Interesting about the grain wagon, I have 2 built with new underframes and one to do, as it stands the original kit is interesting if you like puzzles.
Scottiedogs TK looks nice, did you paint it or did he.
Thirsk seems a long time ago, it was a good larf.
Interesting about the grain wagon, I have 2 built with new underframes and one to do, as it stands the original kit is interesting if you like puzzles.
-
jwealleans
- LNER A4 4-6-2 'Streak'
- Posts: 4303
- Joined: Wed Oct 25, 2006 8:46 am
Re: West End Workbench
Tested Shotover at the weekend and it pulls well too. It can be a bit of a lottery with Hornby A1/3s, but the NRM specials seem to have decent quality mechanisms consistently. I painted the TK; I have some more of Dave's to finish as well.
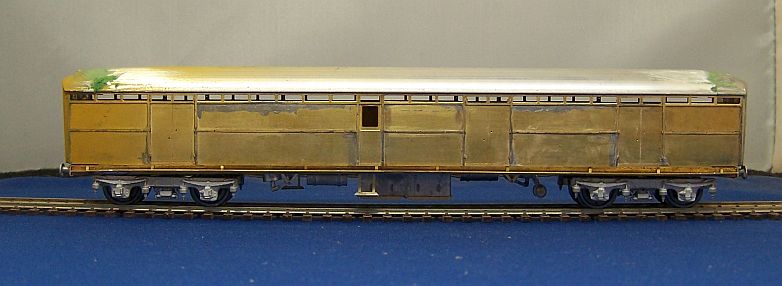
Something new now. At S4North in March I was talking to Ian MacDonald along with Jon Bates (Jon4470)and Ian asked for any ideas for new kits. Jon came out with the D45 steel BG instantly. We've been looking at it since then and a couple of weeks ago some etches dropped onto the doormat. There have been etches produced for this vehicle before, but they've been unavailable for many years. Steve Banks illustrates his build of those etches here and also provides much invaluable prototype information here. These were built in 1927-8 and were used on principal ECML services up to the War.
Ian's etches are for the sides as all the rest can be made up from MJT parts. This is what you need:
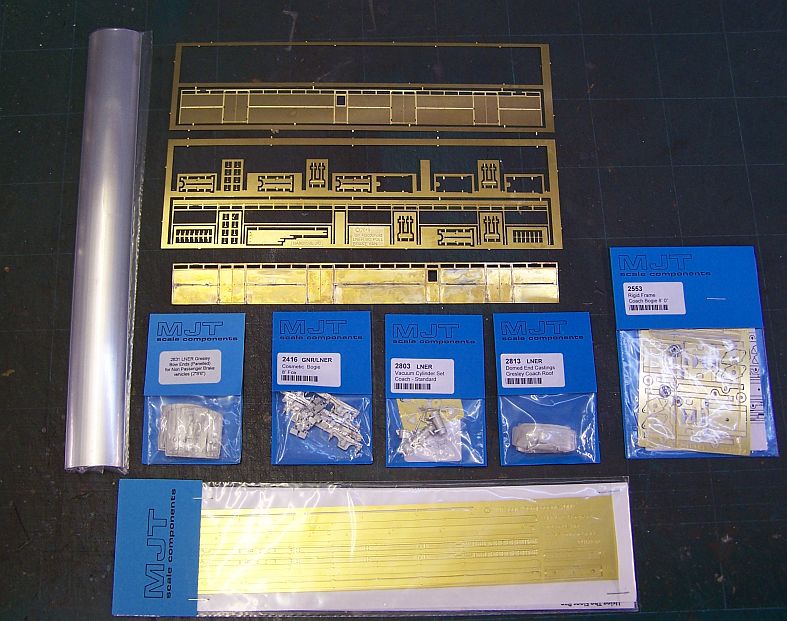
The sides have recessed strips for the raised beading over the seams to seat into and once the handrails are added you can flood them with solder from the rear. The handrails along the length of the sides are a feature of this and the contemporary teak diagram (113). Ian provides bending jigs on the etch.
Construction is straightforward, making the same modifications as I do to all MJT vehicles I build. The main points specific to this vehicle are the ends. As they're also steel panelled, you have to lose the MJT detail and reprofile them to a different shape.
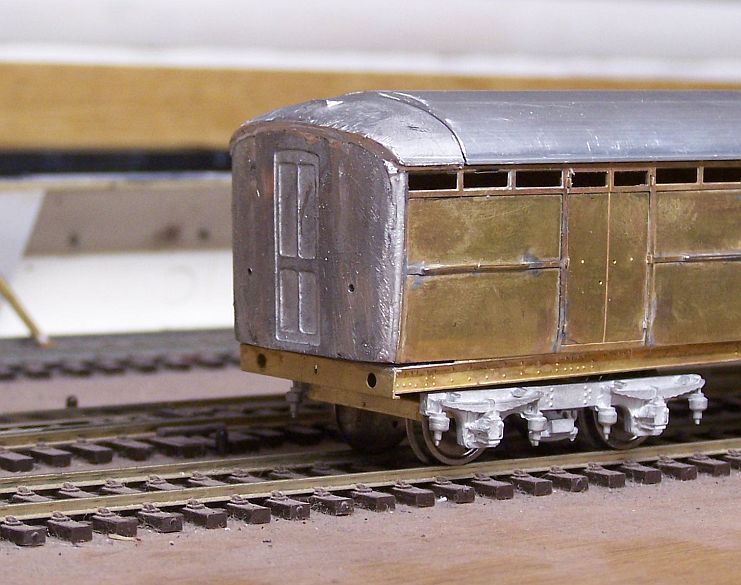
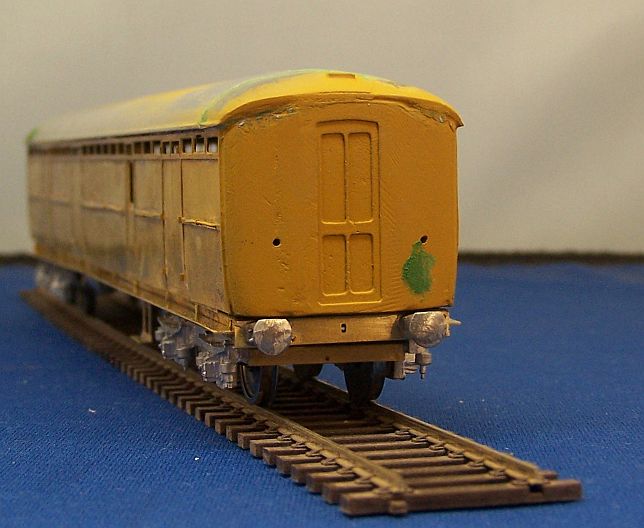
It's quite easy to do and very much like the filling and shaping you do to the roof dome.
When assembled the model has a quite airy look underneath as there's no trussing on this vehicle.
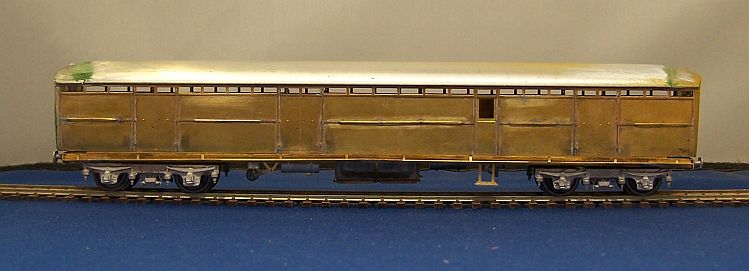
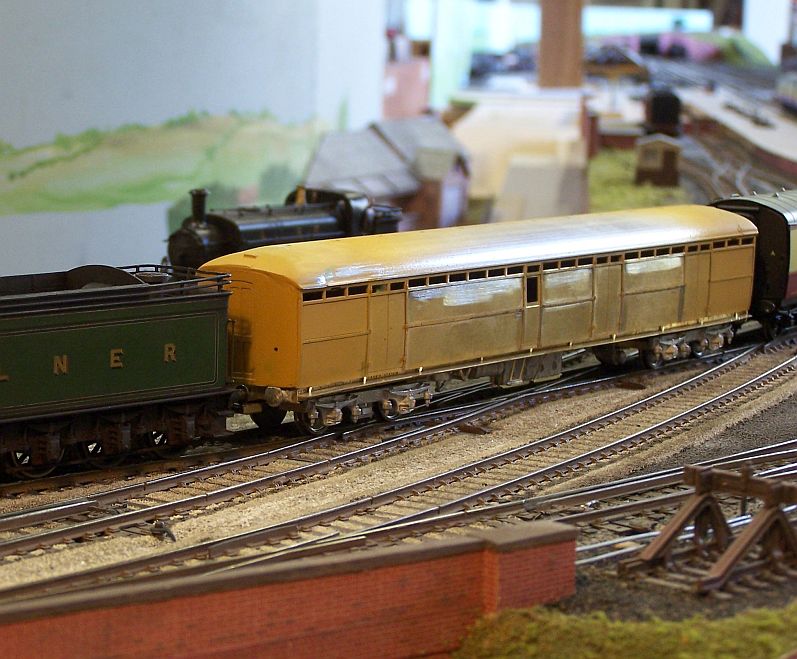
We gave it a test run at the weekend on what would have been their regular prewar working, the Flying Scotsman.
Ian doesn't post on here but any expressions of interest can come to me or to 'macgeordie' on RMWeb.
Something new now. At S4North in March I was talking to Ian MacDonald along with Jon Bates (Jon4470)and Ian asked for any ideas for new kits. Jon came out with the D45 steel BG instantly. We've been looking at it since then and a couple of weeks ago some etches dropped onto the doormat. There have been etches produced for this vehicle before, but they've been unavailable for many years. Steve Banks illustrates his build of those etches here and also provides much invaluable prototype information here. These were built in 1927-8 and were used on principal ECML services up to the War.
Ian's etches are for the sides as all the rest can be made up from MJT parts. This is what you need:

The sides have recessed strips for the raised beading over the seams to seat into and once the handrails are added you can flood them with solder from the rear. The handrails along the length of the sides are a feature of this and the contemporary teak diagram (113). Ian provides bending jigs on the etch.
Construction is straightforward, making the same modifications as I do to all MJT vehicles I build. The main points specific to this vehicle are the ends. As they're also steel panelled, you have to lose the MJT detail and reprofile them to a different shape.


It's quite easy to do and very much like the filling and shaping you do to the roof dome.
When assembled the model has a quite airy look underneath as there's no trussing on this vehicle.


We gave it a test run at the weekend on what would have been their regular prewar working, the Flying Scotsman.

Ian doesn't post on here but any expressions of interest can come to me or to 'macgeordie' on RMWeb.
-
jwealleans
- LNER A4 4-6-2 'Streak'
- Posts: 4303
- Joined: Wed Oct 25, 2006 8:46 am
Re: West End Workbench
Back to the BG tonight after a few days away from it. I've added the other side handrails and also experimented with the end beading. There will be provision for this in the next iteration, but I had to make my own. For the lower I used some MJT fret, full thickness but filed down after attaching. I haven't quite got both sides in line, but that won't be apparent with a gangway in place. Normal solder to attach to the existing beading, low melt onto the end casting.
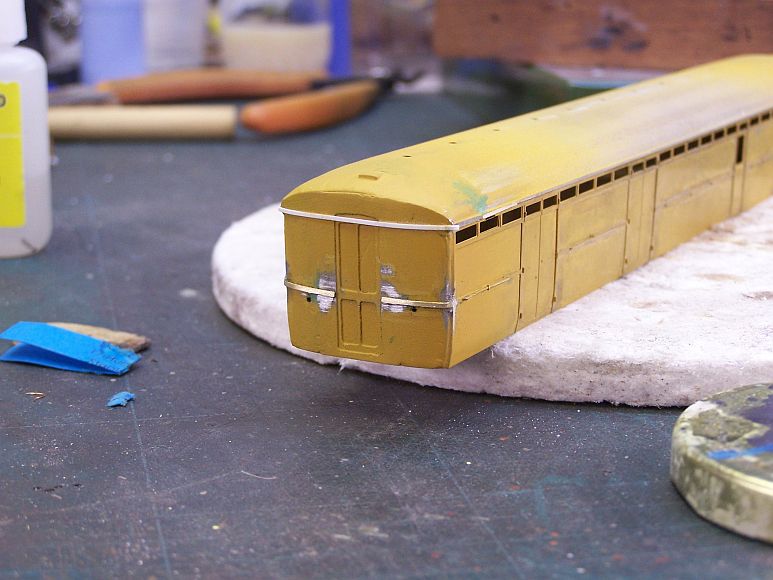
For the top beading I hesitated about to try solder as the roof dome is whitemetal and there's a great deal of filler over the upper end. I tried 10 x 30 thou Evergreen strip, superglued in one piece and then to cut down and dress once the glue has fully set.
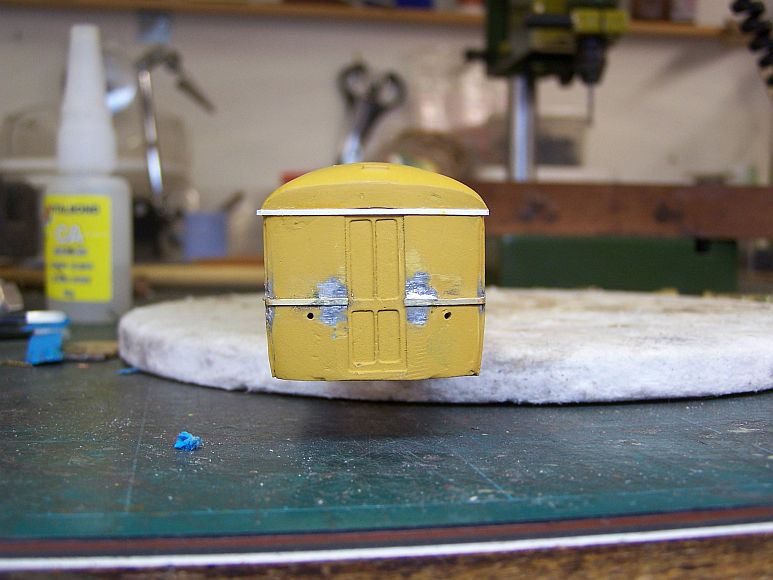
Although my natural inclination is to solder, I think the plastic looks as good.

For the top beading I hesitated about to try solder as the roof dome is whitemetal and there's a great deal of filler over the upper end. I tried 10 x 30 thou Evergreen strip, superglued in one piece and then to cut down and dress once the glue has fully set.

Although my natural inclination is to solder, I think the plastic looks as good.
-
jwealleans
- LNER A4 4-6-2 'Streak'
- Posts: 4303
- Joined: Wed Oct 25, 2006 8:46 am
Re: West End Workbench
Pleasure to see everyone at Expo EM Autumn last weekend; I hope to catch up with a few people at Shipley on Sunday.
I picked up some bits and bobs which allowed me to finish these off this week. These two didn't make the cut for Ely Show in May. They were waiting for brass tube to make the shock absorbers and so with the addition of securing chains are now done. The Conflat A is another built using the alternative chassis (PA16).
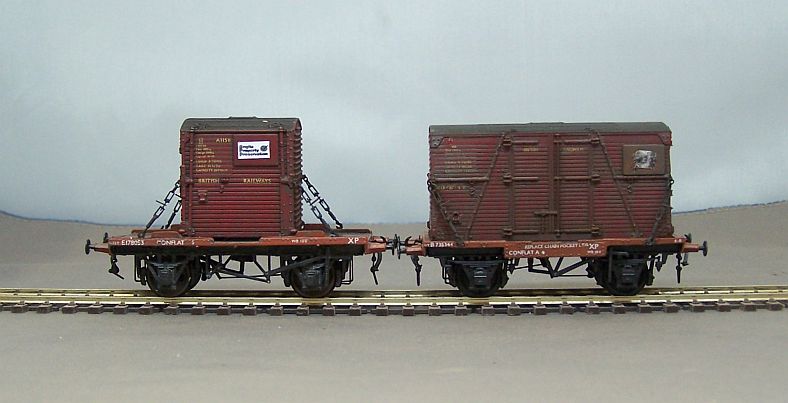
I picked up some bits and bobs which allowed me to finish these off this week. These two didn't make the cut for Ely Show in May. They were waiting for brass tube to make the shock absorbers and so with the addition of securing chains are now done. The Conflat A is another built using the alternative chassis (PA16).
