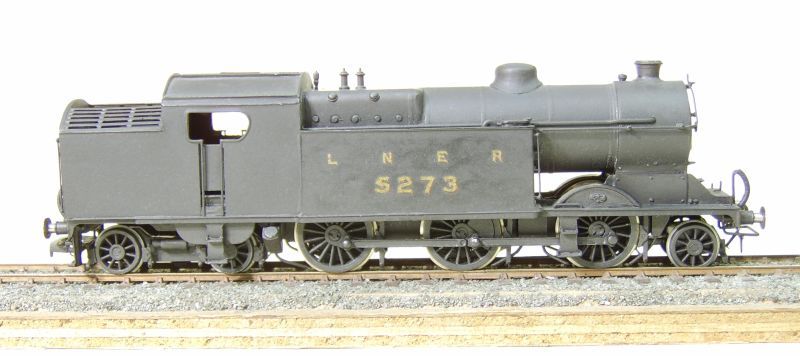
James' workbench- ex-GC locos and stock in OO
Moderators: 52D, Tom F, Rlangham, Atlantic 3279, Blink Bonny, Saint Johnstoun, richard
-
- GCR O4 2-8-0 'ROD'
- Posts: 581
- Joined: Tue Apr 30, 2013 7:15 pm
Re: James' workbench- ex-GC locos and stock in OO
Still slowly plodding along with my D6; it's turned into a marathon rather than a sprint (no bad thing either).
She's now gained the coaming around the cab cutouts and a tender.
The tender is a Triang 2P/ 4F tender which I've cut down to tank top level then laminated around with 0.5mm plastic sheet to build up a new tank 20mm in height. Some 0.5mm sheet was then cut into 1mm strips and laid down on top of this, and given a liberal smothering of filler to suggest the flare to the tender top. Once a rudimentary interior had been built up out of more plastic sheet, the coal rails were added. I'm not yet entirely happy with the finish of the tender; it needs some smoothing down. But it is nice to see it (even roughly) in the same colour as the loco- it feels as though one last big push will see it pretty much finished. (Though this is far from the case).
As an experiment, I've painted her in just Revell 'Leaf Green' enamel. Usually I give my models a coat of two of this as a precursor to a coat of Humbrol's notoriously thin apple green acrylic, but to be entirely honest I've never noticed a difference between the two. So I'm seeing what it looks like just with the Revell.
Still masses to be done of course, but it is getting there, slowly.
- 73082gibbers
- LNER Thompson L1 2-6-4T
- Posts: 80
- Joined: Sun Oct 05, 2014 6:01 pm
- Location: Selhurst T&RSMD
- Contact:
Re: James' workbench- ex-GC locos and stock in OO
That looks fantastic James! Was following your thread as a general passing search on google on the steampunk forum (I think) and saw what you'd done to your stock, and I must say it looks very good! Are you, or would you ever consider doing a GCR L1/L3? I'm looking into the feasibility of getting one of Dean Sidings' resin body kits to make one in LNER livery.
Nathan..
Nathan..
-
- GCR O4 2-8-0 'ROD'
- Posts: 581
- Joined: Tue Apr 30, 2013 7:15 pm
Re: James' workbench- ex-GC locos and stock in OO
Thanks! (another one who's found my work via the 'mad Victorian' scene too!)
I have built an L1; it's a very easy kit to build and looks pretty neat when finished:
The body is a hefty single-piece resin moulding and then the boiler fittings are whitemetal castings (I seem to recall there was a choice of three chimneys, two domes and two safety valves, as well as a feed water heater, so any member of the class could be modelled at any time from 1914-1955).
The only really disappointing part of the model I would say is the treatment of the coal hopper; it is supposed to be a grille but is moulded solid with the body. I cut it out on my model and replaced it with some plastic rod:
-
- LNER A4 4-6-2 'Streak'
- Posts: 1669
- Joined: Tue Mar 09, 2010 9:23 am
- Location: Surrey
Re: James' workbench- ex-GC locos and stock in OO
Good morning all
The L1 is interesting as I've been wondering about what to do with the bunker rails as they do let the kit down.
Earlswood nob
The L1 is interesting as I've been wondering about what to do with the bunker rails as they do let the kit down.
Earlswood nob
- 73082gibbers
- LNER Thompson L1 2-6-4T
- Posts: 80
- Joined: Sun Oct 05, 2014 6:01 pm
- Location: Selhurst T&RSMD
- Contact:
Re: James' workbench- ex-GC locos and stock in OO
Hi James! The L1 looks fantastic! I'm still contemplating on getting one, however unsure as to whether or not they wore apple green at all... If they didn't then I suppose I can live with that, but might opt for the NBR/LNER N15 0-6-2T and do one in black with red lining..
Nathan!
Nathan!
- 52D
- LNER A4 4-6-2 'Streak'
- Posts: 3968
- Joined: Sun Jun 03, 2007 3:50 pm
- Location: Reallocated now between the Lickey and GWR
- Contact:
Re: James' workbench- ex-GC locos and stock in OO
Hi Nathan I have an N15 in whitemetal, id love to see the resin version as I was contemplating doing it last year73082gibbers wrote:Hi James! The L1 looks fantastic! I'm still contemplating on getting one, however unsure as to whether or not they wore apple green at all... If they didn't then I suppose I can live with that, but might opt for the NBR/LNER N15 0-6-2T and do one in black with red lining..
Nathan!
Hi interested in the area served by 52D. also researching colliery wagonways from same area.
-
- GCR O4 2-8-0 'ROD'
- Posts: 581
- Joined: Tue Apr 30, 2013 7:15 pm
Re: James' workbench- ex-GC locos and stock in OO
I believe they (the L1's) wore black for their entire lives; they were, after all, humble goods engines. I'm considering whether to add red lining to mine; I'm not sure if they went straight from GCR lined black to LNER plain black or had red lining in the interim.73082gibbers wrote:Hi James! The L1 looks fantastic! I'm still contemplating on getting one, however unsure as to whether or not they wore apple green at all... If they didn't then I suppose I can live with that, but might opt for the NBR/LNER N15 0-6-2T and do one in black with red lining..
Nathan!
-
- GNR J52 0-6-0T
- Posts: 25
- Joined: Thu Sep 11, 2014 9:23 pm
Re: James' workbench- ex-GC locos and stock in OO
That resin kit is rather interesting, and youve done a great job on it, I'm assuming its a dean sidings kit? If so is there a website for dean sidings? I can't seem to find one.
Nelson
1̶6̶ 17 years old and modelling the LNER, LMS NCC and UTA (steam of course)
- Atlantic 3279
- LNER A4 4-6-2 'Streak'
- Posts: 6657
- Joined: Fri Jun 26, 2009 9:51 am
- Location: 2850, 245
Re: James' workbench- ex-GC locos and stock in OO
Rob Bergin, who unfortunately has not posted any of his work on here for three or four years now, built a Dean Sidings L1 (circa 2008?). I believe he later got very busy with building his layout and looking after a growing family. Maybe we'll hear from him again in years to come.
viewtopic.php?f=3&t=1126&p=10800&hilit= ... ngs#p10800
It's a pity that his image links are no longer working, as you would enjoy looking at much of his loco building work. If you read the page in that link however you'll notice that he did discover distortion in the running plate under on of the side tanks and considered it impractical to rectify. I'm not sure it would be impossible, but it would certainly be a challenge.
No Dean Sidings website as far as I know, and I'm not sure that Dave Slater's record of being contactable by (and responsive to) phone calls / e-mails / letters is exemplary. The best way to get stuff from him is by intercepting him at a show. Even if he doesn't have his own stand there, I have on occasion spotted him helping out at Eileen's Emporium, so maybe they have a magic means of getting in touch with him.....
Most subjects, models and techniques covered in this thread are now listed in various categories on page1
Dec. 2018: Almost all images that disappeared from my own thread following loss of free remote hosting are now restored.
- Atlantic 3279
- LNER A4 4-6-2 'Streak'
- Posts: 6657
- Joined: Fri Jun 26, 2009 9:51 am
- Location: 2850, 245
Re: James' workbench- ex-GC locos and stock in OO
This cast and etched kit used to be available from Kingdom Kits:
Most subjects, models and techniques covered in this thread are now listed in various categories on page1
Dec. 2018: Almost all images that disappeared from my own thread following loss of free remote hosting are now restored.
-
- GCR O4 2-8-0 'ROD'
- Posts: 581
- Joined: Tue Apr 30, 2013 7:15 pm
Re: James' workbench- ex-GC locos and stock in OO
Thanks; it is indeed the Dean Sidings kit. There isn't a website but he does advertise in Railway Modeller and sell at shows, which is where I got mine from a few years ago.Dunluce Castle wrote:That resin kit is rather interesting, and youve done a great job on it, I'm assuming its a dean sidings kit? If so is there a website for dean sidings? I can't seem to find one.
The kit isn't perfect (there's the issue of the bunker and then the fact that the running plate is slightly askew forward of the tanks) but it can be turned into a decent representation of the original, with a bit of work.
That is a very nice model; a pity it's not available any more.Atlantic 3279 wrote:This cast and etched kit used to be available from Kingdom Kits:
-
- GCR O4 2-8-0 'ROD'
- Posts: 581
- Joined: Tue Apr 30, 2013 7:15 pm
Re: James' workbench- ex-GC locos and stock in OO
After a fairly productive week, the D6 has come on in leaps and bounds and is pretty much finished in terms of actual construction; most of the work left now is painting and lining (and how I hate lining!)
I've built a cab roof out of the cardboard tube you get in the middle of kitchen rolls; I eased the radius of it a little by putting a rolling pin over it. The safety valves were scratchbuilt from plastic sheet; two pieces of 0.5mm sheet were laminated together to form the base, then three laminated to form the valve covers. A length of thin wire was then glued around the top of it to get the fairing on top.
Thin wire was used to add cab handrails and smokebox door dart.
I think the largest job left to do on it now is to fabricate the running plate steps...
-
- GCR O4 2-8-0 'ROD'
- Posts: 581
- Joined: Tue Apr 30, 2013 7:15 pm
Re: James' workbench- ex-GC locos and stock in OO
This last week has been spent mainly on finishing the paint job and doing the lining.
The loco footsteps still need doing!
This last photo is pretty much a mirror image of the photo of the original loco that inspired the model in the first place (which I shall post when the model is finished).
After I had finished the loco lining I came to the decision that the Revell 'leaf green' enamel alone does not make for a convincing reproduction of LNER apple green; it is too bright and, to my eye, too yellow. So I had to go back and give the loco a couple of coats of Humbrol 'apple green' too.
The lining itself is a mixture of methods and mediums; for the boiler bands I cut some 1mm strips of paper and used a ball point pen to line in the black strip. For the cab sheets and the splashers, and the black/white lines on the tender and the red lining on the running plate, I used paint pens (and a very steady hand).
There is still a bit of lining to do on the tender, and for that I'm planning to use HMRS pressfix lining transfers. Embarrassingly I thought I had plenty of that in my bits box; only when I came to actually appy the lining did I find that I did indeed have enough of the straight lengths to do the job, but only about two of the curved sections! So until a new sheet arrives in the post this job is on hold.
-
- GCR O4 2-8-0 'ROD'
- Posts: 581
- Joined: Tue Apr 30, 2013 7:15 pm
Re: James' workbench- ex-GC locos and stock in OO
Finished!
The cruel camera aside, I'm quite pleased with it.
What I am doing at the moment, aside from drawing up a list of projects for next year, is slowly buying up the more expensive bits of trackwrok required for a small shed scene diorama and (and this I think is quite exciting) gradually going about removing the trainset couplings from my passenger locos and carriages and replacing them with closer-to-scale Buckeye couplers. So far my rake of clerestory stock (5 carriages) and a brakevan have been converted. I'm anticipating being able to convert probably 5 or 6 carriages a month, and there are about 30 carriages at the moment (even before I build any more) to convert. Plus about 15 locos....
Whilst converting the couplings on my clerestory stock I've also decided to completely rebuild them. Although 'good', I was frustrated by the standard of the teak finish, the interior I thought was lacking and the glazing could have been better. So far, I've stripped down one of them, scrapped the interior and discarded the glazing and given it a coat of gloss yellow paint as a base to teak from.
-
- GCR O4 2-8-0 'ROD'
- Posts: 581
- Joined: Tue Apr 30, 2013 7:15 pm
Re: James' workbench- ex-GC locos and stock in OO
On to the next project then.
Rebuilding some old clerestory carriages....
I built these late last year/ early this year and ended up with a set of five carriages, all looking like this:
Typically, no sooner had I finished them then I found a better way of representing the teak finish. I was also more than a little annoyed by the massive couplings on each carriage; leaving a 1.5-inch gap between each coach (put another way, this was a scale 8 feet. Put differently, it added six inches to the overall length of the train- the difference between 'just fits my space' and 'won't go'.)
Getting increasingly dissatisfied with the train set style couplings, I decided to experiment with alternatives. The clerestory rake became the guinea pig for testing ideas... the first idea was to make a simple 'hook and loop' from wire, but I found this too fragile and liable to distorting. The second attempt was to make my own three link couplings, and although these work and look good, I found them too finicky for everyday use (the main problem being the hieght of the carriage above the coupling- with small open wagons I see no problem). This left the buckeye coupling to try, so I bought some, fitted them to a few carriages and then (without sounding too childish) 'had a play'. I think that the coupling problem has been solved; they are quite small, they look good and they work.
The problem though is that to fit the couplings the bogies had to be removed. To remove the bogies I had to release a plastic lug inside the carriage. To get to this lug I had to wreck the interior I had fitted.... quite quickly the amount of work involved rose to the point where it would take just as much time and effort to completely rebuild the carriage as it would just to make good the damage done in fitting the new couplings.
So; let's pick up with the new couplings fitted and the interior in ruins. The first step is to remove the remains and discard them; this includes the glazing. The coach body is then given a coat of gloss yellow paint and set aside to dry. Once it has dried (this takes about a day), you can set-to with a pencil and ruler to measure up for a new interior.
I have decided in future that any interiors I fit to my carriage stock should be removeable. So the first stage of the interior is to measure the internal dimensions of the carriage for a false foor. This is then cut out of paper, and dropped inside to test the fit before we go any further. I found that although the carriage measured 28mm inside, ideally I needed an interior 2mm less than that to fit comfortably.
I then measured the individual compartments up and found they were 24mm (a scale 6 feet' each. Wanting to minimise the number of parts to the interior, I decided the best way of building it is from one continuous strip of paper. So you cut a strip of paper 26mm wide by 'however' long; 297mm in my case as I used some scrap A4 paper I have to hand. You then measure back 24mm along the length, and mark off. This gives you a floor. Then measure back 26mm and mark off, and then another 26mm and mark off again. Then another 24mm.... you repeat this for the number of compartments in the carriage. Then you score the mark lines and fold it up. The 24mm lengths are the floors for each compartment and the 26mm lengths become the bulkheads in between. This is then glued to the false floor and painted.
I had noted when I finished these carriages the first time that fitting an interior increased the realism of the model by stopping the capability of being able to see through it from end to end; at the same time however much of the effort was wasted as the seats were not visible unless you actually got up close and went looking for them. Therefore on these carriages I limited my interior to the floor and the bulkheads.
When you've built the interior, set it aside and bring the carriage body back. Now the 'fun' begins!
I painted the body in satin mid-brown paint and then removed most of it with tissue paper. What you end up with is a faint smear of brown paint, thin enough for the undercoat to show through in places. It looks remarkably like woodgrain. That's the teaking finished. Once it has dried I replaced the glazing and fitted my new interior, then repainted the roof.
So; the newly rebuilt carriage, now awaiting transfers and varnish: