West End Workbench
Moderators: 52D, Tom F, Rlangham, Atlantic 3279, Blink Bonny, Saint Johnstoun, richard
-
Mersey508138
- NBR J36 0-6-0
- Posts: 114
- Joined: Sun Aug 14, 2016 1:22 am
Re: West End Workbench
Hi Everyone
My britannia loco currently has a tender from a tender driven locomotive but instead of the ringfield motor block which can be fairly weighty, I fitted it with the block from the unpowered end of a class 92 locomotive ( fortunately same dimensions and wheels spacing as the tender frame so the tender is fairly light weight compared to what it used to be.
It is fitted with my self made pickups wired through to the locos pickups which are in turn connected to the motor as I didn't want to invade the cab with wires as was originally done when hornby first introduced tender driven locomotives back in the early 80s when you could buy Flying Scotsman brand new for just £30.
The main thing left to do at this point is to paint the currently black tender body green to match the loco which I have numbered as 70056 as if it was a brand new build locomotive. I know they britannia's were numbered 70000 - 70055 but I liked the thought of numbering the loco as if she was a brand new build much like the new Clan class loco which will be 72010 Hengist although I haven't thought of a name for my 70056 yet, any suggestions please.
When running light the loco runs well but when coupled to 6 Mainline Mk1 coaches of which I think only 2 have metal wheels there is a lot of wheel spinning in both directions so I think I have a lot more remedial work to do but the idea of possibly build a white metal britannia body is looking like it may be the way to go.
Many thanks for any replies given and if anybody has any name suggestions for my 70056 I will give them some thought.
-
Danby Wiske
- GCR D11 4-4-0 'Improved Director'
- Posts: 413
- Joined: Fri Oct 19, 2012 12:09 am
Re: West End Workbench
How about Richard Beeching?
 I'll get my coat...
-
giner
- LNER A4 4-6-2 'Streak'
- Posts: 1558
- Joined: Wed Feb 27, 2008 5:17 am
- Location: Alberta - ex. Stevenage
Re: West End Workbench
I’d get a bulletproof vest, if I were you. 
-
Hatfield Shed
- LNER A4 4-6-2 'Streak'
- Posts: 1728
- Joined: Fri Dec 23, 2011 3:34 pm
Re: West End Workbench
A very obvious name would be Robert Riddles.
-
Mersey508138
- NBR J36 0-6-0
- Posts: 114
- Joined: Sun Aug 14, 2016 1:22 am
Re: West End Workbench
Very true
-
jwealleans
- LNER A4 4-6-2 'Streak'
- Posts: 4302
- Joined: Wed Oct 25, 2006 8:46 am
Re: West End Workbench
Bit of a hiccup with the B1 build; made up the gearbox, fitted the motor, applied flyleads and absolutely nothing happened. The (brand new) motor was completely dead.
As you'd expect, no dramas at all from High Level and a replacement arrived today. I've fitted that, fettled the coupling rods a little and it has had about half an hour on the rolling road this evening.
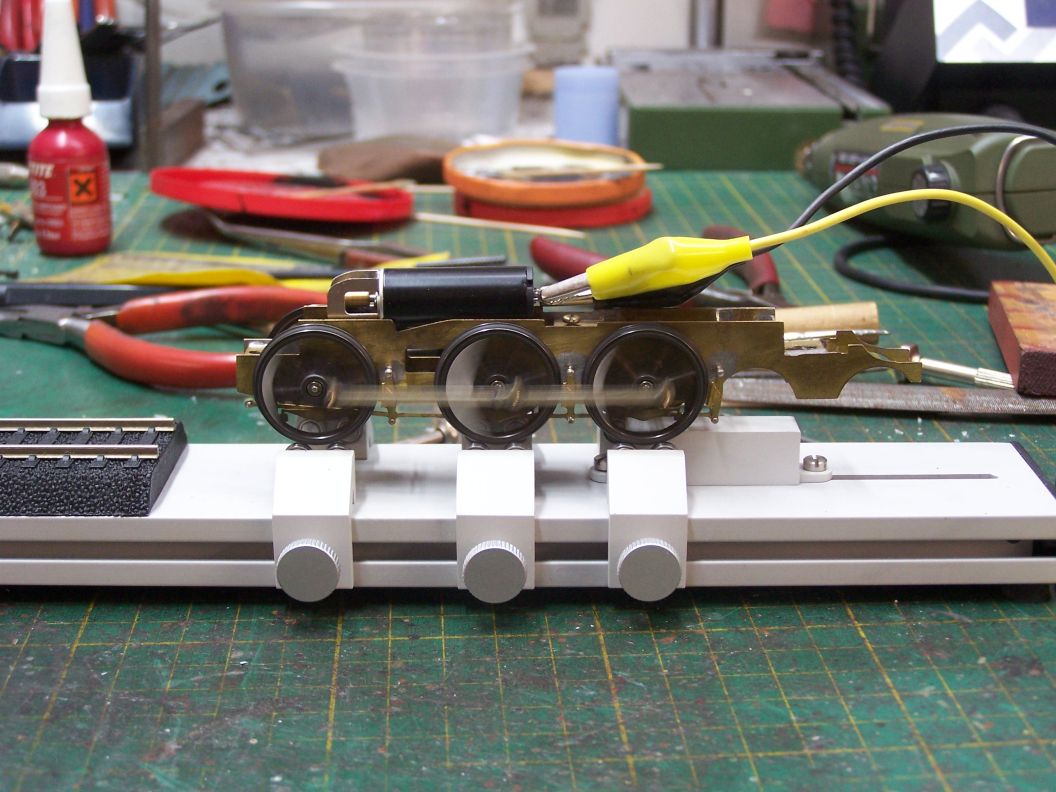
I've been adding pads for pickups and making provision for things like couplings so it hasn't been completely lost time.
I've filled the gap with a few more wagons. I picked up three NER G1s on Ebay for less than a tenner each; incomplete but I had most of the missing bits in stock. When they turned up, it was apparent that whoever made them had done so partly with glue and partly with normal solder and a hot iron. He hadn't always got away with it either:
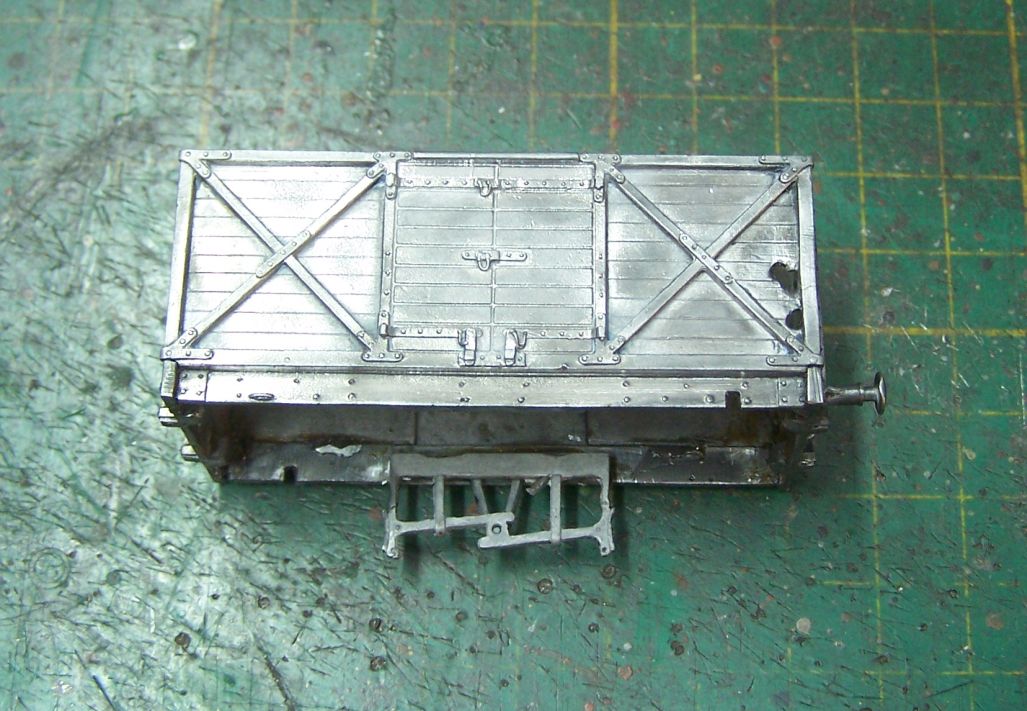
He'd also used something like Fry's flux and not washed it off, so there was brown gunk all over the insides. Nothing too difficult, though and apart from grumbling about getting it all over my hands they've gone back together pretty well. He'd fitted an assortment of axleboxes so I just had to fill in the gaps with matching ones and make up some replacement brake gear.
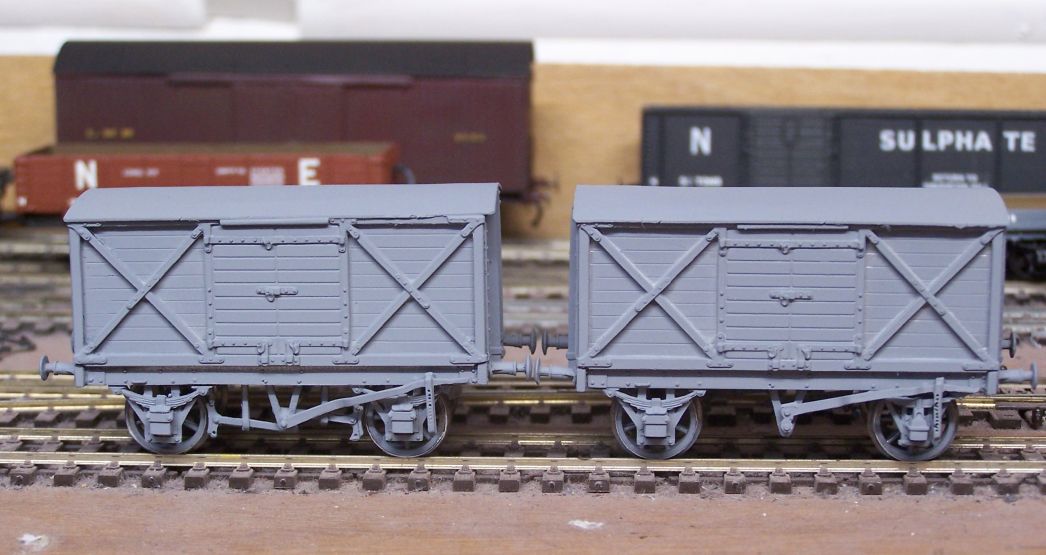
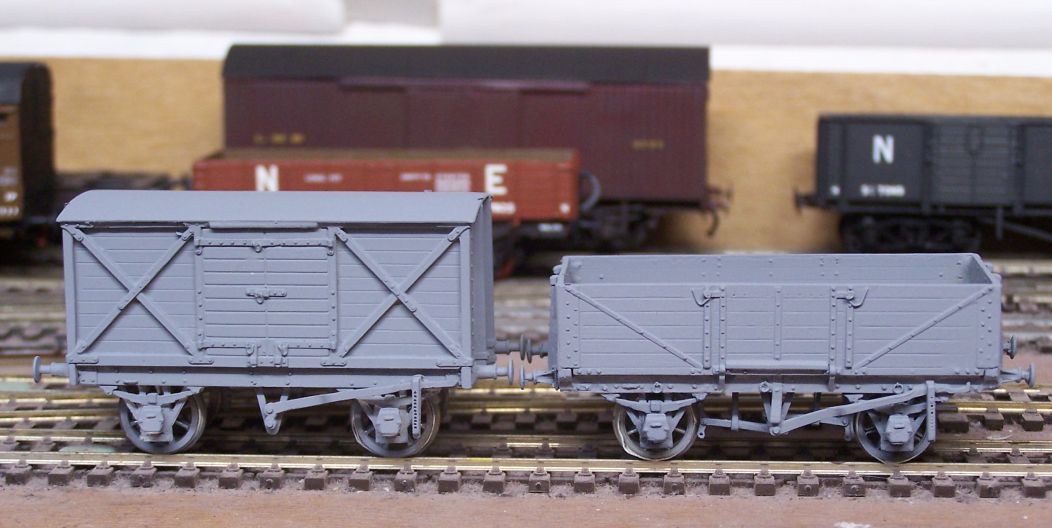
The C10 open is 51L and that was among the collection of the late Caroline of this parish. It was also incomplete so I've replaced the lost parts and soldered it together (it had been glued).
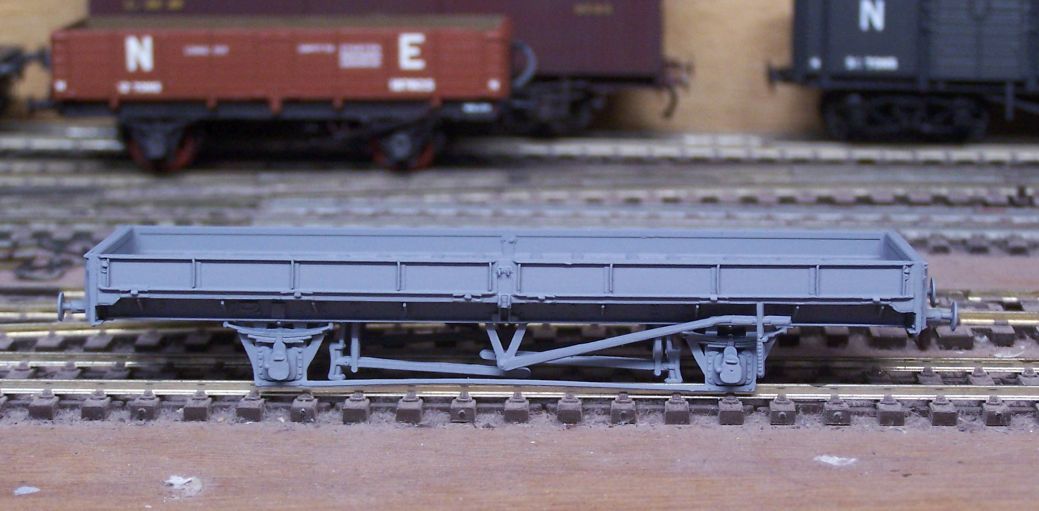
Parkside Plate - was complete, no wheels, just needed the red oxide stripping back and repainting grey.
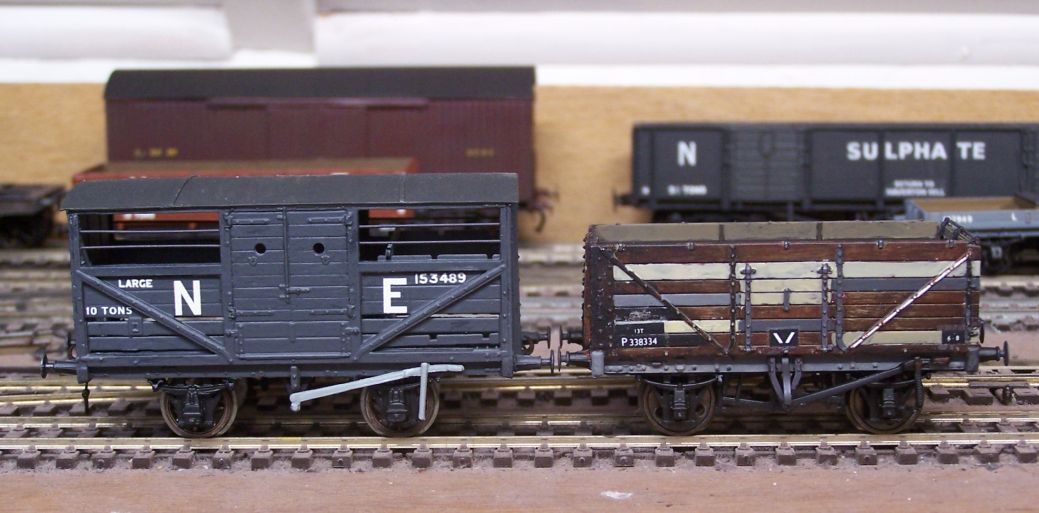
Cattle wagon lettered and the missing brake lever replaced (how many times did I pick it up before I noticed?). The mineral is Slaters.
Finally, just to show the benefits of keeping your eyes open:
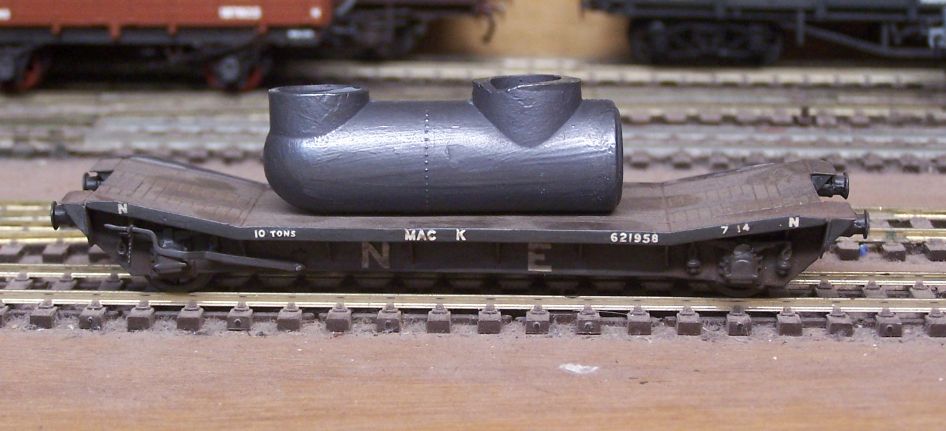
I picked this up out of the mud down the yard at work. It's the top of the water outlet on a ball valve. I looked at it and thought I could probably do something with it. It's been smoothed off, a few Archer rivets added and a coat of Metalcote 27004. I'm making up two planked discs to cover the holes, then with a bit of timber packing underneath and some chains it'll make what I think will be an interesting load.
As you'd expect, no dramas at all from High Level and a replacement arrived today. I've fitted that, fettled the coupling rods a little and it has had about half an hour on the rolling road this evening.

I've been adding pads for pickups and making provision for things like couplings so it hasn't been completely lost time.
I've filled the gap with a few more wagons. I picked up three NER G1s on Ebay for less than a tenner each; incomplete but I had most of the missing bits in stock. When they turned up, it was apparent that whoever made them had done so partly with glue and partly with normal solder and a hot iron. He hadn't always got away with it either:

He'd also used something like Fry's flux and not washed it off, so there was brown gunk all over the insides. Nothing too difficult, though and apart from grumbling about getting it all over my hands they've gone back together pretty well. He'd fitted an assortment of axleboxes so I just had to fill in the gaps with matching ones and make up some replacement brake gear.


The C10 open is 51L and that was among the collection of the late Caroline of this parish. It was also incomplete so I've replaced the lost parts and soldered it together (it had been glued).

Parkside Plate - was complete, no wheels, just needed the red oxide stripping back and repainting grey.

Cattle wagon lettered and the missing brake lever replaced (how many times did I pick it up before I noticed?). The mineral is Slaters.
Finally, just to show the benefits of keeping your eyes open:

I picked this up out of the mud down the yard at work. It's the top of the water outlet on a ball valve. I looked at it and thought I could probably do something with it. It's been smoothed off, a few Archer rivets added and a coat of Metalcote 27004. I'm making up two planked discs to cover the holes, then with a bit of timber packing underneath and some chains it'll make what I think will be an interesting load.
-
jwealleans
- LNER A4 4-6-2 'Streak'
- Posts: 4302
- Joined: Wed Oct 25, 2006 8:46 am
Re: West End Workbench
As we're only a week away, just a note to say I shall be demonstrating weathering at Thirsk Show next Sunday in the Town Hall.
I'm told I've been moved out of the upstairs room (presumably at the request of the other demonstrators) and placed on the landing next to the tea urn.
Details here. Always a quality show and in aid of a good cause.
I'm told I've been moved out of the upstairs room (presumably at the request of the other demonstrators) and placed on the landing next to the tea urn.
Details here. Always a quality show and in aid of a good cause.
-
jwealleans
- LNER A4 4-6-2 'Streak'
- Posts: 4302
- Joined: Wed Oct 25, 2006 8:46 am
Re: West End Workbench
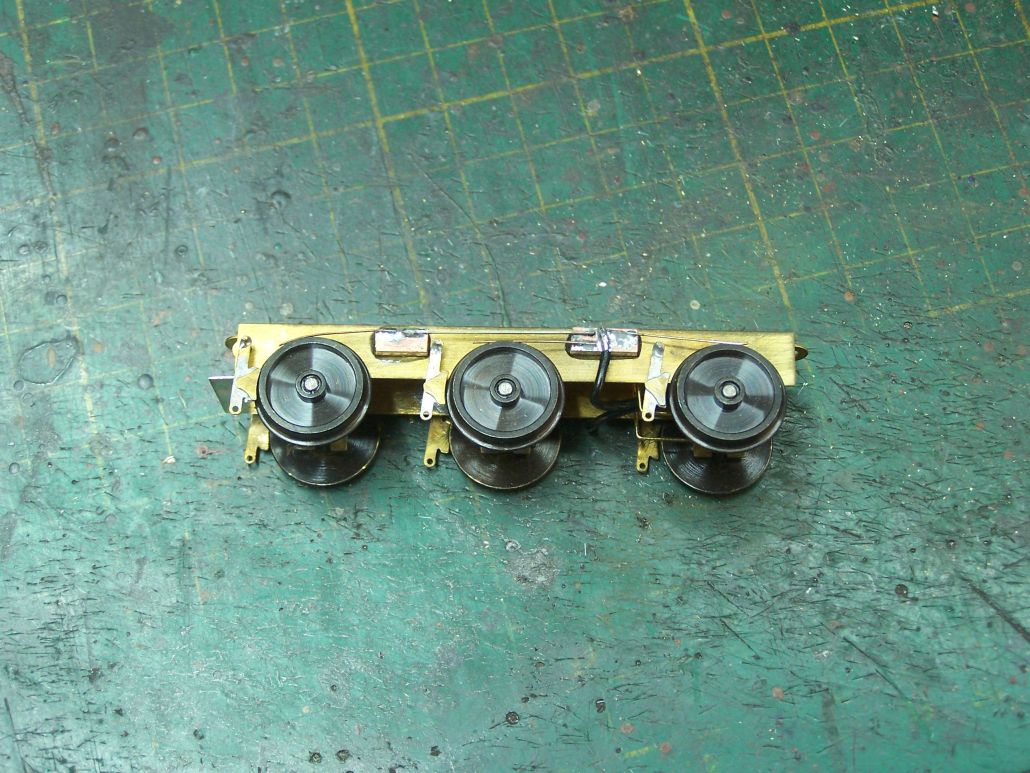
Workbench progress will probably halt for a little while as I get my demo material ready. I've been concentrating on running in the B1 chassis and adding pickups. On the loco this is hampered by the springs, so I've gone for little curly ones rather than my usual long springy ones.
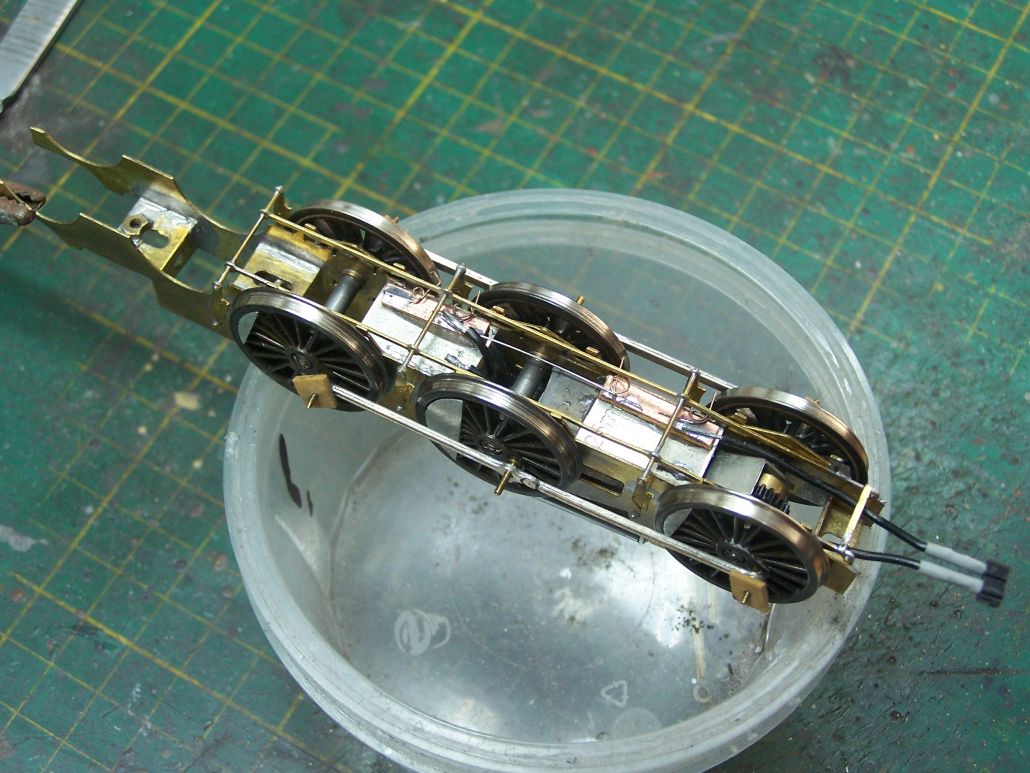
I don't think I'd build a tender loco without tender pickups now and the Comet tender underframe allows room to put them on top of the wheels, nicely out of the way.
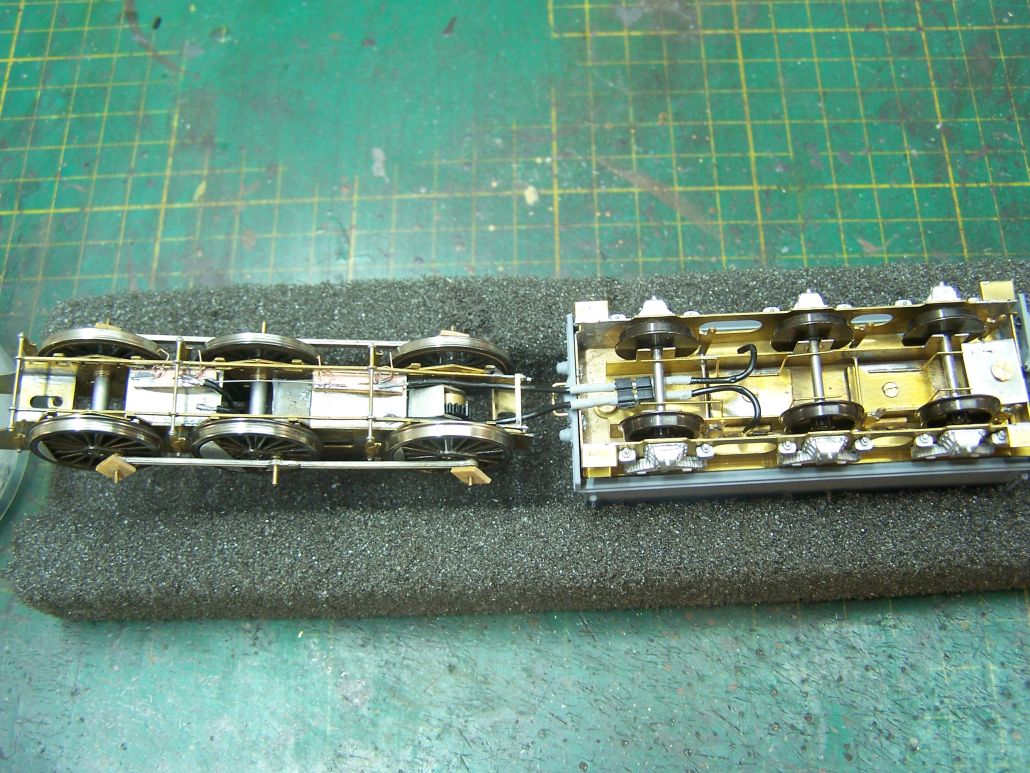
The whole thing connected by my usual Peter's Spares plug arrangement which regular readers will be very familiar with. This bizarre looking ensemble ran up and down my layout two or three times this evening - enough of a test before it's dismantled for painting. I've added an unprototypical bar across the back of the brake rigging to hold the plug up clear of trackwork
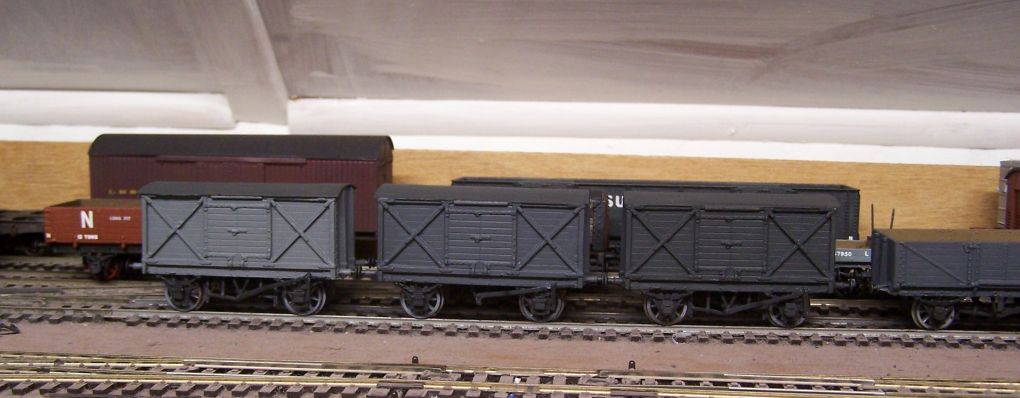
I haven't neglected the wagons: 3 G1s and a C10 now painted and ready for lettering.

I don't think I'd build a tender loco without tender pickups now and the Comet tender underframe allows room to put them on top of the wheels, nicely out of the way.

The whole thing connected by my usual Peter's Spares plug arrangement which regular readers will be very familiar with. This bizarre looking ensemble ran up and down my layout two or three times this evening - enough of a test before it's dismantled for painting. I've added an unprototypical bar across the back of the brake rigging to hold the plug up clear of trackwork

I haven't neglected the wagons: 3 G1s and a C10 now painted and ready for lettering.

-
jwealleans
- LNER A4 4-6-2 'Streak'
- Posts: 4302
- Joined: Wed Oct 25, 2006 8:46 am
Re: West End Workbench
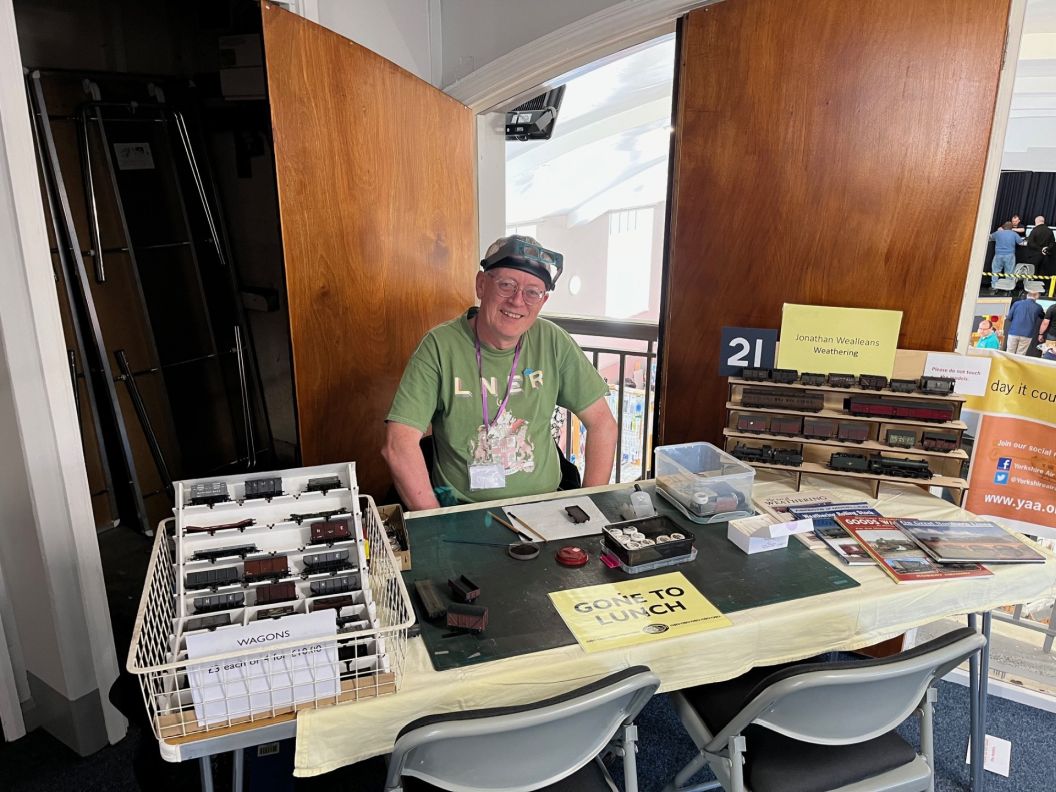
Thank you to everyone who came along to support the Thirsk show and took the time to say hello. My demonstration attracted some interest and we sold a great many of Caroline's wagons (and a couple of mine accidentally).
In among that the B1 was dismantled and painted and I'm now erecting the frames again for what I hope is the final time. Having got it back to the running chassis it was before, I'm now adding the valve gear one bit at a time, testing as I go.
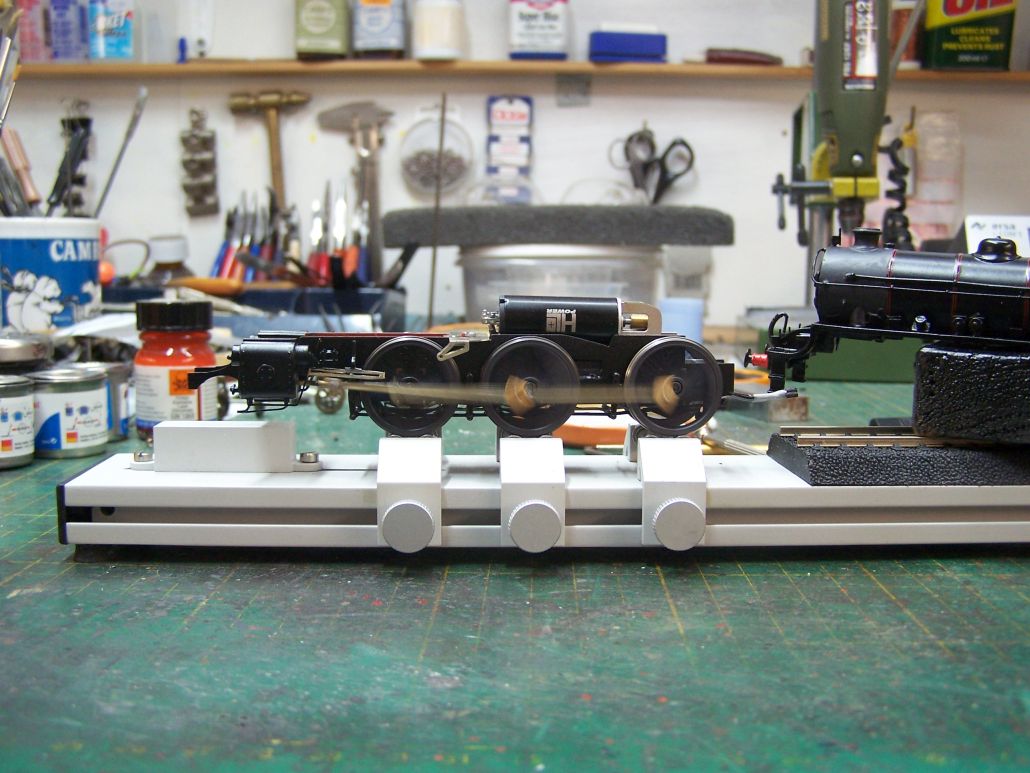
I hit a problem I haven't come across before this morning, not being a habitual user of the Romford deluxe crankpin (the threaded one). I set the chassis running on the rolling road and after a short time it slowed down then locked up. Eventually I worked out that the rear nearside crankpin nut was tightening itself up and jamming the coupling rod. Here i've taken it off and replaced with my usual piece of elastic band and it's run freely for as long as I was there watching it. I'm a bit loath to replace the crankpin now the chassis runs freely, so I may just solder it in place and see if that solves it. I'd Loctited the front ones so they didn't have the same problem but they'll be soldered anyway.
The body was also painted and I've applied the Fox Transfers lining pack. i don't like them but they are the best around at the moment.
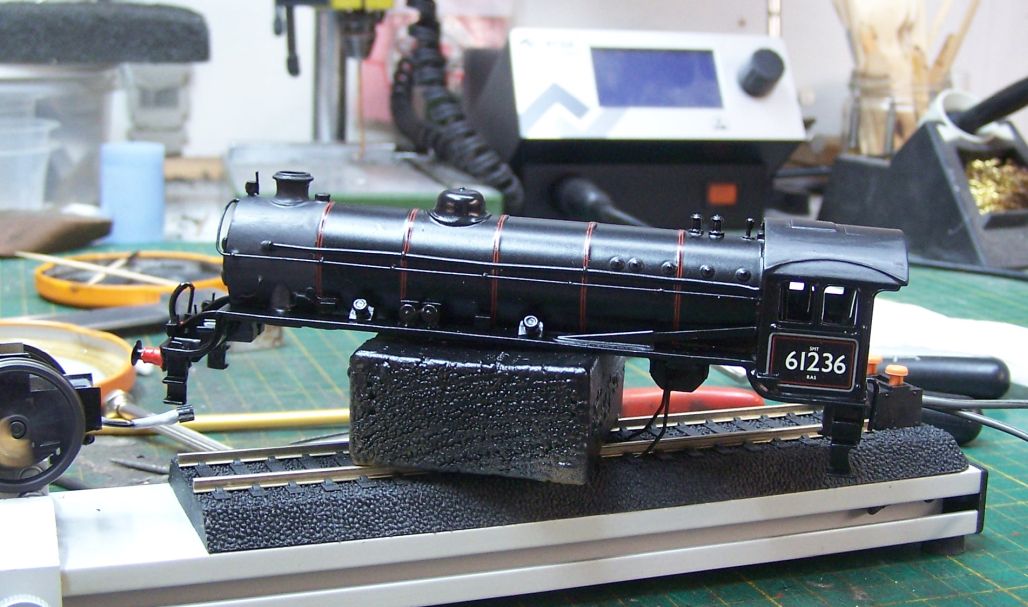
Bit of a gotcha here - the cab lining comes with a number already laid out (61018). I didn't want that one, so I took off the last three numbers before I applied it to the cabside. My number (61236) is wider, so adding it has left it off centre, but the transfer is so fragile I daren't try to cut out the two which are part of it and try again. There's also not enough material under the running plate to get the valance lining transfer on, so I'll put the light grey line on by hand as it's the most visible part.

In among that the B1 was dismantled and painted and I'm now erecting the frames again for what I hope is the final time. Having got it back to the running chassis it was before, I'm now adding the valve gear one bit at a time, testing as I go.

I hit a problem I haven't come across before this morning, not being a habitual user of the Romford deluxe crankpin (the threaded one). I set the chassis running on the rolling road and after a short time it slowed down then locked up. Eventually I worked out that the rear nearside crankpin nut was tightening itself up and jamming the coupling rod. Here i've taken it off and replaced with my usual piece of elastic band and it's run freely for as long as I was there watching it. I'm a bit loath to replace the crankpin now the chassis runs freely, so I may just solder it in place and see if that solves it. I'd Loctited the front ones so they didn't have the same problem but they'll be soldered anyway.
The body was also painted and I've applied the Fox Transfers lining pack. i don't like them but they are the best around at the moment.

Bit of a gotcha here - the cab lining comes with a number already laid out (61018). I didn't want that one, so I took off the last three numbers before I applied it to the cabside. My number (61236) is wider, so adding it has left it off centre, but the transfer is so fragile I daren't try to cut out the two which are part of it and try again. There's also not enough material under the running plate to get the valance lining transfer on, so I'll put the light grey line on by hand as it's the most visible part.
-
jwealleans
- LNER A4 4-6-2 'Streak'
- Posts: 4302
- Joined: Wed Oct 25, 2006 8:46 am
Re: West End Workbench
One step forward, one back.... first, the motion. The previous builder had made up subassemblies, so when I came to present it all to the loco I only had four bits to worry about.
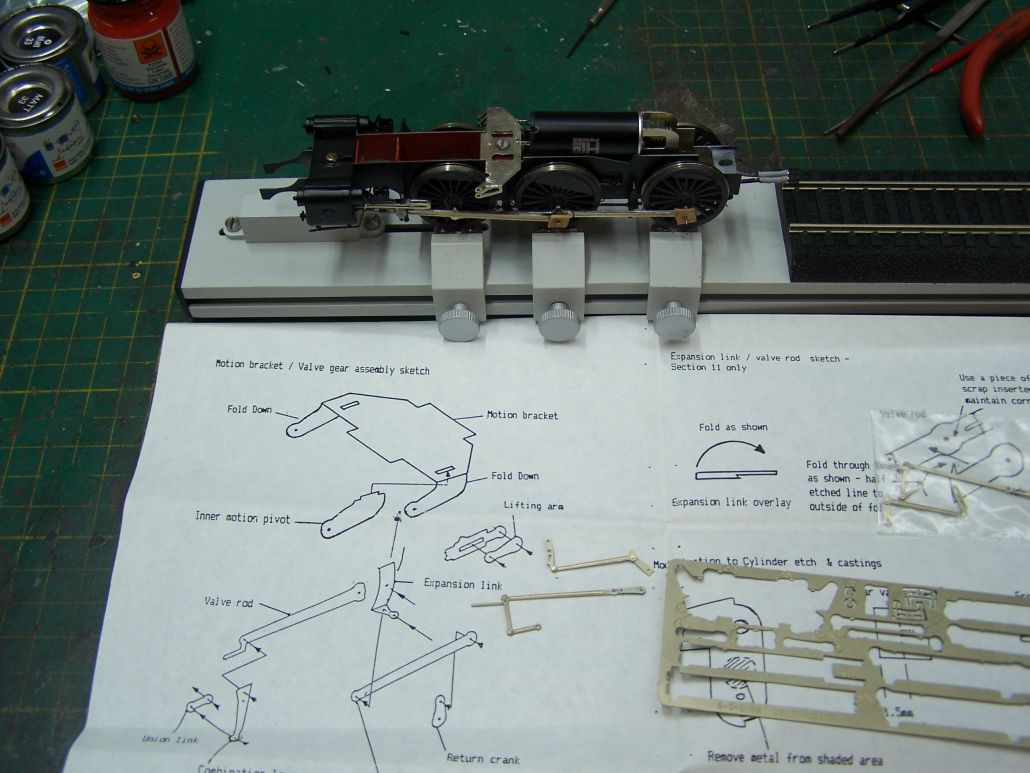
Can't say it wasn't a fiddle - one side just fell together, I had to have three goes at the other - but in the end it's all on and runs freely on the rolling road. We'll get to test running in due course.
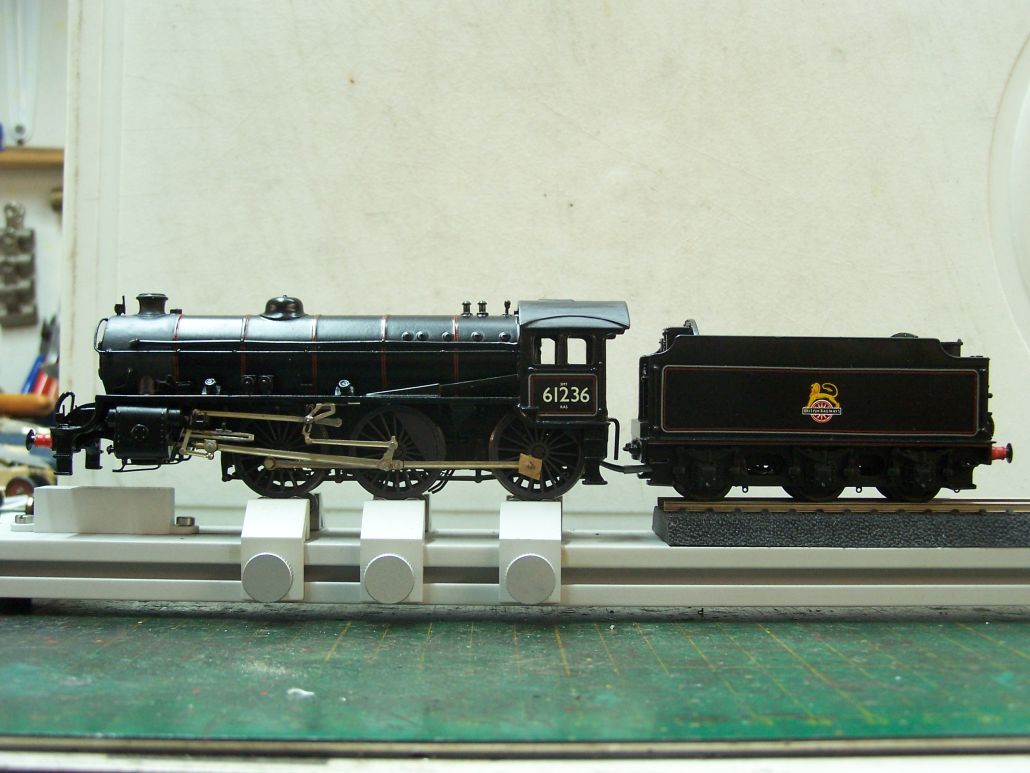
Now a step back... just a couple of minutes after taking that picture, I sprayed loco and tender bodies with Halfords lacquer - the same I use on everything - whereupon the cabside transfer wrinkled irretrievably all over the surface and the tender lining did the same. The boiler lining was unaffected, yet it all came off the same sheet. The air was blue.
I'll strip the tender but on the loco I've just scraped the cabside clean and smooth and I'll only repaint that. No need to redo all the boiler when it's absolutely fine.

Can't say it wasn't a fiddle - one side just fell together, I had to have three goes at the other - but in the end it's all on and runs freely on the rolling road. We'll get to test running in due course.

Now a step back... just a couple of minutes after taking that picture, I sprayed loco and tender bodies with Halfords lacquer - the same I use on everything - whereupon the cabside transfer wrinkled irretrievably all over the surface and the tender lining did the same. The boiler lining was unaffected, yet it all came off the same sheet. The air was blue.
I'll strip the tender but on the loco I've just scraped the cabside clean and smooth and I'll only repaint that. No need to redo all the boiler when it's absolutely fine.
- manna
- LNER A4 4-6-2 'Streak'
- Posts: 3860
- Joined: Sun May 24, 2009 12:56 am
- Location: All over Australia
Re: West End Workbench
G'Day Gents
I bet the air was Blue, pain in the backside when that happens.
manna
I bet the air was Blue, pain in the backside when that happens.
manna
EDGWARE GN, Steam in the Suburbs.
- Atlantic 3279
- LNER A4 4-6-2 'Streak'
- Posts: 6657
- Joined: Fri Jun 26, 2009 9:51 am
- Location: 2850, 245
Re: West End Workbench
Hence, even if it isn't as hard wearing and requires an airbrush, I only use Railmatch varnishes or "big tin" traditional decorators' or polyurethane varnishes over transfers, even when the main paint coats came from Halfords rattle cans. The Halfords paints may be "super-acrylic" but they still smell strongly of what I imagine are fairly powerful solvents. I have been able to use the Halfords sprays fairly adventurously over some base coats of doubtful compatibility by initially applying several mist coats to "seal" the surface, but anything more than a light coat over those mist coats can still cause a reaction. That's not much use if you want a nice wet coat to produce a gloss finish straight from the can. The oils, white spirit, turpentine or whatever in the more traditional paints and varnishes seem to cause less trouble when applied over other materials.
I realised over forty years ago, after trying to spray black car paint over some "universal" brush-on primer, that all claims of universality on paint tins (or anything else) were best totally ignored.
I realised over forty years ago, after trying to spray black car paint over some "universal" brush-on primer, that all claims of universality on paint tins (or anything else) were best totally ignored.
Most subjects, models and techniques covered in this thread are now listed in various categories on page1
Dec. 2018: Almost all images that disappeared from my own thread following loss of free remote hosting are now restored.
Dec. 2018: Almost all images that disappeared from my own thread following loss of free remote hosting are now restored.
-
jwealleans
- LNER A4 4-6-2 'Streak'
- Posts: 4302
- Joined: Wed Oct 25, 2006 8:46 am
Re: West End Workbench
I've indulged in a bit of wagon therapy while stripping and respraying the B1. I fancied making some more minerals: the 1950s stock I have is a bit heavy on the steel wagons and the ratio should be roughly 75% timber to 25% steel for the early part of the 1950s.
First thing I happened on was a lot of 6 Ks 7 planks on Ebay which I scored for just over 3 quid each. I didn't recall that Ks had ever done a 7 plank mineral, but clearly they did. They're both plastic and basic, which was what i expected. They'd been built to EM gauge with what looked like decent wheelsets, so I decided to try to retain what I could.
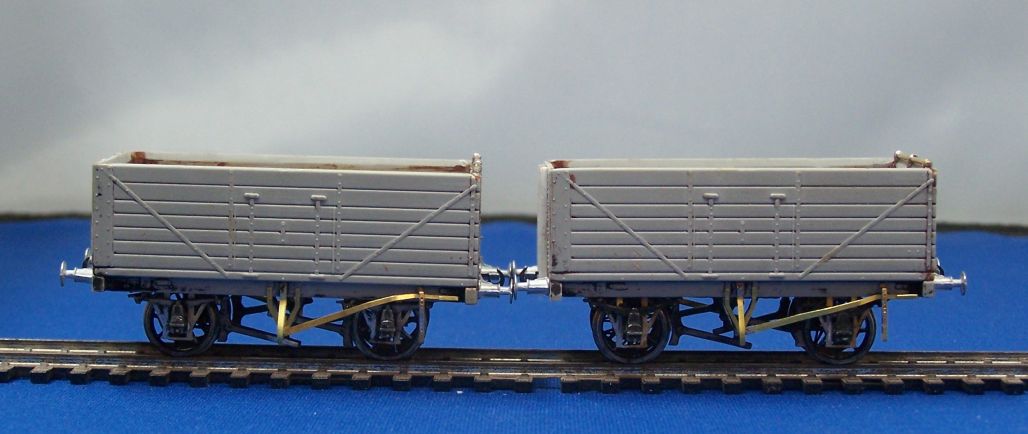
You can see most of what i did here. The wheels are regauged but I tried the original W irons and bearings. The first one didn't roll very well so I replaced the bearings with some more modern Wizard Models ones and that ran a lot better. The originals have a very shallow hole for the pinpoint and seem to grip the axles slightly. Buffers from LMS, brake handles and external V hanger from Wizard, the rest made up from fret and wire.
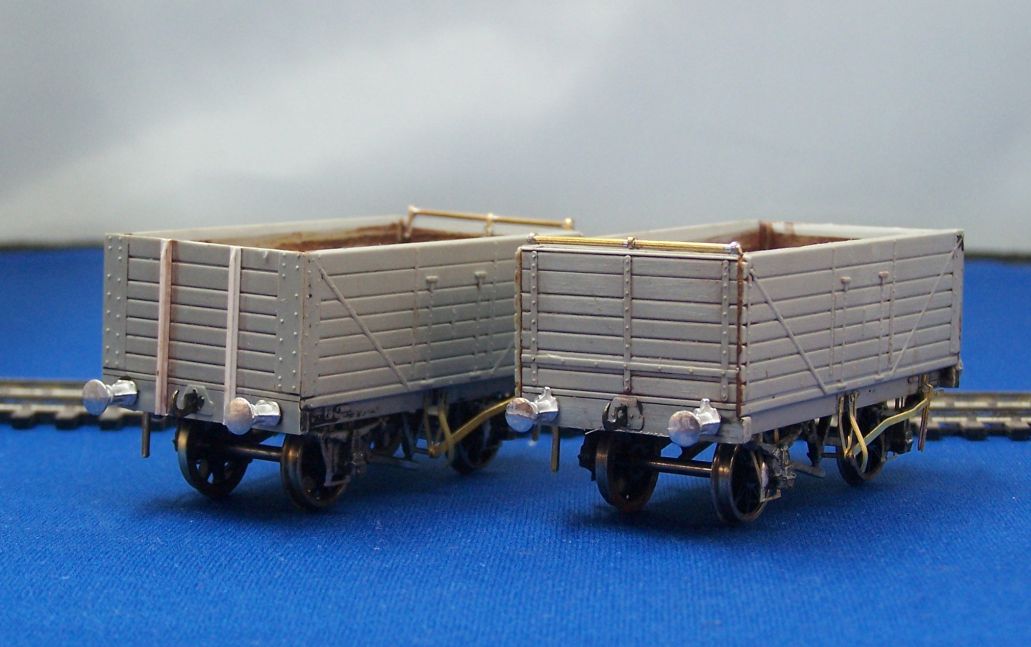
The strapping is a bit insipid, but replacing all that would be a bit much. End stanchions are another matter and I've added my own. The ex-PO on the right has wooden ones, 60 x 40 Evergreen strip filed down at the top to represent the taper. The other one will be an ex-company example, so steel end stanchions from 20 x 10 and 30 x 10 Evergreen. You can also see where I've chamfered the tops of the sides and ends to reduce visibility of the overthick sides.
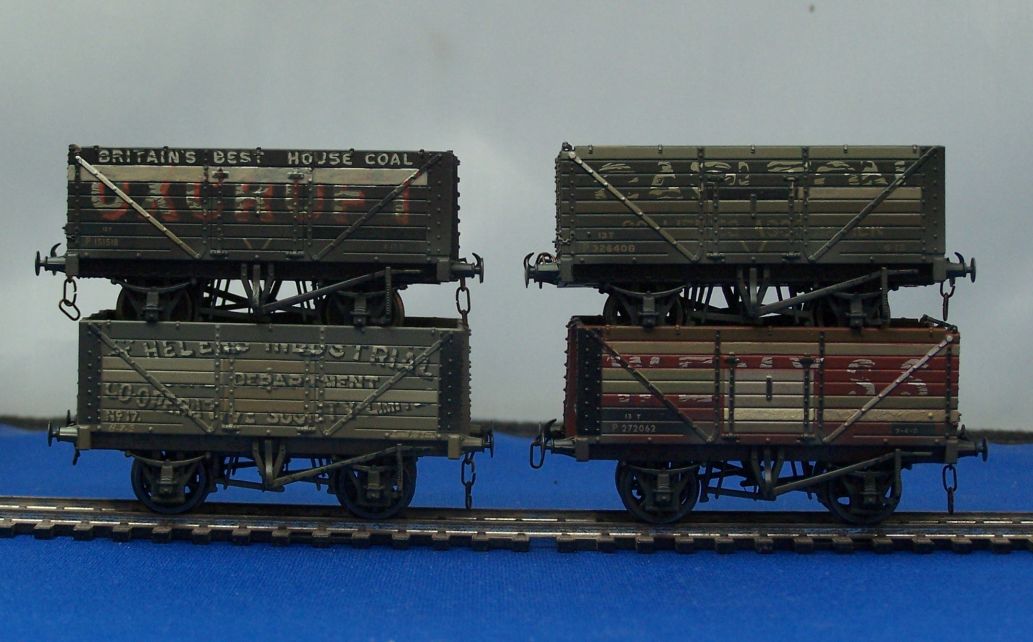
Having embarked on those, I then went to Redcar Show last Sunday afternoon and found that Dave Scott was selling some Bachmann examples which will need a lot less work. These were all factory weathered, but not unsalvageably so, so there's been a bit more distressing of planks and they'll now go to be weathered properly.
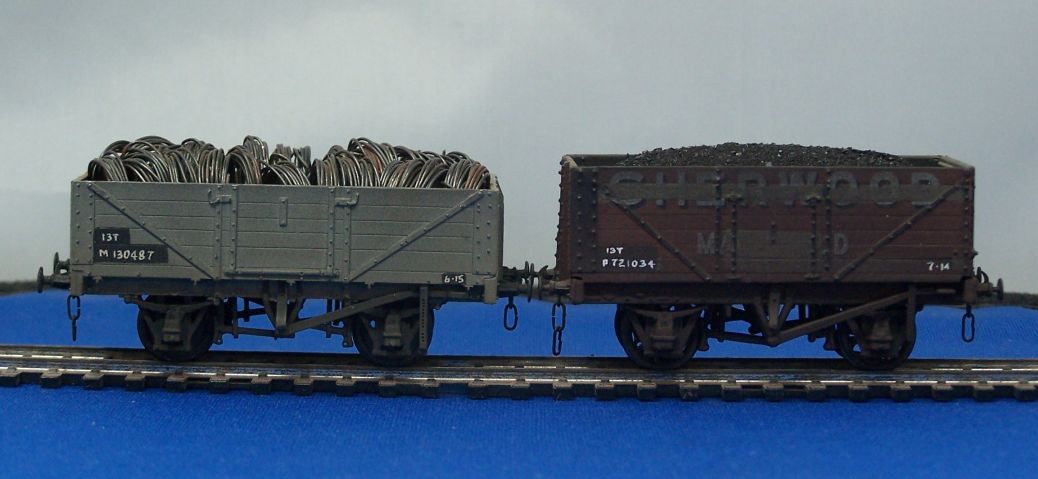
I called on Mr. Nicholas through the week as well and was lucky enough to be able to acquire a couple of wagons by Peter Lawson. These are both excellently built and painted and will drop straight into traffic, though I may weather the 6 plank a little more. That is whitemetal, I think from ABS and the mineral is Slaters.
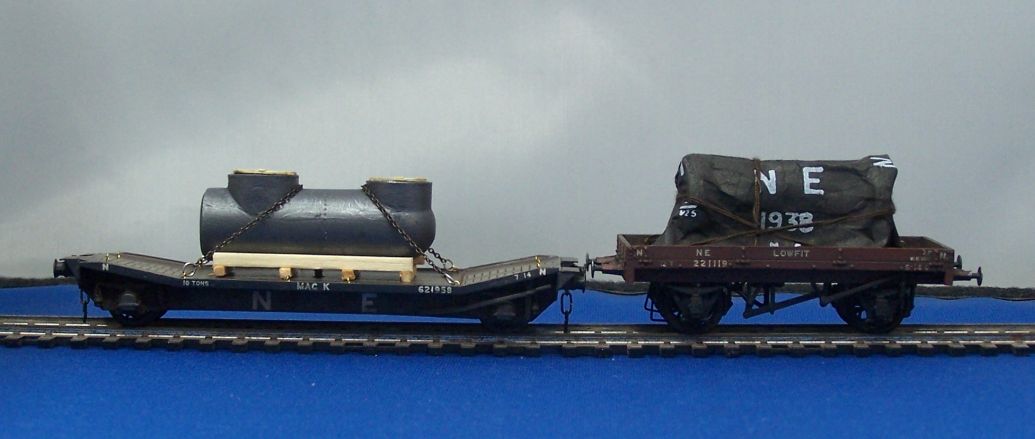
I wrangled a bit of chain this evening; the water valve is now firmly attached to its Lowmac. All this needs to be blackened, but again I've photographed it as is so those who take an interest can see how it's done. The Lowfit was gifted by Rob: I've done nothing to this except weather it. The load is bobbins - quite literally, it's a bobbin the Mrs. had finished with, filled with lead shot, screwed to the wagon, sheeted over and tied down. This will go into the Grantham Scotch Goods for the next show.
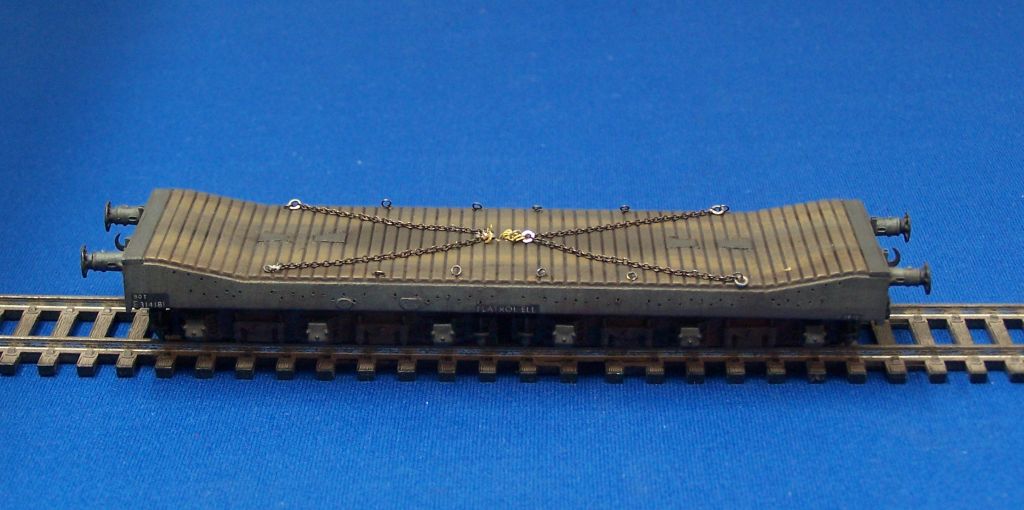
While I was in that sort of mood and had all the gear out, I did the Flatrol ELL as well. One of the drawings I have shows the chains laid out as here and I have a photograph where they're similarly deployed, so that'll do me. It's more interesting than a bare deck.
First thing I happened on was a lot of 6 Ks 7 planks on Ebay which I scored for just over 3 quid each. I didn't recall that Ks had ever done a 7 plank mineral, but clearly they did. They're both plastic and basic, which was what i expected. They'd been built to EM gauge with what looked like decent wheelsets, so I decided to try to retain what I could.

You can see most of what i did here. The wheels are regauged but I tried the original W irons and bearings. The first one didn't roll very well so I replaced the bearings with some more modern Wizard Models ones and that ran a lot better. The originals have a very shallow hole for the pinpoint and seem to grip the axles slightly. Buffers from LMS, brake handles and external V hanger from Wizard, the rest made up from fret and wire.

The strapping is a bit insipid, but replacing all that would be a bit much. End stanchions are another matter and I've added my own. The ex-PO on the right has wooden ones, 60 x 40 Evergreen strip filed down at the top to represent the taper. The other one will be an ex-company example, so steel end stanchions from 20 x 10 and 30 x 10 Evergreen. You can also see where I've chamfered the tops of the sides and ends to reduce visibility of the overthick sides.

Having embarked on those, I then went to Redcar Show last Sunday afternoon and found that Dave Scott was selling some Bachmann examples which will need a lot less work. These were all factory weathered, but not unsalvageably so, so there's been a bit more distressing of planks and they'll now go to be weathered properly.

I called on Mr. Nicholas through the week as well and was lucky enough to be able to acquire a couple of wagons by Peter Lawson. These are both excellently built and painted and will drop straight into traffic, though I may weather the 6 plank a little more. That is whitemetal, I think from ABS and the mineral is Slaters.

I wrangled a bit of chain this evening; the water valve is now firmly attached to its Lowmac. All this needs to be blackened, but again I've photographed it as is so those who take an interest can see how it's done. The Lowfit was gifted by Rob: I've done nothing to this except weather it. The load is bobbins - quite literally, it's a bobbin the Mrs. had finished with, filled with lead shot, screwed to the wagon, sheeted over and tied down. This will go into the Grantham Scotch Goods for the next show.

While I was in that sort of mood and had all the gear out, I did the Flatrol ELL as well. One of the drawings I have shows the chains laid out as here and I have a photograph where they're similarly deployed, so that'll do me. It's more interesting than a bare deck.
-
jwealleans
- LNER A4 4-6-2 'Streak'
- Posts: 4302
- Joined: Wed Oct 25, 2006 8:46 am
Re: West End Workbench
Well, we've had visitors for the Bank Holiday.
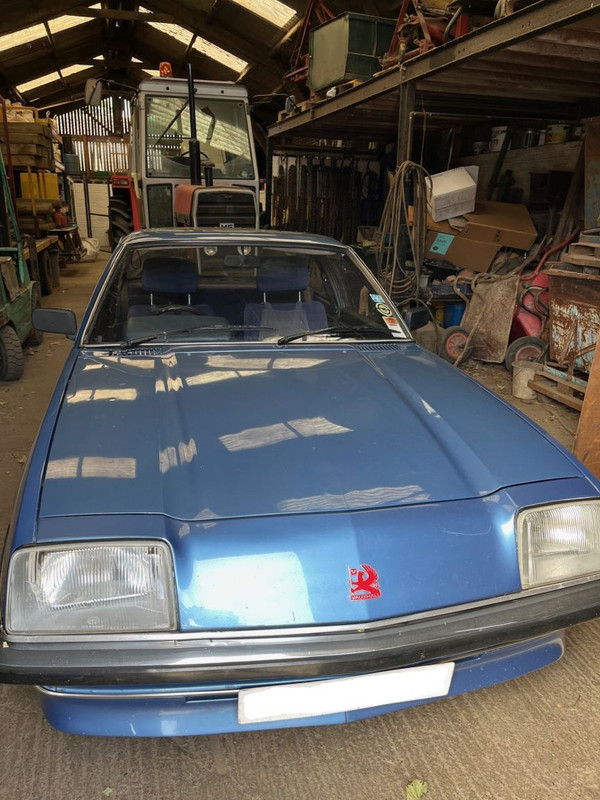
Bringing novelties with them:
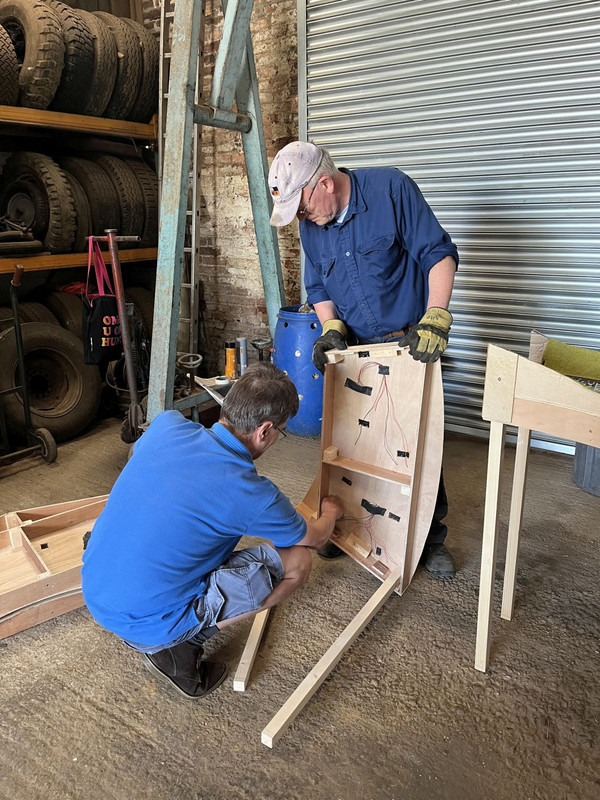
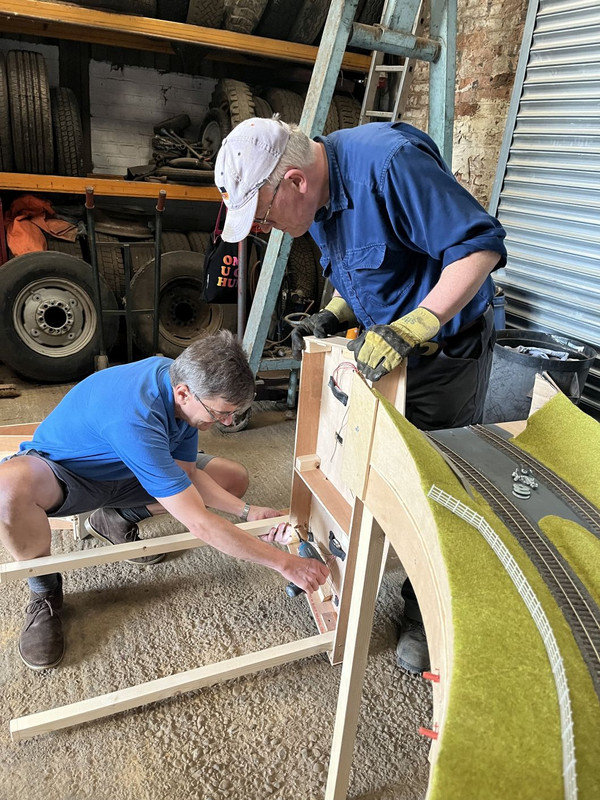
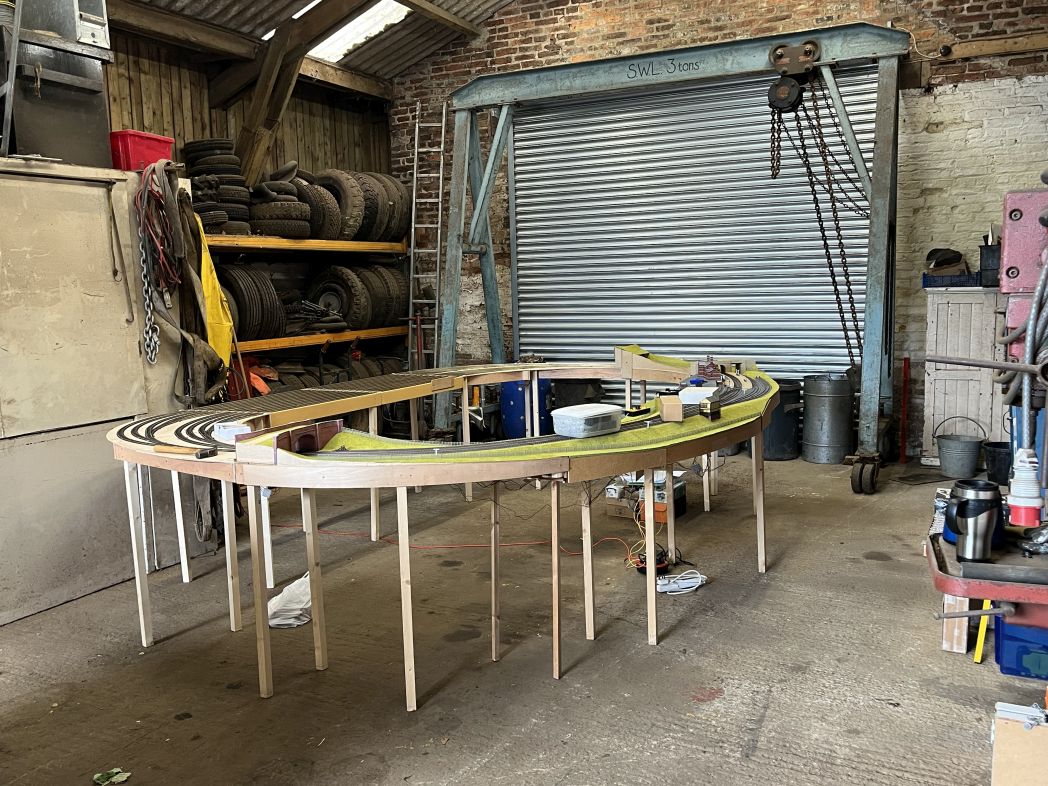
This was a travelling test, to ensure everything needed to erect and operate the layout was included and no hurried late night trips to B & Q or Grimsburg would be needed to ensure completion. That test was passed with flying colours.
After that, it was a case of populating and operating it and working out fiddle yard dispositions, planned moves and the best way to run the thing in an authentic yet entertaining manner. As a bonus, or perhaps a quid pro quo, I got to exercise some recent wagon builds and some which had not yet been seen on a layout anywhere. To further enhance everyone's operating pleasure, Dave of this parish joined us on Saturday with some goodies of his own. So, in no particular order (because I already can't remember the order they were taken in), here are a few teasers for Immingham 2025:
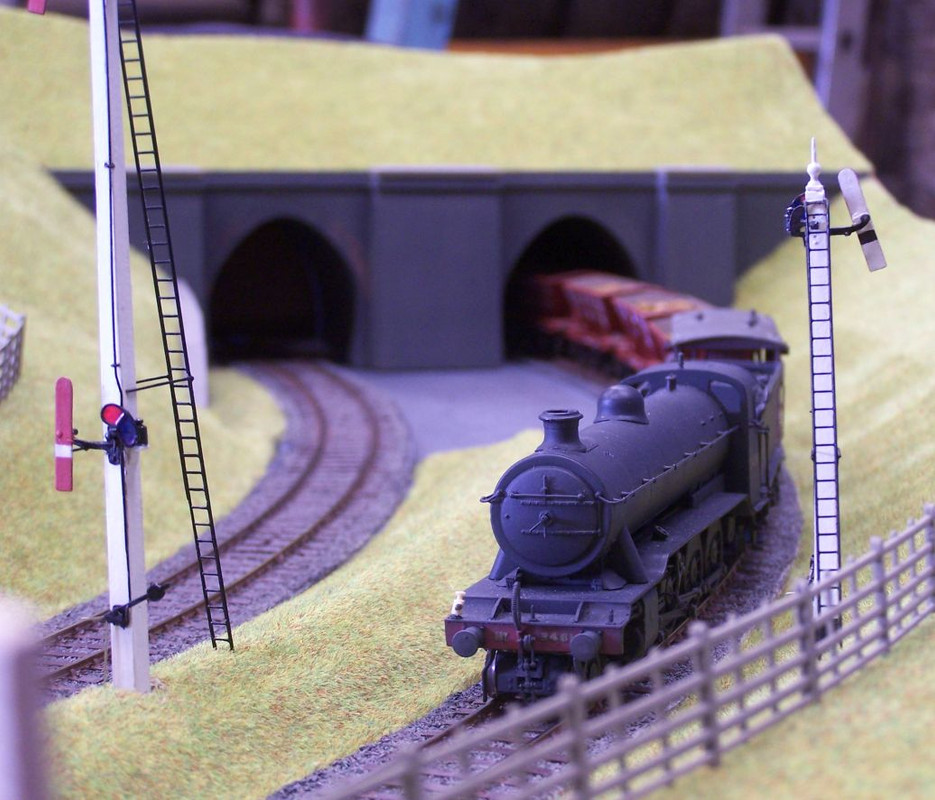
O2 with iron ore heading for Scunthorpe. This started as a through train, but we may have more ambitious plans for it.
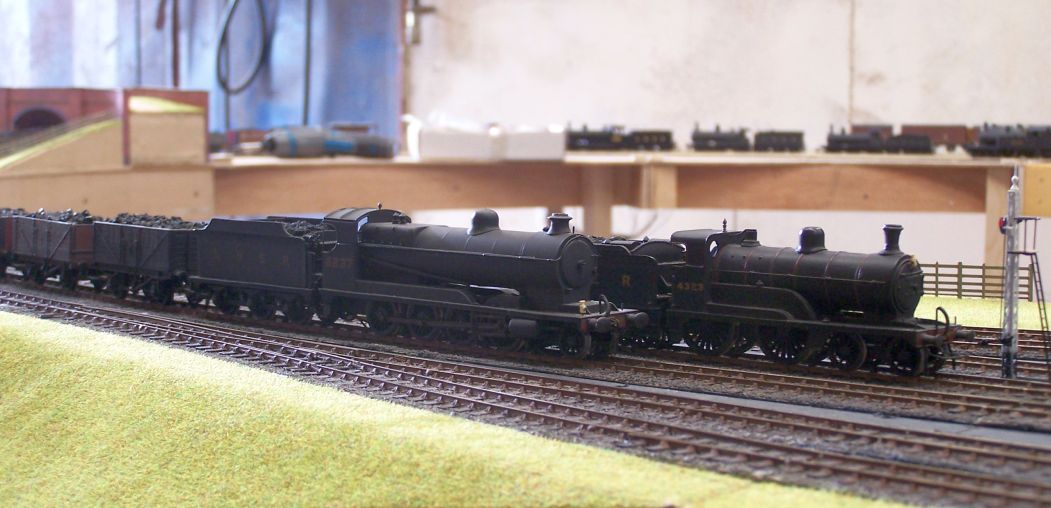
O4 heading Down with the line limit of 21 loaded minerals.
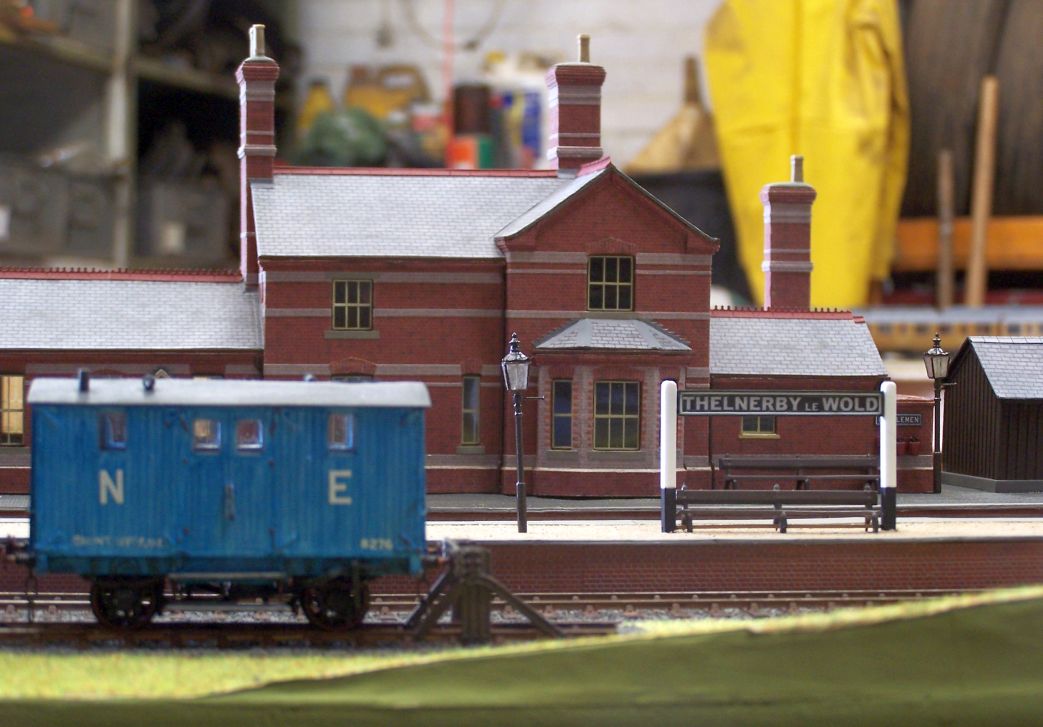
Station building and Mr. Job's Pooley van - just passing through, there's no weighbridge to calibrate as yet.
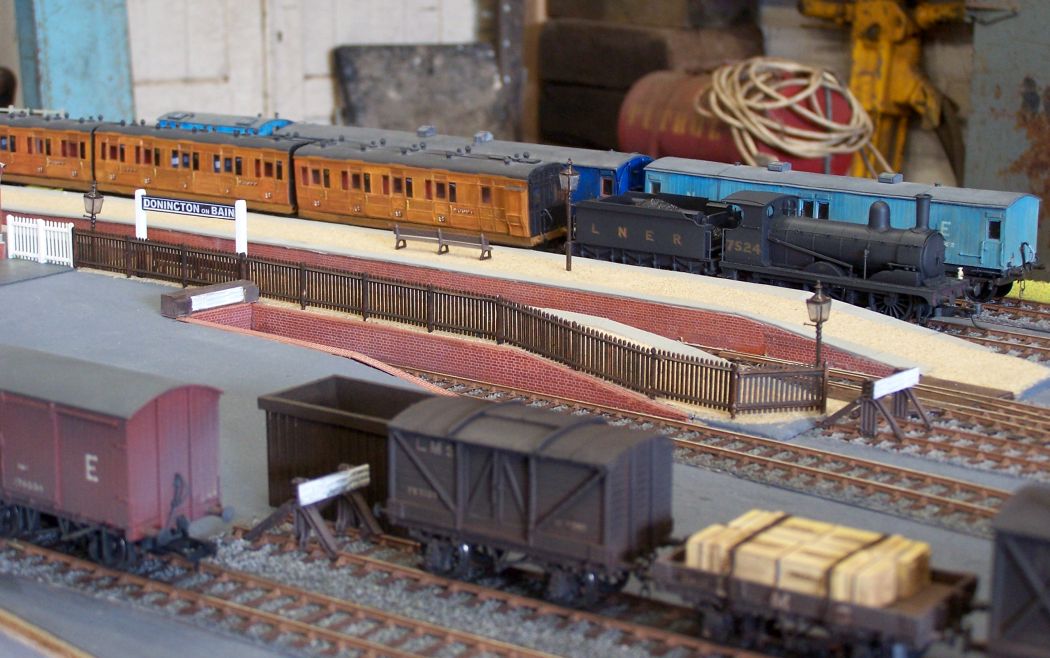
Hornby J15 on a D & S Quad set. After the lengthy saga of the J15's squeal, it didn't perform to par, barely managing this set. I fear a firm talking-to is in store when it returns home. Dave's scratchbuilt stores vans in the background.
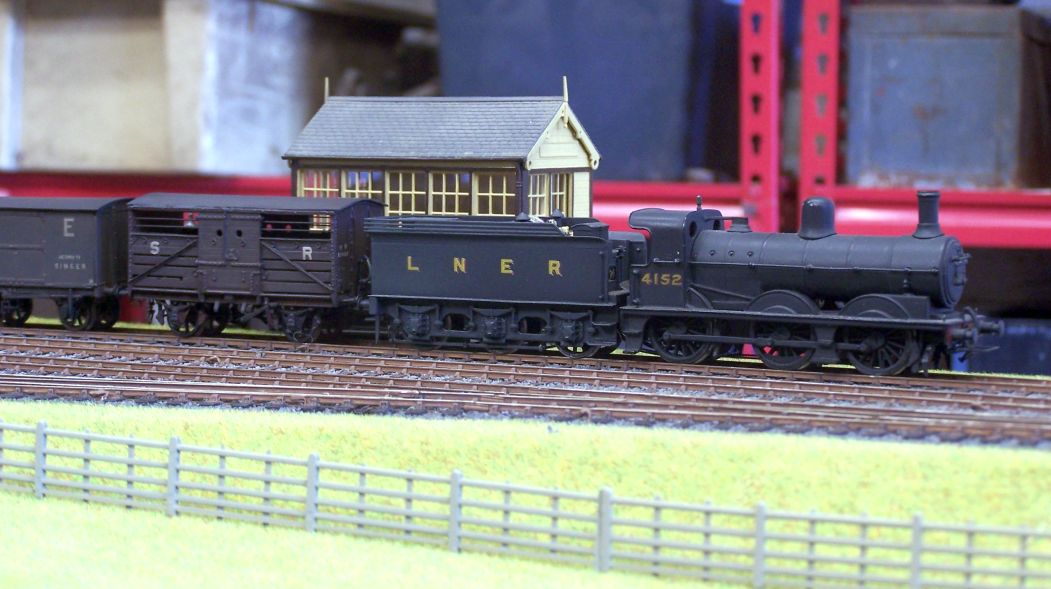
4152, a former Grantham regular by Ks, with a local goods service as we shunted the yards for the first time.
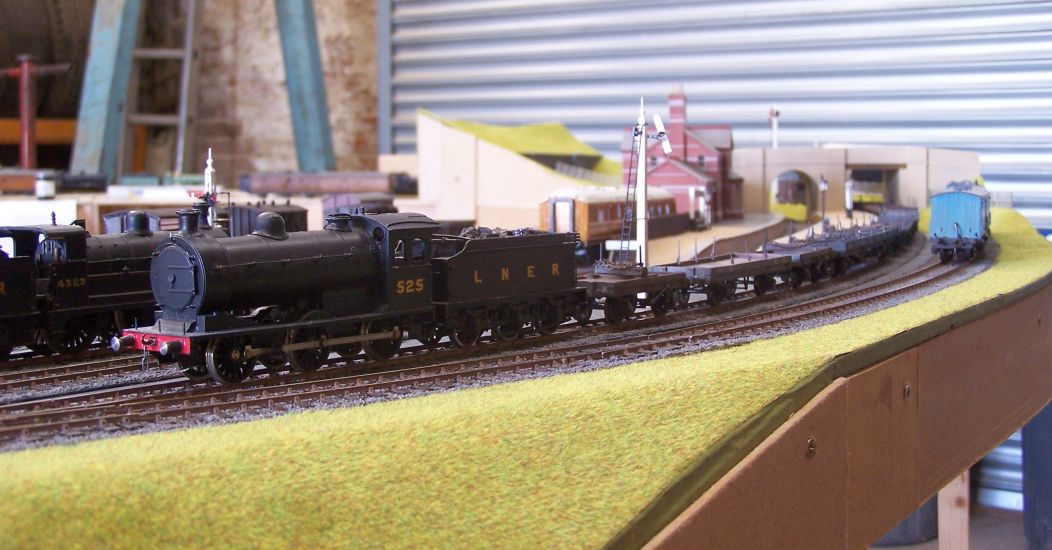
Dave's NuCast J26, 525, (Built by Dave Scott) with a train of empty bolster wagons also heading for Scunthorpe and the steelworks.
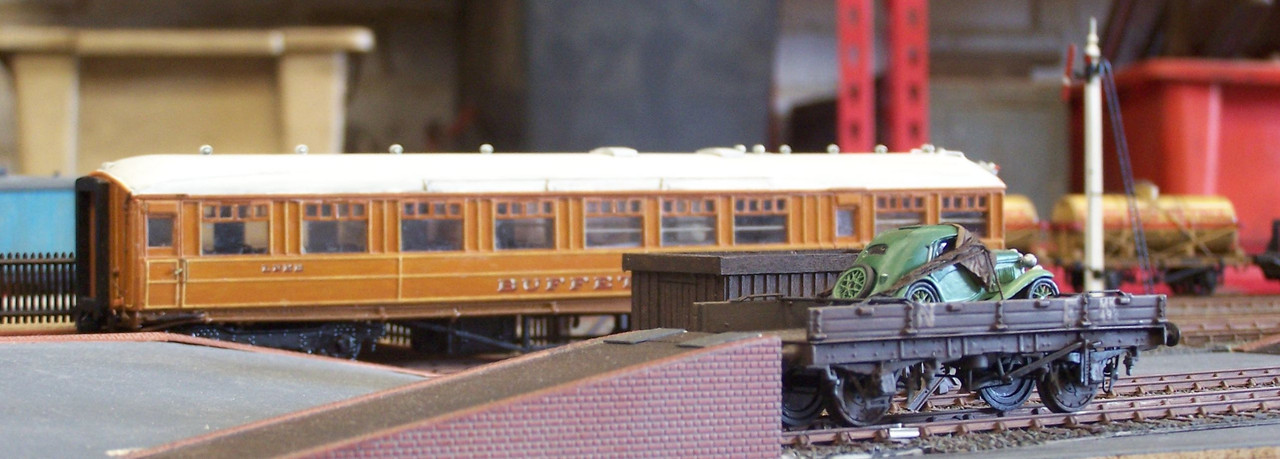
GN OCT at the loading ramp with a vehicle secured for transport. The buffet car behind (also by Dave) must have been knocked out for a hot box or run out of cucumber sandwiches, or something.
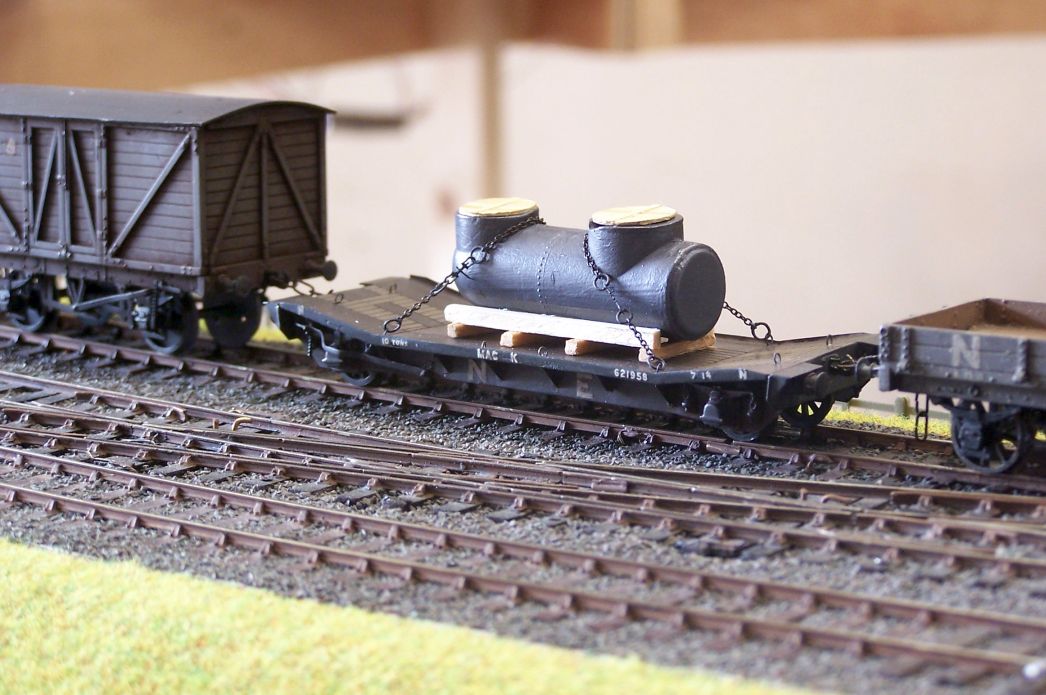
I took the opportunity to run the loaded Lowmac which I finished off very recently.
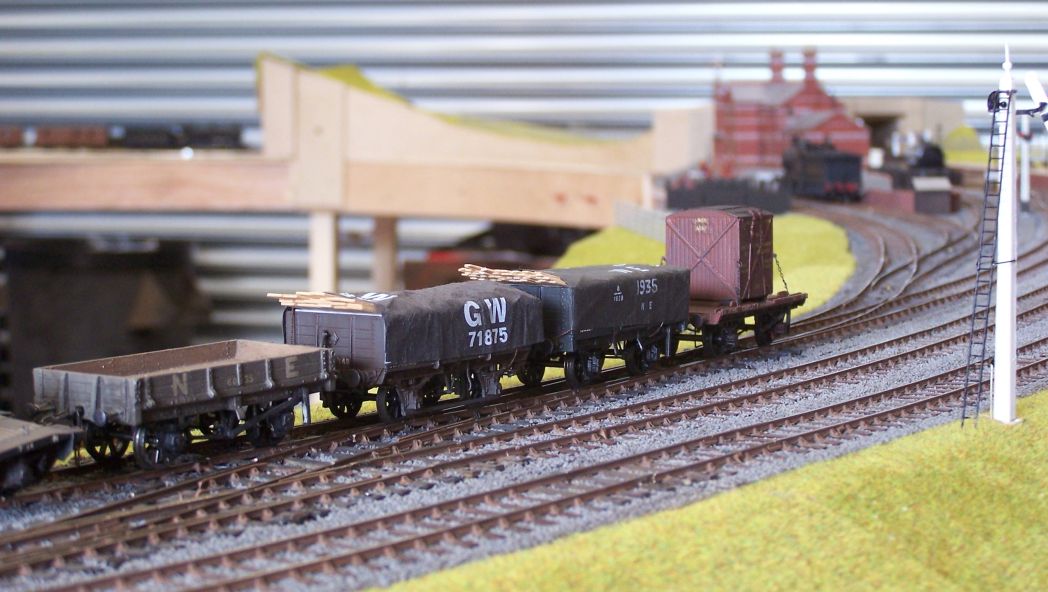
A delivery of timber with runner wagon at this end. Again, I did a set of these to amuse myself some time last year and this is the first time they've gone out to a layout.
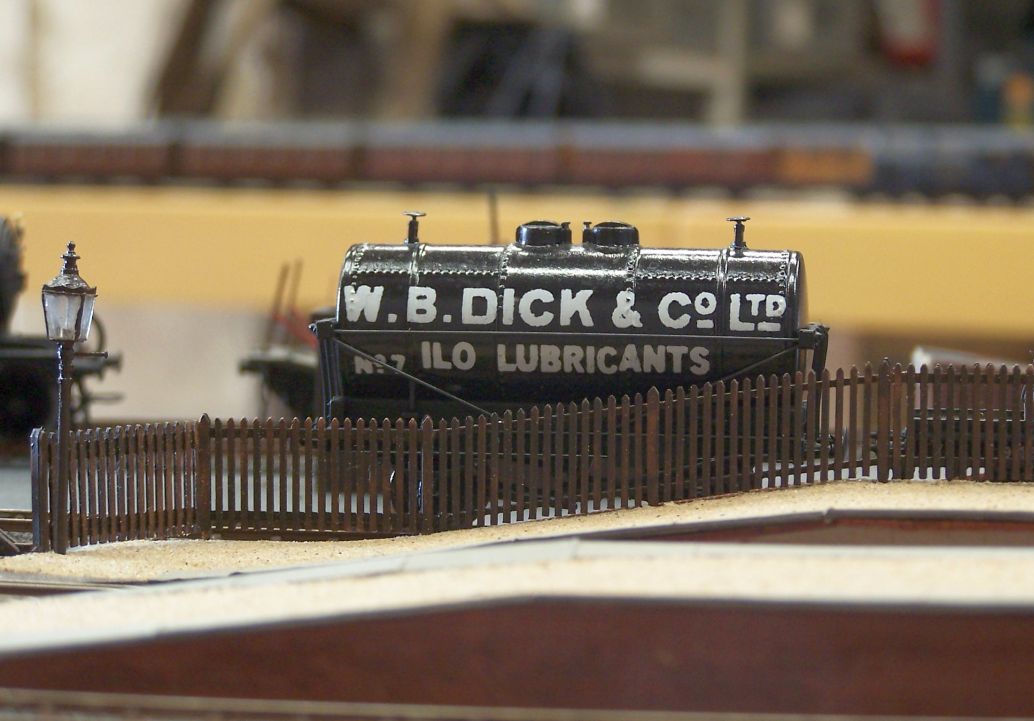
Inevitably, the tone had to be lowered.
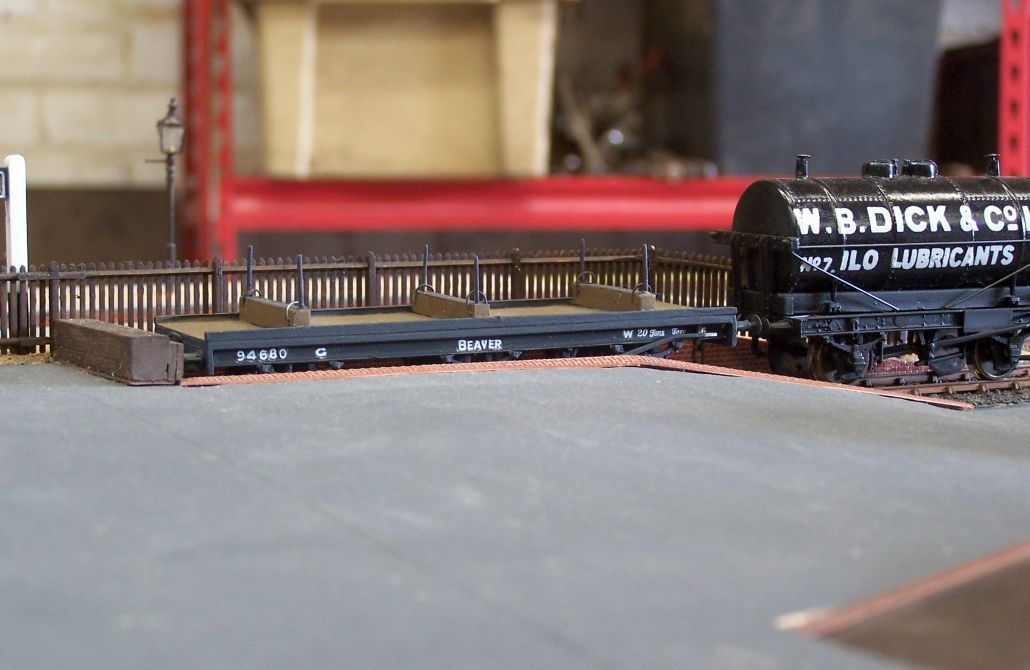
Equally predictably, where there's a Dick....
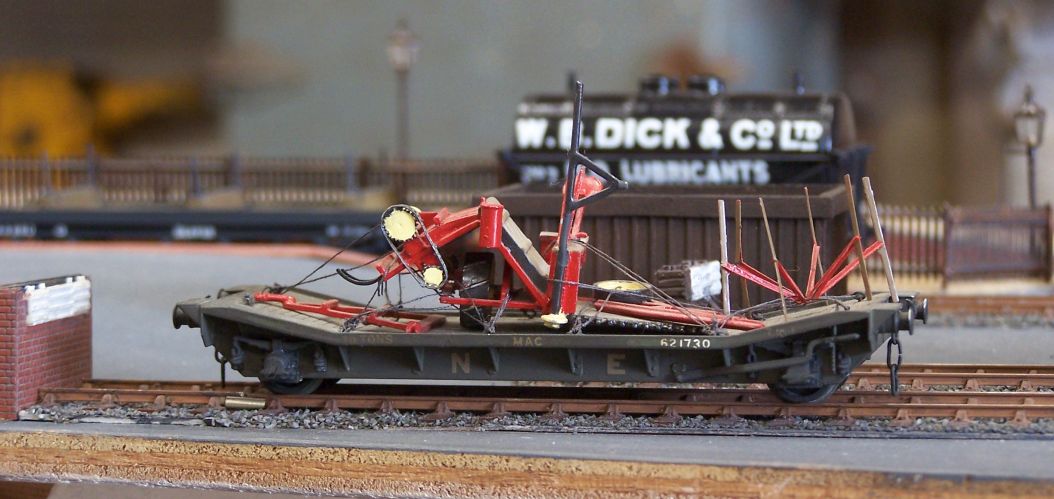
I think the local WI may have bitten off more than they can chew with this knitting machine they've ordered.....
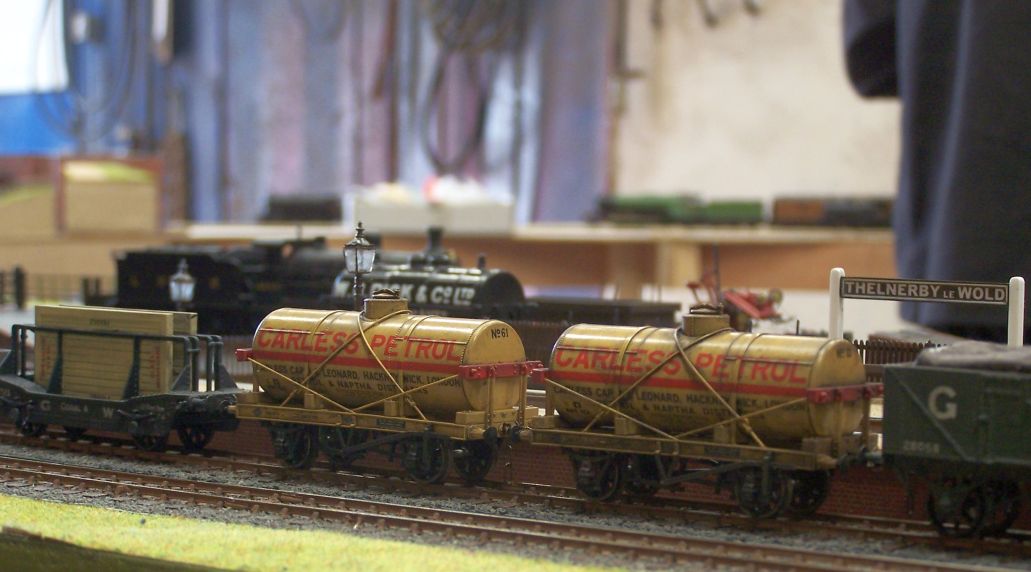
A pair of Oxford Rail tankers. I quite like these, I have to say.
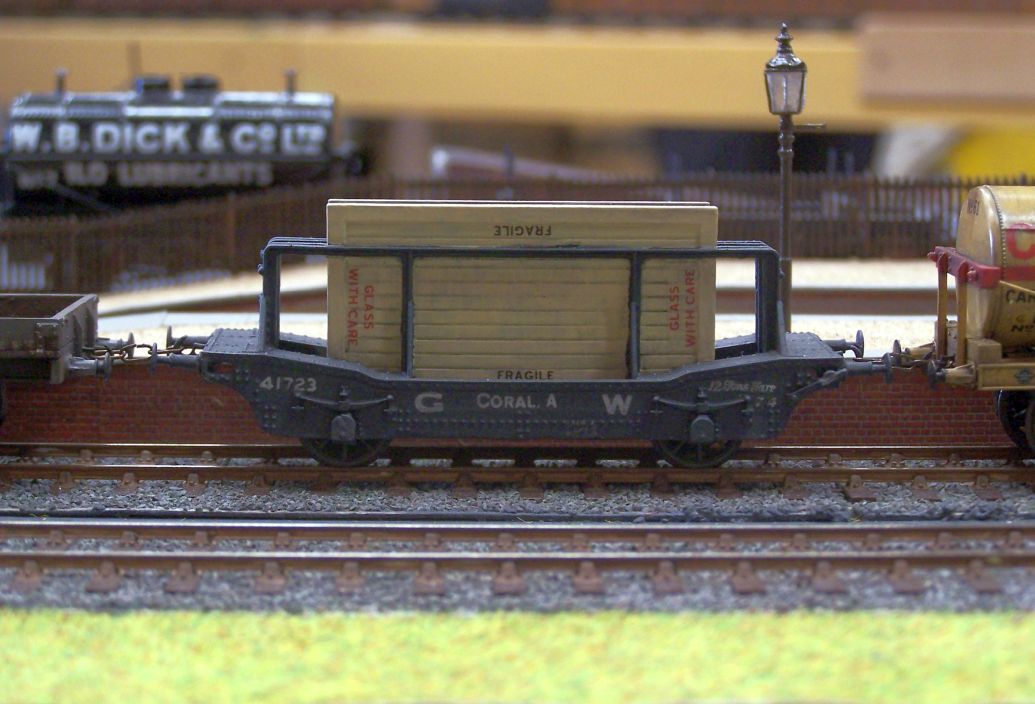
247 Developments Coral glass wagon. I think this was the first chance I've had to run this away from home.
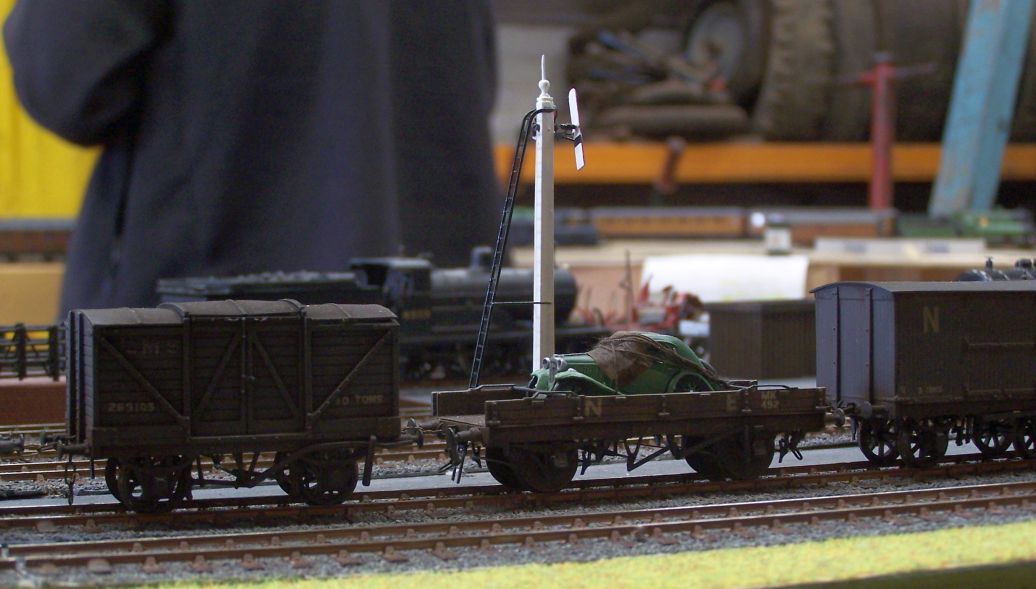
OCT collected and on its way to who knows where.
All things being equal you can see Thelnerby in the flesh, so to speak, at Immingham Model Railway show next May.

Bringing novelties with them:


This was a travelling test, to ensure everything needed to erect and operate the layout was included and no hurried late night trips to B & Q or Grimsburg would be needed to ensure completion. That test was passed with flying colours.
After that, it was a case of populating and operating it and working out fiddle yard dispositions, planned moves and the best way to run the thing in an authentic yet entertaining manner. As a bonus, or perhaps a quid pro quo, I got to exercise some recent wagon builds and some which had not yet been seen on a layout anywhere. To further enhance everyone's operating pleasure, Dave of this parish joined us on Saturday with some goodies of his own. So, in no particular order (because I already can't remember the order they were taken in), here are a few teasers for Immingham 2025:

O2 with iron ore heading for Scunthorpe. This started as a through train, but we may have more ambitious plans for it.

O4 heading Down with the line limit of 21 loaded minerals.

Station building and Mr. Job's Pooley van - just passing through, there's no weighbridge to calibrate as yet.

Hornby J15 on a D & S Quad set. After the lengthy saga of the J15's squeal, it didn't perform to par, barely managing this set. I fear a firm talking-to is in store when it returns home. Dave's scratchbuilt stores vans in the background.

4152, a former Grantham regular by Ks, with a local goods service as we shunted the yards for the first time.

Dave's NuCast J26, 525, (Built by Dave Scott) with a train of empty bolster wagons also heading for Scunthorpe and the steelworks.

GN OCT at the loading ramp with a vehicle secured for transport. The buffet car behind (also by Dave) must have been knocked out for a hot box or run out of cucumber sandwiches, or something.

I took the opportunity to run the loaded Lowmac which I finished off very recently.

A delivery of timber with runner wagon at this end. Again, I did a set of these to amuse myself some time last year and this is the first time they've gone out to a layout.

Inevitably, the tone had to be lowered.

Equally predictably, where there's a Dick....

I think the local WI may have bitten off more than they can chew with this knitting machine they've ordered.....

A pair of Oxford Rail tankers. I quite like these, I have to say.

247 Developments Coral glass wagon. I think this was the first chance I've had to run this away from home.

OCT collected and on its way to who knows where.
All things being equal you can see Thelnerby in the flesh, so to speak, at Immingham Model Railway show next May.
- manna
- LNER A4 4-6-2 'Streak'
- Posts: 3860
- Joined: Sun May 24, 2009 12:56 am
- Location: All over Australia
Re: West End Workbench
G'Day Gents
Well, that's looking fantastic, with lots of interesting rolling stock.

manna
Well, that's looking fantastic, with lots of interesting rolling stock.
manna
EDGWARE GN, Steam in the Suburbs.