I response to a suggestion that my views might be interesting, here are some remarks on the Hornby model, partly recycled from personal messages already exchanged with one or two others. If therefore the "train of thought" jumps around all over the place, please excuse the lack of organisation.
The chassis dismantles in a lovely straightforward way. No daft pick-up plate-on-a-tight-wire that's too short to allow the plate to be moved aside. None of the screws in mine had been factory tightened to breaking point in tight or crossed threads either, and the screw heads were all in good order. Same screws throughout by the look of it too. Somebody in the design and production team has grown a brain! Nice round-topped axle ways and 3mm axles by the look of it (EM rapid conversionist Pete Hill confirms that) and no working valve gear to get all knotted up (especially if the gauge is widened) - save for the return cranks and crossheads which have miles more clearance than you'd ever want for running around realistic curves in OO at any rate.
This may be repetition, but......There's nominally only the screw accessed through the hole in the pony truck that has to be released to take the body off. The front of the chassis should then drop slightly and be drawn forward a little to release the rear mounting lug. Supposedly everything will then be free to descend. Believe me, IT WON'T. The shape of the chassis and body present numerous opportunities for things to snag as the two are shuffled apart. On top of that, the mould feeds inside the body are broken off roughly rather than trimmed off to a neat finish, so these can catch on edges on the chassis. THE BIG ONE TO WATCH OUT FOR IS THE PROBLEM OF THE CONTACT TAGS ON THE LEFT SIDE OF THE MOTOR. THESE WILL READILY HOOK THEMSELVES ONTO EITHER THE INSIDE LOWER EDGE OF THE BOILER MOULDING, OR INTO THE GAP BETWEEN THE BOILER AND RUNNING PLATE. IF YOU APPLY BRUTE FORCE YOU MAY SNAP THEM OFF RATHER THAN MERELY BEND THEM. I'd ADVISE TAKING CARE TO SPLAY THE BODY MOULDING APART BY MEANS OF A SLIM LEVER BETWEEN THE MOTOR AND THE BODY SLOT WHILE YOU SLIDE THE CHASSIS OUT (OR BACK IN). I've used care to bend my upper motor tag upwards rather than downwards, and have curved it slightly over the top of the motor so that it cannot "hook" as the chassis comes out of the body and it also has a "leading edge" to guide it into the boiler slot as the chassis goes back in.
On some of the Railroad models I've seen the fitting of the chimney left something to be desired, not pushed home fully into the smokebox top and sitting higher at its front rim than the rear, well above loading gauge. I altered this on one Railroad loco. I had been tempted merely to file it down because it seemed so firmly stuck in the wrong position, but on digging out the body plastic that sits between the two locating tabs under the base of the chimney I WAS able to push the chimney out of its socket without damage and then re-fit it properly.
Running seemed good or very good straight out of the box. My later delivered main range loco was intitially perhaps slightly notchy at lowest speeds but nothing suggested tight spots. It improved noticeably after only a little running.
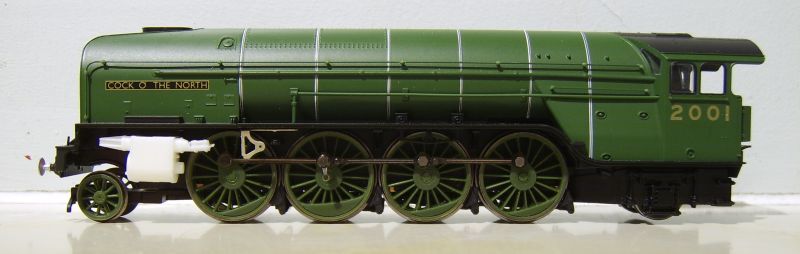
There's been plenty of comment about moulded handrails on the cab and tender. They are VERY well done, but look a lot more convincingly "real" on the main range loco when painted to represent polished handrails which were of course only evident if a "special finish" was applied to a loco for publicity purposes. 2001 was like that when new, so that's fine, but they don't look so good in green on the Railroad loco. There's possibly something odd about the finish chosen for the main range loco, for having gone for the "polished" handrails for understandable reasons, Hornby have created a questionable combination by fitting wheels with lined rims. The lining is excellent on the rims and the bosses (as it is on all other parts of the loco) but photos of 2001 in its brand new swanky ex-works finish show the wheel rims in burnished steel, unlined. The Railroad loco has bright wheel rims (with green handrails?!?!) but no lining on the bosses. Never mind, that may work to my advantage in the long run as I have it in mind to turn a Railroad loco (or two) into other class members that always had painted wheel rims. A wheel swap between locos may thus mean that I'll only need to think about lining the bosses on one set of wheels at any rate.
The notorious Hornby double-pivot pony truck design is present, but it seems to behave well enough on these locos on my track (copperclad pointwork to fairly finescale standards "on scene" and Peco code 75 medium radius in the hidden yard). What happens on Peco or other code 100 girder-rail points with broad crossing gaps is for others to discover....
Having said that the lining is of a lovely standard of fineness and regularity on the main range model (equally good where present on the Railroad loco too), I reckon the panel of lining on the rear of the tender (only present on the main range loco) sits too high up. I think it should be in register with the lining panels on the sides. I don't know if this is simply the best that can by done by the printing machines given the positions of the lamp irons and steps on the rear of the tender. It isn't THAT obvious, unless you are a pedant as several of us rightly are.
Apart from the much more extensive decoration I am yet to find many differences between the main and Railroad versions of the model. Curiously, the cab doors are fitted to the Railroad model but left for the owner to fit on the posh version. Same goes for the brake rigging. Maybe the cab doors are left off in order to facilitate detailing of the cab interior on the posh loco. If you want to fit a fallplate, seats, crew and paint the details on the backhead I suppose it may be handy to have no cab doors to work around. As Hornby were obviously trimming cost on these models I think they have sensibly left all backheads in plain black rather than spend money on paintwork in a hidden area, only to claw it back by omitting something more visible. You don't get tender pick-ups or sprung buffers on either version (not even metal buffer heads, although the plastic ones, some of which have slightly ragged edges, are separate from the sockets and could fairly easily be replaced). The only mechanical or electrical difference I can find so far between the two versions of the model is the mode of attachment of the loco drawbar to the tender. The main range version has the two-position drawbar screwed to both units, which may not be convenient especially as there's no electrical connection to demand such union. The Railroad version has the standard shouldered screw on the loco end replaced by one that is entirely parallel-sided (yet still with a slotted end) and this simply forms a pin that hooks into either of the two eyes in the loco drawbar. For once, the short drawbar setting, "for display only on some locos) is actually of some practical use, at least on my 3 foot ruling track radii.
Maybe the all black, moulded plastic Lentz valve gear on both versions of the model isn't quite convincing in appearance as some of it probably ought to look like burnished steel. Robustness will have to be tested by time. A bit of clever painting might aid the appearance. I'm not sure how many will want to alter the moulded plastic reversing shaft above the running plate. It does tend to be a bit wonky whereas the real thing of course would be of straight steel rod or tube with suitable joints.
The very "clean" and simple layout of the chassis, with large detachable weight and clip-fit cylinder stretcher has already convinced me that conversion to Walschaerts valve gear is likely to be highly viable. The moulded plastic wheel bosses and spokes (which some of you might not trust for strength and durability) insulate the wheel rims from mutually the crankpins and from the axles. Also, both motor brushes are insulated so that in standard form the chassis block is electrically neutral. The coupling rods (when not mangled by heavy handling) appear to clear the wheel rims even when full opposite sideplay is inflicted on adjacent wheelsets. This all means that I won't have to worry about the consequences of carrying valve gear for both sides of the loco on a common metal stretcher screwed or clamped in place. If I paint the backs of the coupling rods with some hard lacquer "just in case" the whole thing ought to be electrically pretty much bomb-proof! We'll see anyway.
Value for money? Well, okay, you get moulded-on plastic fittings in a number of places where we've recently been much more accustomed to separate fittings, often in metal. The cab/tender handrails for instance, the (static in this case, more or less correctly) valve gear, the smokebox door handles (and the hinge which isn't upright as it really would be) and even the whistle, but.... I am utterly convinced that in main-range guise it is ten times the model and at only a third of the price compared to the stinking pile of poo (allegedly a showcase quality limited edition P2) that I refused to pay for during my contentious dealings eleven years ago with gangsters in Lincoln who were advertising in the model press at the time. The same dodgy firm later re-appeared on the internet under another name, but they do now seem to have crawled back under their rock. A really good quality commission built model of 2001 could easily cost the top side of £1000, and a used one at auction possibly half of that, so I'd say the Hornby model is storming good value!
Excuse also any high-speed typing blunders in the above......
Most subjects, models and techniques covered in this thread are now listed in various categories on page1
Dec. 2018: Almost all images that disappeared from my own thread following loss of free remote hosting are now restored.
Thanks Graeme for the comments, just need Hattons to find some more .
The very few pictures of the Tenders I have seen the handrails are far more noticeable then the cab that I have seen , as to the rear lining I have never seen any that do not line up with sides. But I haven't found a picture of C of N's rear end to confirm
The overflows look very poorly done ? , is the coal fixed down ?
Do you think a Bugatti nose version will be viable ?
I would imagine the way the C of N has been snapped that further Hornby versions are a no brainer in due course .
mick b wrote:Thanks Graeme for the comments, just need Hattons to find some more .
The very few pictures of the Tenders I have seen the handrails are far more noticeable then the cab that I have seen , as to the rear lining I have never seen any that do not line up with sides. But I haven't found a picture of C of N's rear end to confirm
The overflows look very poorly done ? , is the coal fixed down ?
Do you think a Bugatti nose version will be viable ?
I would imagine the way the C of N has been snapped that further Hornby versions are a no brainer in due course .
I have a pic of CotN's tender in a book & the rear tender lining should line up with the sides.
After endless scraping, sanding & filling the P2 body is getting there. The dodgy bit at the bottom of the 'wings' will be well hidden by the extra deflectors with their internal sloping wind deflecting plate. I've also removed the moulded smokebox handle.
While I won't have time to get on with this "in full" for a while, I decided to "suck it and see" with a few cautious, fully reversible changes to the chassis as a first tactic. Voila, one P2 chassis ready for Walschaerts valve gear thanks to a modified "M. Gilbert / Yours Truly" A2/2 motion bracket and some resin cylinders on a rough plastikard stretcher, purely to establish correct dimensions before I consider making one in metal. I'll probably reveal the hidden elements of the anatomy in my own workbench thread later on tomorrow.
Most subjects, models and techniques covered in this thread are now listed in various categories on page1
Dec. 2018: Almost all images that disappeared from my own thread following loss of free remote hosting are now restored.
Excellent work on both P2s gentlemen, and thank you Graeme for that in-depth analysis, much appreciated. Confirms a lot of thoughts.
I have two of the Railroad P2s and they are both in various stages of rebuilding - one to streamlined and the other to a "more modern" form. The walschaerts valve gear issue is intriguing.
I have been using Bachmann V2 valve gear again - not as pretty as Comet or the Thompson conversion parts but it serves a purpose. Modifications needed to the cylinders I have used (A4 type) in order to fit the chassis and also the streamlined front end.
If you combine all three of ours you get 2002 in theory…
Can I claim mine as the first walschaerts fitted Hornby P2 in the country…?
Won't be as fine as Graeme's or using Comet V2 valve gear, but I can confirm it does work and works well without any modification to either the P2 chassis or to Bachmann's V2 valve gear. It works so well I am considering getting another set for a further P2 conversion.
I am also working on a set of cylinders, but in a different manner to Graeme's excellent method. The body shell is all but complete and will be revealed at a later date.
It looks as if some of the scale errors in the Bachmann V2 gear are working to your advantage there. Even so, I can't help thinking that by the time the right kind of cylinders are in the right places, you may have to shorten the radius rods to pull back the tops of union links, and that you may well have to trim the fronts of the piston rods. Something similar in the way of trimming of the slidebars might be required too unless you can push them deep into the cylinder backs. Somehow, the fact that the valve gear is 2-3mm too long overall will have to be overcome, although I think the connecting rods (handily) aren't as long as they should be for V2 use.
Most subjects, models and techniques covered in this thread are now listed in various categories on page1
Dec. 2018: Almost all images that disappeared from my own thread following loss of free remote hosting are now restored.
Hi Graeme - the piston rods will need to be clipped, as I did on the Thompson A2 variants I have used this valve gear on. Not an issue particularly and I suspect will not be a problem when cylinders are fitted either. The A2/1 and A2/2 have worked fine with this mod and the A2/3 I am working on has had no problems either. My only concern at this point is lowering the cylinders to the right depth to fit the valve gear. Thinking hat well and truly on.