West End Workbench
Moderators: 52D, Tom F, Rlangham, Atlantic 3279, Blink Bonny, Saint Johnstoun, richard
- Dave
- LNER A4 4-6-2 'Streak'
- Posts: 1733
- Joined: Sat Nov 13, 2010 9:33 pm
- Location: Centre of the known universe York
Re: West End Workbench
Bloody ell Jonathan will you please slow down you are putting some of us the shame.
Kimballthurlow, have a look at Graeme Kings pages he did some reefer conversions of hornby wagons and if you can bare
it somewhere a couple of years ago I did some on my pages, (Daves C&W Works).
Kimballthurlow, have a look at Graeme Kings pages he did some reefer conversions of hornby wagons and if you can bare
it somewhere a couple of years ago I did some on my pages, (Daves C&W Works).
-
jwealleans
- LNER A4 4-6-2 'Streak'
- Posts: 4303
- Joined: Wed Oct 25, 2006 8:46 am
Re: West End Workbench
You've seen enough wagons being lettered and varnished for the moment so I shan't bore you with those. Instead, New Year, new project. LRM kit LOCO84, GNR J5/LNER J4. I don't think we've had one of these on Grantham, or if we did I missed it. The idea came from Dick Hardy's last book, A Life on the Lines, which includes a photo of him and a colleague in the (Stirling) cab of No. 4040 at Grantham during the War. 4040 was at Grantham from 1936 to 1943, so squarely in our timeframe and that cab made it irresistible.

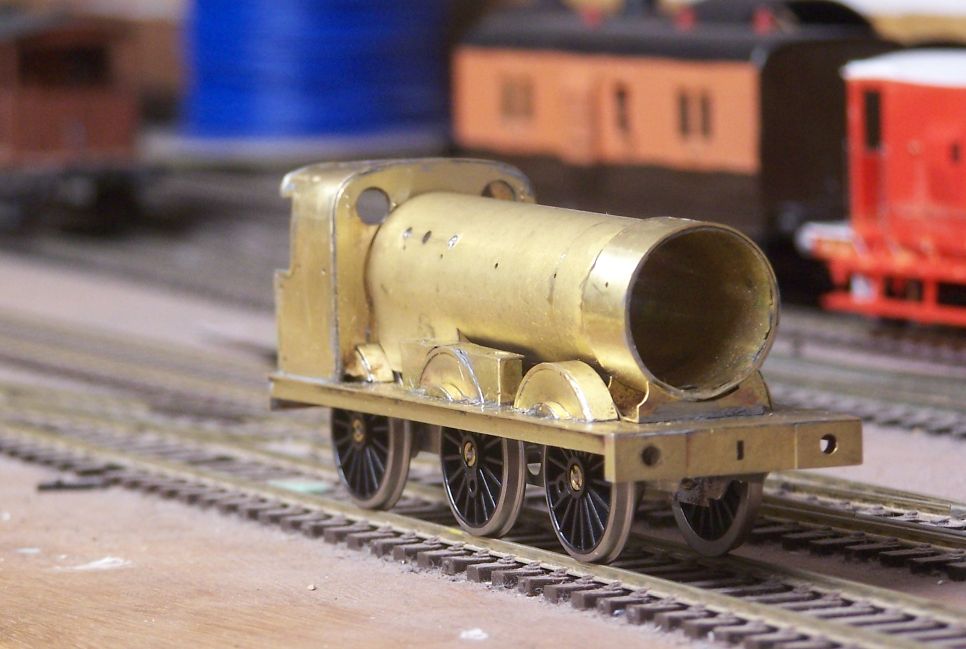
As regular readers will know, I have built the LRM J6 and then J5 in the last couple of years, so I'm reasonably familiar with the general type and the usual way LRM kits work. I bought the Isinglass drawing for this loco when I did the J6, so I've had it for a couple of years and I've looked through the Yeadon and the Greenie prior to starting. There's a decent picture of 4040 in Yeadon and another on Ebay currently, so I thought it was time to have a go.
This is not an easy kit. I erected the frames yesterday afternoon and the splashers and cab today. The frames were problematic as they built up too wide - Romford wheels wouldn't fit completely onto the axles, let alone turn. The footplate and frames don't marry up quite as they should. Some of the problems were self-induced, but the instructions are not always crystal clear and to complicate it further there's a separate extra etch pack to make a 1031 series loco, which was what I needed for what had been 1040 when built. Putting the box on top of one of the replacement etches didn't help me any. But we are getting there. I've substituted some spare frame spacers I found, taken a deep breath and redone what I've realised I've cocked up and so I have the makings of a nice looking little loco. There will be a pause now as I've reached the stage where I can size up an appropriate High Level drive combination, which I'll have to order. I've also been in touch with John Redrup about the frame issues and to ask for a Strling tender for it. I'll go into the problems I encountered in more detail (if anyone's interested) after I've been able to communicate with John about them.
- kimballthurlow
- GCR D11 4-4-0 'Improved Director'
- Posts: 437
- Joined: Wed Apr 29, 2009 10:58 am
- Location: Brisbane, Australia
- Contact:
Re: West End Workbench
Hello Dave,Dave wrote: ↑Thu Dec 29, 2022 11:30 pm Bloody ell Jonathan will you please slow down you are putting some of us the shame.
Kimballthurlow, have a look at Graeme Kings pages he did some reefer conversions of hornby wagons and if you can bare
it somewhere a couple of years ago I did some on my pages, (Daves C&W Works).
Thank you, I found your write up and pictures in September 2018.
I have 5 of the F10, maybe one of the H&B, and have collated all that info.
Will do something with them soon.
Kimball
- Atlantic 3279
- LNER A4 4-6-2 'Streak'
- Posts: 6658
- Joined: Fri Jun 26, 2009 9:51 am
- Location: 2850, 245
Re: West End Workbench
Which sort of Stirling tender does it want Jonathan? LRM do both a D and the even earlier E/F type I believe.
Most subjects, models and techniques covered in this thread are now listed in various categories on page1
Dec. 2018: Almost all images that disappeared from my own thread following loss of free remote hosting are now restored.
Dec. 2018: Almost all images that disappeared from my own thread following loss of free remote hosting are now restored.
-
jwealleans
- LNER A4 4-6-2 'Streak'
- Posts: 4303
- Joined: Wed Oct 25, 2006 8:46 am
Re: West End Workbench
Progress on the J4. I have spoken to John Redrup about the problem I had with the frames. No clear idea of the reason - excessive etch cusp was about the best we could come up with. I'd like to think I'd dressed the edges of the spacers, but they're covered in solder now so I can't tell, other than I did do the front and rear edges. Interestingly, someone on RMWeb commented that he'd had the same issue with a J21. I built the J21 frames last year and didn't have any problem. Bit of a mystery.
Chris Gibbon at High Level must have sent my motor and gearbox out by return as I had them on Thursday. I went for a 60:1 Roadrunner with a 1219C Coreless motor, intending to drive on the middle axle either by standing the motor in the firebox or having it horizontal above the frames. The latter turned out to be the best option as it sits exactly on a spacer placed at the top of the frames.
Here's the chassis with rods fettled and after a very quick test under power:
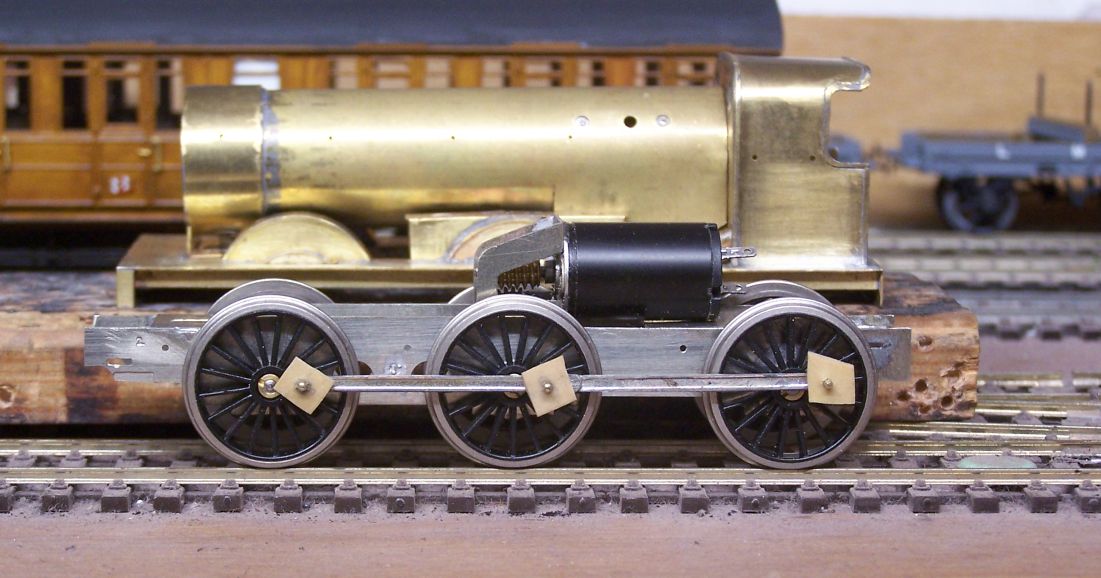
You can see against the body where it will sit and how it'll be hidden by the sandboxes. On a later series loco it would probably be concealed by firebox and centre splasher.
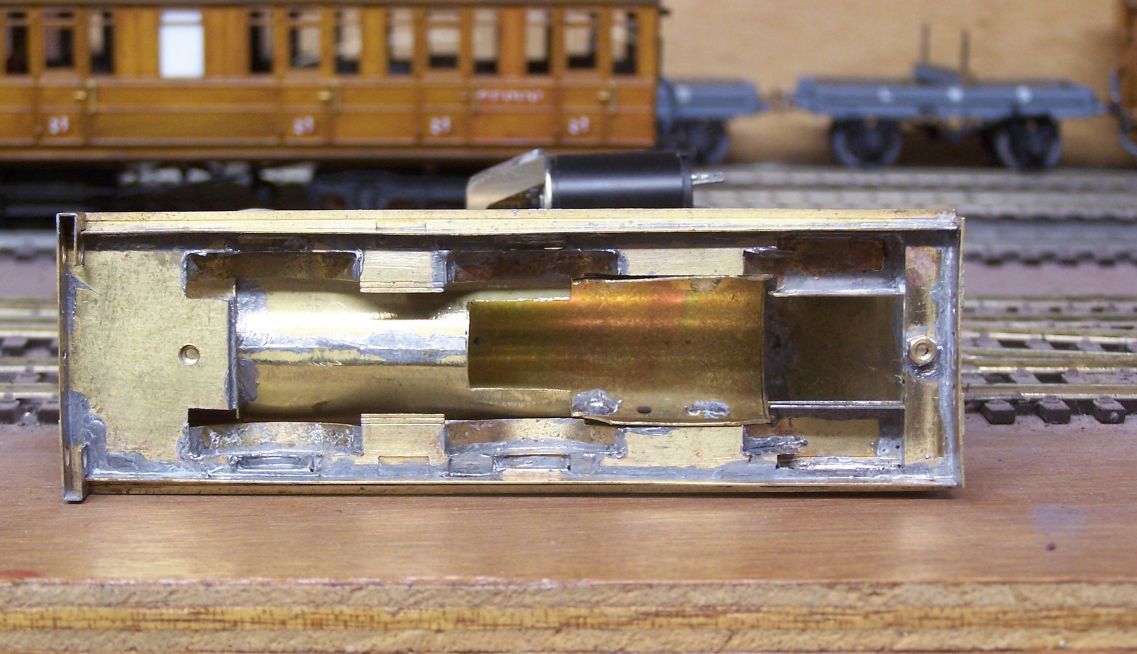
Here you can see the extra cutout I had to make in the boiler to fit the gearbox. Most of the boiler is empty, so there's plenty of space for ballast once everything else is soldered on.
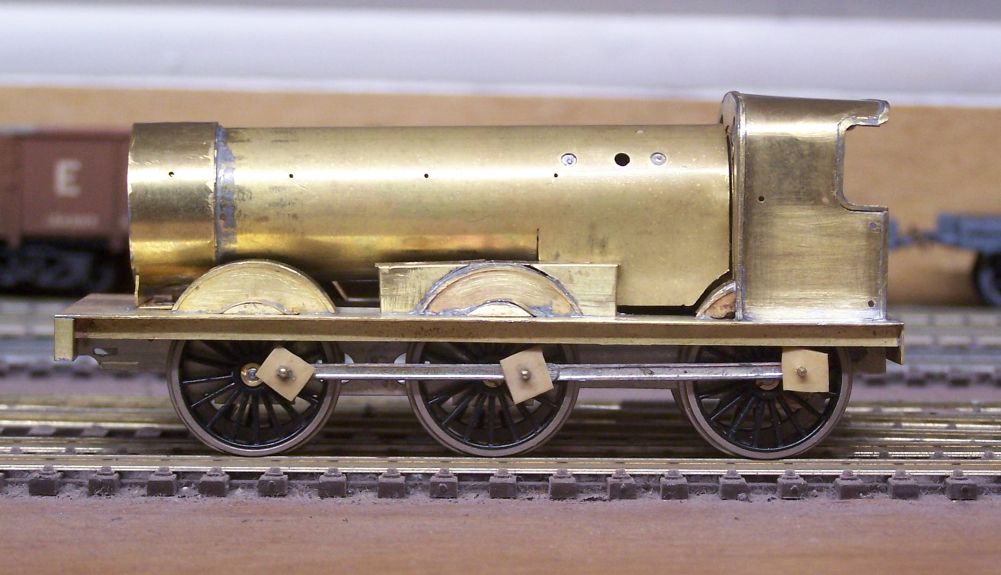
Here with her clothes on. The boiler isn't yet fixed, but you can clearly see - or perhaps not see - that the drivetrain is concealed.
Chris Gibbon at High Level must have sent my motor and gearbox out by return as I had them on Thursday. I went for a 60:1 Roadrunner with a 1219C Coreless motor, intending to drive on the middle axle either by standing the motor in the firebox or having it horizontal above the frames. The latter turned out to be the best option as it sits exactly on a spacer placed at the top of the frames.
Here's the chassis with rods fettled and after a very quick test under power:

You can see against the body where it will sit and how it'll be hidden by the sandboxes. On a later series loco it would probably be concealed by firebox and centre splasher.

Here you can see the extra cutout I had to make in the boiler to fit the gearbox. Most of the boiler is empty, so there's plenty of space for ballast once everything else is soldered on.

Here with her clothes on. The boiler isn't yet fixed, but you can clearly see - or perhaps not see - that the drivetrain is concealed.
-
jwealleans
- LNER A4 4-6-2 'Streak'
- Posts: 4303
- Joined: Wed Oct 25, 2006 8:46 am
Re: West End Workbench
Back in the jug agane tomorrow, so a day spent trying to get a few things wrapped up and put away.
The last of the 58' carriages, D183 BCL is done.

I found the picture Ellis Clark used to advertise them:
With the D183 complete, I posed them with 4430, the last C1 I've finished.

Wagons are also now ready for weathering and couplings when they arrive:


The interloper is a Rapido SECR open which someone was selling half price at Hartlepool. It was the first of their wagons I've had in my hand and I have to say it's nicely made and finished. I'm unlikely to acquire many more unless I happen across them in a bargain bin, but it is a nice vehicle.
Finally, most attention focused on the J4. I've made a bit of a Horlicks of the front end through not reading the instructions thoroughly enough, but I think it's salvageable.
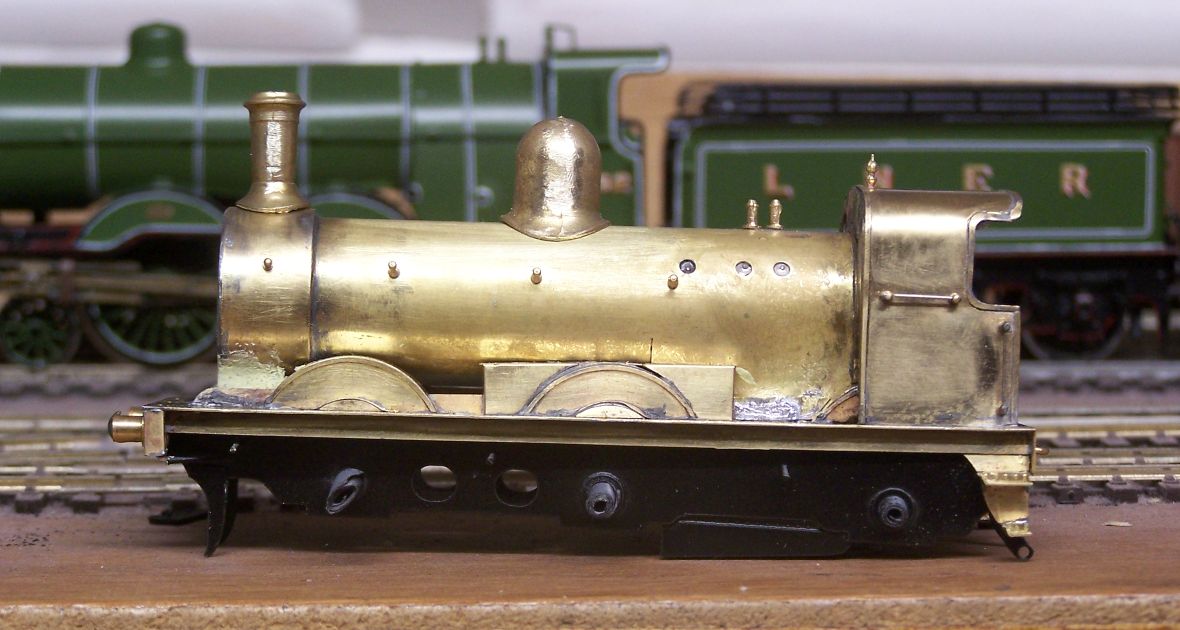
I finished soldering the frames and got them into primer. I'd added much of the body detail yesterday and some more went on today (the bits which haven't been cleaned up). I also reshaped the cab to get rid of the rearward slope on the roof. Chimney and dome are just posed for the moment. The tender is on order too. Progress will now slow as I have to turn my attention to more mundane matters, sadly.
The last of the 58' carriages, D183 BCL is done.

I found the picture Ellis Clark used to advertise them:
With the D183 complete, I posed them with 4430, the last C1 I've finished.

Wagons are also now ready for weathering and couplings when they arrive:


The interloper is a Rapido SECR open which someone was selling half price at Hartlepool. It was the first of their wagons I've had in my hand and I have to say it's nicely made and finished. I'm unlikely to acquire many more unless I happen across them in a bargain bin, but it is a nice vehicle.
Finally, most attention focused on the J4. I've made a bit of a Horlicks of the front end through not reading the instructions thoroughly enough, but I think it's salvageable.

I finished soldering the frames and got them into primer. I'd added much of the body detail yesterday and some more went on today (the bits which haven't been cleaned up). I also reshaped the cab to get rid of the rearward slope on the roof. Chimney and dome are just posed for the moment. The tender is on order too. Progress will now slow as I have to turn my attention to more mundane matters, sadly.
-
Woodcock29
- GNR C1 4-4-2
- Posts: 713
- Joined: Tue Nov 27, 2012 8:59 am
- Location: South Australia
Re: West End Workbench
Great work as always Jonathan.
I've been building/kitbashing/renovating a range of LMS vans for the LMS part of my layout so better not show them here!
Your work on the ABS fitted 6pl got me delving into my drawers. Found an unmade one bought years ago on eBay and one to renovate from a cheap bin somewhere. This has now been stripped down to components. I also found the 10ft unfitted version but this is more problematic as it was badly soldered together - still its going go get built.
Only wish I'd got one of John Fozzard' s GN Dia 121. I've got his Dia 274 to build and Dan's Dia 183 and the 3rd saloon. I just need more time!
Andrew
- Atlantic 3279
- LNER A4 4-6-2 'Streak'
- Posts: 6658
- Joined: Fri Jun 26, 2009 9:51 am
- Location: 2850, 245
Re: West End Workbench
I do like that GN non-vestibuled carriage set, a lot.
Most subjects, models and techniques covered in this thread are now listed in various categories on page1
Dec. 2018: Almost all images that disappeared from my own thread following loss of free remote hosting are now restored.
Dec. 2018: Almost all images that disappeared from my own thread following loss of free remote hosting are now restored.
-
Jim de Griz
- H&BR Q10 0-8-0
- Posts: 178
- Joined: Thu Apr 01, 2021 8:47 pm
Re: West End Workbench
I have to agree!Atlantic 3279 wrote: ↑Tue Jan 10, 2023 11:28 am I do like that GN non-vestibuled carriage set, a lot.
The teak finish is awesome.
Jim de Griz
-
jwealleans
- LNER A4 4-6-2 'Streak'
- Posts: 4303
- Joined: Wed Oct 25, 2006 8:46 am
Re: West End Workbench
Thank you for your kind words. I am very fond of Gresley's 58' non-corridor stock and that D 121 especially caught my eye when I first saw them advertised. It's a type which most kitmakers seem to have ignored.
I'm calling the body on this complete. I think another go at the handrails is called for.though and maybe with .45 wire this time. The .33 doesn't cut it on the boiler although I think it looks OK for the cabside handrails. I'm also not sure how it will stand up to exhibition use.

This series of locos apparently had springs above the frames behind the leading splasher. I've yet to be able to see them in any photographs, so I didn't bother. I've added the whistle operating lever and the sander operating levers as well, which are a very visible feature of these engines. The boiler backplate was a monumentally awful fit, but with a crew in you won't see much of it. By a happy turn of events the tender kit arrived today, so I can crack straight on with that.
I'm calling the body on this complete. I think another go at the handrails is called for.though and maybe with .45 wire this time. The .33 doesn't cut it on the boiler although I think it looks OK for the cabside handrails. I'm also not sure how it will stand up to exhibition use.

This series of locos apparently had springs above the frames behind the leading splasher. I've yet to be able to see them in any photographs, so I didn't bother. I've added the whistle operating lever and the sander operating levers as well, which are a very visible feature of these engines. The boiler backplate was a monumentally awful fit, but with a crew in you won't see much of it. By a happy turn of events the tender kit arrived today, so I can crack straight on with that.
- Atlantic 3279
- LNER A4 4-6-2 'Streak'
- Posts: 6658
- Joined: Fri Jun 26, 2009 9:51 am
- Location: 2850, 245
Re: West End Workbench
When I looked at the works drawing, from the NRM, for my Stirling 174 series 0-6-0 it showed that all that would be visible of the springs (in side view) would be the "knuckle" at the top of each hanger grasping the end of the top leaf. More would probably show in an oblique view. I thought about trying to represent them, but I concluded that in OO gauge, unless the boiler is very slim or is high mounted, there's nowhere to put complete springs. Even if you keep the splasher tops realistically narrow, the wheels get in the way on account of their narrow back-to-back gauge. I could have spent a lot (more) of my time making representations of just the spring ends and hanger tops, to mount in awkward areas on the running plate, but I didn't...
Most subjects, models and techniques covered in this thread are now listed in various categories on page1
Dec. 2018: Almost all images that disappeared from my own thread following loss of free remote hosting are now restored.
Dec. 2018: Almost all images that disappeared from my own thread following loss of free remote hosting are now restored.
Re: West End Workbench
Hi Jonathan,
Agree with Graeme on this one. It's do-able in the wider gauges but even then not very noticeable. Seen here on my P4 LNWR 0-8-0 built from a Brassmaster kit. More time spent on the visible details would be far more fruitful.
The thing that is more obvious in this photo is that I should have made the loco frames match the splasher profile to block the background showing through
Cheers...Morgan
-
jwealleans
- LNER A4 4-6-2 'Streak'
- Posts: 4303
- Joined: Wed Oct 25, 2006 8:46 am
Re: West End Workbench
Evening Morgan, nice to hear from you. Yes, there was a sentence which went missing there to the effect of 'why would I bother if it's not visible'. I didn't.
I didn't bother sorting the handrails out either yet - the tender kit arrived on Thursday so I wanted to get stuck into that while I have a bit of enthusiasm. Friday night I erected the frames and footplate to check height against the loco. No real problems there.
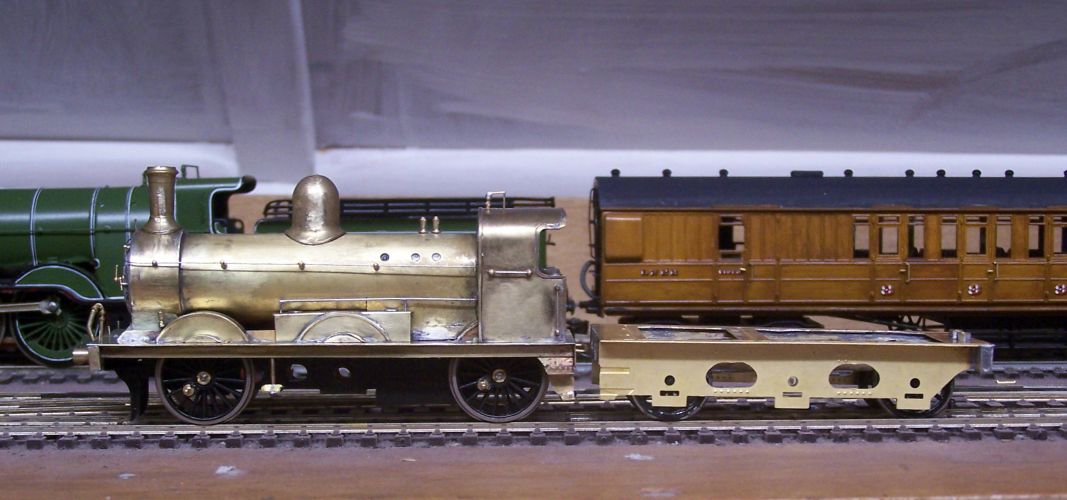
This afternoon, with poor weather forecast, I got the bit between my teeth and cracked on. I haven't built one of these before, but it's from the same stable as the Ivatt tenders (George Norton) and the same methodology applies. Is the spirit of not bothering if you can't see it, the kit includes a sheet of brass and formers for the S curve of the front of the water tank down towards the coal hole to encourage the coal to move in that direction. I didn't bother, it looked a right faff and it'll be buried anyway. I'm afraid a simple bend to form a ramp will have to do. Other than that there were no real problems with this. You're expected to make your own handbrake standard and there were no buffers with it. The loco kit included a set of 4 but they were Group Standard and so not correct for the tender. I found these tapered ones in the spares box.
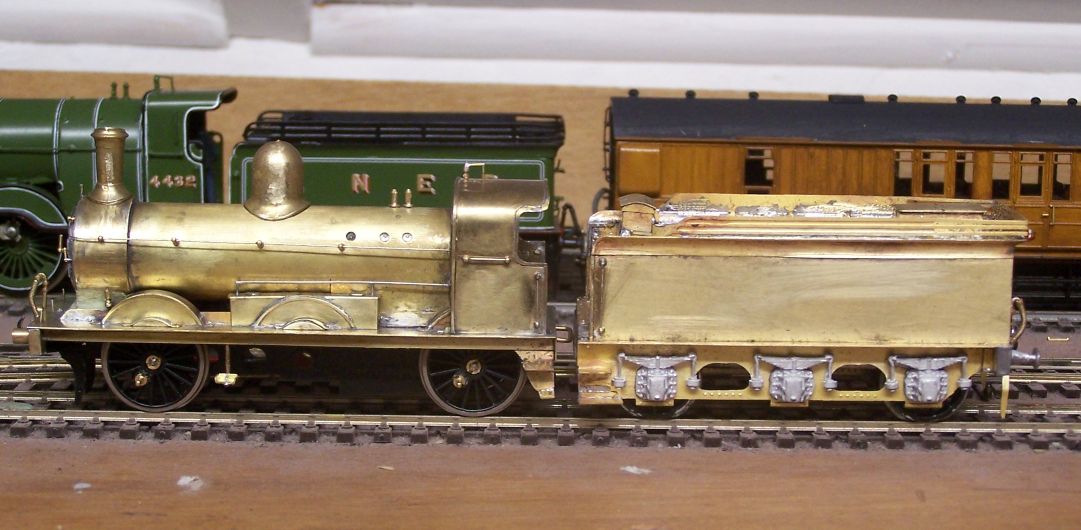
I didn't bother sorting the handrails out either yet - the tender kit arrived on Thursday so I wanted to get stuck into that while I have a bit of enthusiasm. Friday night I erected the frames and footplate to check height against the loco. No real problems there.

This afternoon, with poor weather forecast, I got the bit between my teeth and cracked on. I haven't built one of these before, but it's from the same stable as the Ivatt tenders (George Norton) and the same methodology applies. Is the spirit of not bothering if you can't see it, the kit includes a sheet of brass and formers for the S curve of the front of the water tank down towards the coal hole to encourage the coal to move in that direction. I didn't bother, it looked a right faff and it'll be buried anyway. I'm afraid a simple bend to form a ramp will have to do. Other than that there were no real problems with this. You're expected to make your own handbrake standard and there were no buffers with it. The loco kit included a set of 4 but they were Group Standard and so not correct for the tender. I found these tapered ones in the spares box.

-
Woodcock29
- GNR C1 4-4-2
- Posts: 713
- Joined: Tue Nov 27, 2012 8:59 am
- Location: South Australia
Re: West End Workbench
J4 is looking good Jonathan.
For some reason - not sure why, I found the LRM Stirling D type tender easier to build than the Ivatt A type (Horseshoe). Maybe because it has square corners? I also built that before the Ivatt A type, of which I have another 2 in stock to build.
Andrew
For some reason - not sure why, I found the LRM Stirling D type tender easier to build than the Ivatt A type (Horseshoe). Maybe because it has square corners? I also built that before the Ivatt A type, of which I have another 2 in stock to build.
Andrew
-
jwealleans
- LNER A4 4-6-2 'Streak'
- Posts: 4303
- Joined: Wed Oct 25, 2006 8:46 am
Re: West End Workbench
Morning Andrew,
I think you're right, without really being able to put my finger on why. Forming those corners is always the most challening part of the Ivatt build. This one didn't go together perfectly, but for a first one I'm quite pleased with it.
I think you're right, without really being able to put my finger on why. Forming those corners is always the most challening part of the Ivatt build. This one didn't go together perfectly, but for a first one I'm quite pleased with it.