
The cut outs behind the windows are different & there are detail differences on the roofsteaky wrote:Can someone explain how the cabs differ please?
P2 update
Moderators: 52D, Tom F, Rlangham, Atlantic 3279, Blink Bonny, Saint Johnstoun, richard
Re: P2 update
Will
My LNER 1930s West Highland Workbench
viewtopic.php?f=3&t=9293
My Blog
http://westhighlandmodelling.wordpress.com/
My LNER 1930s West Highland Workbench
viewtopic.php?f=3&t=9293
My Blog
http://westhighlandmodelling.wordpress.com/
-
Saint Johnstoun

- LNER A3 4-6-2
- Posts: 1236
- Joined: Tue Apr 01, 2008 11:12 pm
- Location: 63A - Scotland
Re: P2 update
When built 2001-2 had deep cutouts to the cab side sheets as they just had wooden seats for the driver and fireman. They were later modified with a shallower cutout when seat backs were fitted, but the tender fronts were never built up to the same height as the cab at that stage.
2003-6 had shallow cutouts and built up tender fronts from new, when 2002 was rebuilt it didn't have a built up tender front but when 2001 was rebuilt its tender was modified - the built up tender fronts had a rubber sheet between the tender and the cab roof. It would appear that the tender on 2002 was never modified.
2003-6 had shallow cutouts and built up tender fronts from new, when 2002 was rebuilt it didn't have a built up tender front but when 2001 was rebuilt its tender was modified - the built up tender fronts had a rubber sheet between the tender and the cab roof. It would appear that the tender on 2002 was never modified.

Re: P2 update
Thanks will5210 & St J.
Detail differences on he roof don't show in those drawings but I have no excuse for missing the cut outs!
So, body taper differs, cab differs, tender differs, valve gear differs. Hornby's Design Clever will have to be very clever. Sounds like the Bugatti nose talk is pure conjecture from a number of wishful thinkers then. Pity. Whilst I prefer 2001 over the rest, I do think the 'streaky' ones have a nice combination of power and grace.
Looks like there might be scope for another of Atlantic's resin specials.
Re: P2 update
Not to mention the single chimney on 2005 & different firebox & combustion chamber on 2006teaky wrote:Thanks will5210 & St J.
Detail differences on he roof don't show in those drawings but I have no excuse for missing the cut outs!
So, body taper differs, cab differs, tender differs, valve gear differs. Hornby's Design Clever will have to be very clever. Sounds like the Bugatti nose talk is pure conjecture from a number of wishful thinkers then. Pity. Whilst I prefer 2001 over the rest, I do think the 'streaky' ones have a nice combination of power and grace.
Looks like there might be scope for another of Atlantic's resin specials.
Will
My LNER 1930s West Highland Workbench
viewtopic.php?f=3&t=9293
My Blog
http://westhighlandmodelling.wordpress.com/
My LNER 1930s West Highland Workbench
viewtopic.php?f=3&t=9293
My Blog
http://westhighlandmodelling.wordpress.com/
-
Atlantic 3279

- LNER A4 4-6-2 'Streak'
- Posts: 6658
- Joined: Fri Jun 26, 2009 9:51 am
- Location: 2850, 245
Re: P2 update

Most subjects, models and techniques covered in this thread are now listed in various categories on page1
Dec. 2018: Almost all images that disappeared from my own thread following loss of free remote hosting are now restored.
Dec. 2018: Almost all images that disappeared from my own thread following loss of free remote hosting are now restored.
Re: P2 update
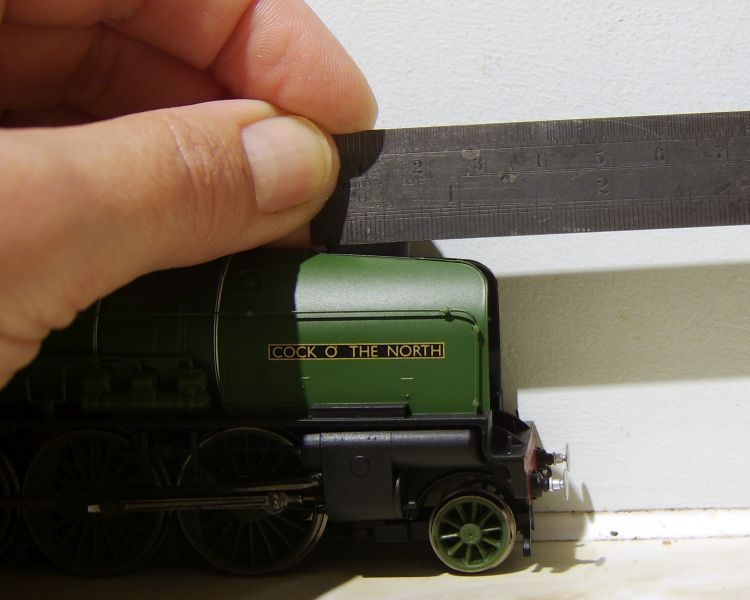
Definitely not right! Mine does the same but not quite as bad. The back of my chimney is at the correct height but the front is a little bit proud.
Will
My LNER 1930s West Highland Workbench
viewtopic.php?f=3&t=9293
My Blog
http://westhighlandmodelling.wordpress.com/
My LNER 1930s West Highland Workbench
viewtopic.php?f=3&t=9293
My Blog
http://westhighlandmodelling.wordpress.com/
Re: P2 update
No doubting that's out by a mile. Others have posted pictures that indicate the chimney is level though. Have you established this is poor assembly quality Graeme, i.e. that the chimney is a separate component that is incorrectly seated? From your photos, it looks like quite a lot of filing and it is hard to imagine the look of the chimney not being affected.
-
Atlantic 3279
- LNER A4 4-6-2 'Streak'
- Posts: 6658
- Joined: Fri Jun 26, 2009 9:51 am
- Location: 2850, 245
Re: P2 update
Well, my chimney is level and at the correct level now. I was on the brink of filing its top down, having found it very firmly resistant to any attempt to push up/out the fixing tags from within the body, but I decided to firstly try something to relieve the "grip created by the tags, slots and glue. From beneath, I drilled away the green body plastic in the base of the "socket" for the chimney, in the area between the black tags that secure the base of the chimney. I was then able to push a slim screwdriver between the outer edges of the black tags and the rest of the socket moulding to break more of the bond. A further round of pushing from below then popped the chimney free.
I found that as well as the plain, flared part of the chimney that you can see atop the smokebox, there's a lower section that is slightly rebated compared to the visible portion. This sits in a tight recess in the top of the smokebox. Evidently it is just a shade too tight as designed and moulded, since it didn't sit very well in the recess in my loco, but after scraping around within the recess with a small screwdriver and running a fine square file around the rebated base of the chimney everything went back together nicely. Job done!
I found that as well as the plain, flared part of the chimney that you can see atop the smokebox, there's a lower section that is slightly rebated compared to the visible portion. This sits in a tight recess in the top of the smokebox. Evidently it is just a shade too tight as designed and moulded, since it didn't sit very well in the recess in my loco, but after scraping around within the recess with a small screwdriver and running a fine square file around the rebated base of the chimney everything went back together nicely. Job done!
Most subjects, models and techniques covered in this thread are now listed in various categories on page1
Dec. 2018: Almost all images that disappeared from my own thread following loss of free remote hosting are now restored.
Dec. 2018: Almost all images that disappeared from my own thread following loss of free remote hosting are now restored.
Re: P2 update
Glad to hear it's a simple solution. Did the body and chassis part easily? What's your next step? Detailing, lining...? I presume that since you have reseated the chimney you are not heading down the Bugatti nose route.
-
Atlantic 3279
- LNER A4 4-6-2 'Streak'
- Posts: 6658
- Joined: Fri Jun 26, 2009 9:51 am
- Location: 2850, 245
Re: P2 update
I felt safe to interfere with the chimney because one of my two Railroad models WILL eventually get a Bugatti nose, hence a failure with the chimney wouldn't matter. The other Railroad loco will become 2002. Nothing will happen in any hurry as ups and downs this summer have put me so far behind on other planned jobs.
There's nominally only the screw accessed through the hole in the pony truck that has to be released to take the body off. The front of the chassis should then drop slightly and be drawn forward to release the rear mounting lug. Supposedly everything will then be free. Believe me, IT WON'T. The shape of the chassis and body present numerous opportunities for things to snag as the two are shuffled apart. On top of that, the mould feeds inside the body are broken off roughly rather than trimmed off to a neat finish, so these can catch on edges on the chassis. THE BIG ONE TO WATCH OUT FOR IS THE PROBLEM OF THE CONTACT TAGS ON THE LEFT SIDE OF THE MOTOR. THESE WILL READILY HOOK THEMSELVES ONTO EITHER THE INSIDE LOWER EDGE OF THE BOILER MOULDING, OR INTO THE GAP BETWEEN THE BOILER AND RUNNING PLATE. IF YOU APPLY BRUTE FORCE YOU MAY SNAP THEM OFF RATHER THAN MERELY BEND THEM. I'd ADVISE TAKING CARE TO SPLAY THE BODY MOULDING APART BY MEANS OF A SLIM LEVER BETWEEN THE MOTOR AND THE BODY SLOT WHILE YOU SLIDE THE CHASSIS OUT (OR BACK IN). I've used care to bend my upper motor tag upwards rather than downwards, and have curved it slightly over the top of the motor so that it cannot "hook" as the chassis comes out of the body and it also has a "leading edge" to guide it into the boiler slot as the chassis goes back in.
There's nominally only the screw accessed through the hole in the pony truck that has to be released to take the body off. The front of the chassis should then drop slightly and be drawn forward to release the rear mounting lug. Supposedly everything will then be free. Believe me, IT WON'T. The shape of the chassis and body present numerous opportunities for things to snag as the two are shuffled apart. On top of that, the mould feeds inside the body are broken off roughly rather than trimmed off to a neat finish, so these can catch on edges on the chassis. THE BIG ONE TO WATCH OUT FOR IS THE PROBLEM OF THE CONTACT TAGS ON THE LEFT SIDE OF THE MOTOR. THESE WILL READILY HOOK THEMSELVES ONTO EITHER THE INSIDE LOWER EDGE OF THE BOILER MOULDING, OR INTO THE GAP BETWEEN THE BOILER AND RUNNING PLATE. IF YOU APPLY BRUTE FORCE YOU MAY SNAP THEM OFF RATHER THAN MERELY BEND THEM. I'd ADVISE TAKING CARE TO SPLAY THE BODY MOULDING APART BY MEANS OF A SLIM LEVER BETWEEN THE MOTOR AND THE BODY SLOT WHILE YOU SLIDE THE CHASSIS OUT (OR BACK IN). I've used care to bend my upper motor tag upwards rather than downwards, and have curved it slightly over the top of the motor so that it cannot "hook" as the chassis comes out of the body and it also has a "leading edge" to guide it into the boiler slot as the chassis goes back in.
Most subjects, models and techniques covered in this thread are now listed in various categories on page1
Dec. 2018: Almost all images that disappeared from my own thread following loss of free remote hosting are now restored.
Dec. 2018: Almost all images that disappeared from my own thread following loss of free remote hosting are now restored.
Re: P2 update
Thanks Graeme. I'll apply appropriate care with my main range P2 when it eventually arrives. I have no drastic plans for it but routine maintenance will be required at some point.
I know you've had flooding and other delays this year. I hope your ups and downs are over now and that you can get back to the distraction of modelling. Your posts are always fascinating. Cheers!
I know you've had flooding and other delays this year. I hope your ups and downs are over now and that you can get back to the distraction of modelling. Your posts are always fascinating. Cheers!
Re: P2 update
Phoned my retailer today regarding my pre-order for the detailed version & was told they are expecting them in by the end of this week, was also assured all pre-orders are covered 
Time will tell
Time will tell
Re: P2 update
Hi all. Progress report on The Earl.
Most of my limited P2 modelling time has been taken up with removing & making good the area affected by the water heater 'lump' on the side of the boiler, but thats boring & not very forum-genic so here's a pic of where I'm up to with the front end.
 DSC02145 by will5210, on Flickr
Removing the higher CotN running plate under the smokebox door was tricky & involved lots of careful scalpel work.
I've since run out of (left the cap off & it evaporated) plastic weld to finish the plasticwork, so I cut down the front fairing & started on the nickel silver deflectors.
The main sheet is 10thou with Mainly Trains rivet strapping along the bottom & .45 brass wire along the top & sides.
Here it is compared to the real thing. The curve of the deflector needs a tweak but I'm happy enough for now.
 DSC02153 by will5210, on Flickr
Cheers
Most of my limited P2 modelling time has been taken up with removing & making good the area affected by the water heater 'lump' on the side of the boiler, but thats boring & not very forum-genic so here's a pic of where I'm up to with the front end.
DSC02145 by will5210, on FlickrRemoving the higher CotN running plate under the smokebox door was tricky & involved lots of careful scalpel work.
I've since run out of (left the cap off & it evaporated) plastic weld to finish the plasticwork, so I cut down the front fairing & started on the nickel silver deflectors.
The main sheet is 10thou with Mainly Trains rivet strapping along the bottom & .45 brass wire along the top & sides.
Here it is compared to the real thing. The curve of the deflector needs a tweak but I'm happy enough for now.
DSC02153 by will5210, on FlickrCheers
Will
My LNER 1930s West Highland Workbench
viewtopic.php?f=3&t=9293
My Blog
http://westhighlandmodelling.wordpress.com/
My LNER 1930s West Highland Workbench
viewtopic.php?f=3&t=9293
My Blog
http://westhighlandmodelling.wordpress.com/
-
S.A.C. Martin
Re: P2 update
Hi Will - I'd be very interested in seeing how you've addressed the boiler sides if it would be possible to see a few pics?
Your work on the front end of 2002 nee 2001 is very good. I particularly like the use of the A3 running plate and K3 cylinder covers. Very inventive.
I am currently working on a Bugatti nosed example using a combination of all manner of components (but mostly taking my cues from the Hornby A4 front and rear ends). I have been looking at the valve gear and wondering what everyone else is thinking for theirs - Comet V2 valve gear? Or as I've done previously for my Thompson Pacifics, Bachmann V2 valve gear?
Re: P2 update
Another pic I forgot to post
 DSC02139 by will5210, on Flickr
I don't have any pics of the boiler side yet but basically I just cut out the 'lump', backed the hole with plasticard, then filled the hole with another piece of plasticard & then started the seemingly endless filling & sanding process.
For valve gear I'm going to use a mix of the comet v2 etch & Graeme's A2/2 etch, probably with the original cylinders (modified). I got a set of Hornby A3 cylinders but they're not flat sided as the P2 ones were so I don't think they'll do.
Cheers
DSC02139 by will5210, on FlickrCheers Simon.S.A.C. Martin wrote:Hi Will - I'd be very interested in seeing how you've addressed the boiler sides if it would be possible to see a few pics?
Your work on the front end of 2002 nee 2001 is very good. I particularly like the use of the A3 running plate and K3 cylinder covers. Very inventive.
I am currently working on a Bugatti nosed example using a combination of all manner of components (but mostly taking my cues from the Hornby A4 front and rear ends). I have been looking at the valve gear and wondering what everyone else is thinking for theirs - Comet V2 valve gear? Or as I've done previously for my Thompson Pacifics, Bachmann V2 valve gear?
I don't have any pics of the boiler side yet but basically I just cut out the 'lump', backed the hole with plasticard, then filled the hole with another piece of plasticard & then started the seemingly endless filling & sanding process.
For valve gear I'm going to use a mix of the comet v2 etch & Graeme's A2/2 etch, probably with the original cylinders (modified). I got a set of Hornby A3 cylinders but they're not flat sided as the P2 ones were so I don't think they'll do.
Cheers
Will
My LNER 1930s West Highland Workbench
viewtopic.php?f=3&t=9293
My Blog
http://westhighlandmodelling.wordpress.com/
My LNER 1930s West Highland Workbench
viewtopic.php?f=3&t=9293
My Blog
http://westhighlandmodelling.wordpress.com/