West End Workbench
Moderators: 52D, Tom F, Rlangham, Atlantic 3279, Blink Bonny, Saint Johnstoun, richard
-
- LNER A4 4-6-2 'Streak'
- Posts: 4316
- Joined: Wed Oct 25, 2006 8:46 am
Re: West End Workbench
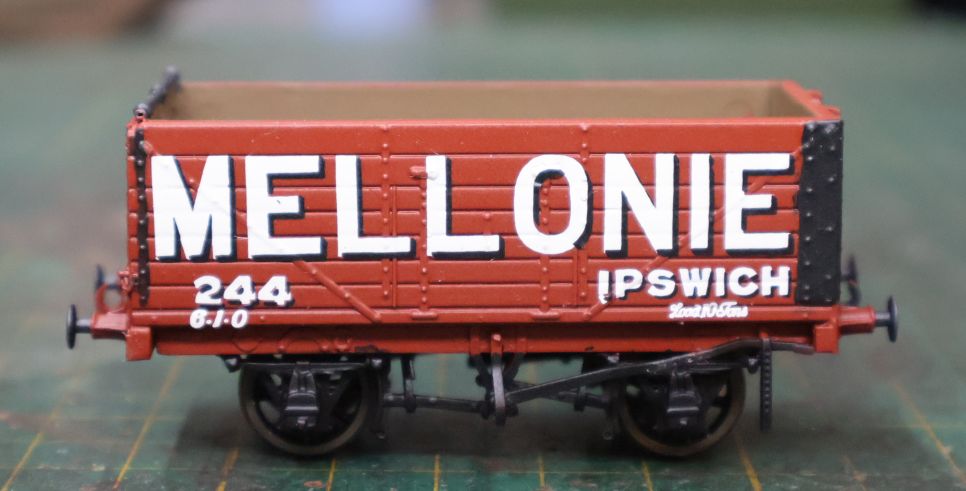
No wagon left behind, mate.
I managed to do the lettering on this this week. It was a very old Powsides transfer I hoovered up on Ebay - in two parts, the white lettering and black shading on different sheets. I've learned to deal with Powsides transfers over the years; though I still hate them, there's not much better for getting right into the contours of wagon bodywork. I had a small tussle with the 'I' of Ipswich, which decided it would rather be on my finger than the wagon, but otherwise it'll be a bit of a shame to weather it.
-
- LNER A4 4-6-2 'Streak'
- Posts: 1785
- Joined: Fri Oct 19, 2007 2:44 pm
- Location: Overlooking the GEML
Re: West End Workbench
I once asked a girl named Melanie out, fancied my chances but she poked me in the eye.
- Atlantic 3279
- LNER A4 4-6-2 'Streak'
- Posts: 6694
- Joined: Fri Jun 26, 2009 9:51 am
- Location: 2850, 245
Re: West End Workbench
That might still have been mildly enjoyable...
Most subjects, models and techniques covered in this thread are now listed in various categories on page1
Dec. 2018: Almost all images that disappeared from my own thread following loss of free remote hosting are now restored.
-
- LNER A4 4-6-2 'Streak'
- Posts: 4316
- Joined: Wed Oct 25, 2006 8:46 am
Re: West End Workbench
I'm sure there are establishments in most major cities where you'd pay handsomely for that kind of treatment.
-
- LNER A4 4-6-2 'Streak'
- Posts: 4316
- Joined: Wed Oct 25, 2006 8:46 am
Re: West End Workbench
I have started to prepare some wagonry to keep myself amused over the Christmas week. There's a bit of a theme here:
I picked up what were then the new wagon kits from 247 Developments at Expo EM North in August and they've been waiting for me to order the correct buffers ever since. One was an LSWR Machinery truck (K416) which is the top vehicle above. The other (not shown) is an LSWR Lowmac. Beautifully formed parts and the quality of the prints is excellent. If you're tacking this one, don't fill the underside with lead shot until you've fitted the brake gear. Don't ask me how I know that.
Underneath it is a Ks Lowmac which I am going to finish as an approximation of a Mac N, the ex-GC vehicle. I got hold of some 51L Caledonian heavy duty buffers as they're more or less the right shape if you trim the webs off. The brake lever had been replaced with a better onw, again using 51L components. There's a little bit more detailing to add and then this too is ready for primer.
I thought this might be of interest as I'm often asked about wagon loads. I had to fit a new battery to a tractor and it came with these covers over the terminals. I thought they might come in so I kept them and found they would be within gauge on a Lowmac. The circles of lead are to give a bit of weight and also allow me to screw them to the wagon. Since this picture I've painted the bottom of each one with a metallic Humbrol paint which will polish up to look like steel. The idea is to have them sheeted but with the bottom showing so they look like some sort of casting. We'll see how that works out.
Finally I lettered the cattle wagon I was working on; it needs to be weathered and then I can fit the roof permanently. After that, thanks to a very kind gift, I have a tanker to weather....
-
- GNR C1 4-4-2
- Posts: 719
- Joined: Tue Nov 27, 2012 8:59 am
- Location: South Australia
Re: West End Workbench
Jonathan
Glad to see the GE cattle wagon in LNER livery rather than for one of the BR period layouts you provide stock for. It looks great.
Andrew
Glad to see the GE cattle wagon in LNER livery rather than for one of the BR period layouts you provide stock for. It looks great.
Andrew
-
- LNER A4 4-6-2 'Streak'
- Posts: 4316
- Joined: Wed Oct 25, 2006 8:46 am
Re: West End Workbench
I'm glad you're pleased with it, Andrew. Much too prized a kit to put into scruffy BR condition.
A Happy Christmas to everyone reading and the best of whatever you'd wish for yourselves for 2025.
Last edited by jwealleans on Wed Dec 25, 2024 1:24 pm, edited 1 time in total.
-
- LNER A4 4-6-2 'Streak'
- Posts: 1785
- Joined: Fri Oct 19, 2007 2:44 pm
- Location: Overlooking the GEML
Re: West End Workbench
You didn't quaff Santa's sherry did you Jonathan?jwealleans wrote: ↑Wed Dec 25, 2024 5:55 am A Happy Christmas to everyone reading and th ebets of whatever you'd wish for yourselves for 2025.
-
- GCR D11 4-4-0 'Improved Director'
- Posts: 417
- Joined: Fri Oct 19, 2012 12:09 am
Re: West End Workbench
I thought he was speaking Klingon...
-
- LNER A4 4-6-2 'Streak'
- Posts: 4316
- Joined: Wed Oct 25, 2006 8:46 am
Re: West End Workbench
No, just lighting the fire with my other hand. Now corrected.
-
- LNER A4 4-6-2 'Streak'
- Posts: 4316
- Joined: Wed Oct 25, 2006 8:46 am
Re: West End Workbench
I have just realised I drafted this up over a week ago, posted it in one place and then forgot the next day to add it here.
Been a bit quiet since Christmas; I had to work through, so didn't get my usual long break and so didn't get as much modelling done as usual. I've also been quite busy at work and with modelling jobs for other people so there's not been a lot worth posting.
I did start a whitemetal wagon one evening just as a change: I can usually finish off an ABS or D & S wagon kit in an evening and it's nice to start and finish a job in one session from time to time. This time, however, it was not to be.
The kit is a D & S 'Jubilee' coal wagon and the W iron near the camera is a faulty casting. The spring and W iron both have missing metal. All is not lost, though, even though Danny is no longer producing this wagon. Like a number of D & S wagons, the kit is now with 51L and he sells these as spares. It will be in my next order to him - probably once his waisted wheel bearings are back in stock. It sometimes baffles me to see people pay way over the odds for a D & S kit on Ebay when the same kit can be had from Andrew for far less.
I also started work on a couple of refrigerated vans over Christmas. One is the second of a pair I bought from Bygone Wagons in Australia. The other comes from Ebay and is advertised as an 'LNER Fish Van' though it clearly is not.
The Bygone wagon doesn't seem to be listed any more. It came as a kit and quite cleverly designed too. However the execution was not as good, as I knew from building the first one. This time I cut all the strapping off while the sides were in the flat. I'll make a new roof as well. The print was done on a filament printer and it shows. There's quite a bit of sanding and filler to get rid of the striations and for such as the roof it's easier just to replace. I also made a new underframe as I have my doubts about the robustness of the 3D printed one and the brake gear was crude. I'd had pointed out to me that the V hangers on these vans (Diagram 21) are not the usual offset ones the LNER used, but unusually (possibly uniquely) are symmetrical and also mounted on the outside of the solebar. There's still a way to go with this one.
The second van is in a different league in terms of quality of print. It's really excellent as these go. However, what is printed is a mixture of imagination and misinformation. Diagram 21 is the closest resemblance, but I wouldn't put it more strongly than that. The body is the right size, but that's about all: the end stanchions should be T section steel, the end vents are too flat, both ladders are on the same side (they should always be on the left as you look at the end) and the vacuum pipes are represented as a kind of raised curve flat against the end. As I went on I found more and more wrong with it. The underframe is timber instead of steel and the brake gear a long way from the LNER's asymmetrical vacuum brake design.
I replaced this completely although it did mean I ended up with a small gap round the base of the sides which I will try to fill with plastic strip.
All in all it's been much more work than I anticipated. Hopefully once painted, weathered and mixed into the rest of the perishables rake on Grantham they won't stand out so badly.
Been a bit quiet since Christmas; I had to work through, so didn't get my usual long break and so didn't get as much modelling done as usual. I've also been quite busy at work and with modelling jobs for other people so there's not been a lot worth posting.
I did start a whitemetal wagon one evening just as a change: I can usually finish off an ABS or D & S wagon kit in an evening and it's nice to start and finish a job in one session from time to time. This time, however, it was not to be.
The kit is a D & S 'Jubilee' coal wagon and the W iron near the camera is a faulty casting. The spring and W iron both have missing metal. All is not lost, though, even though Danny is no longer producing this wagon. Like a number of D & S wagons, the kit is now with 51L and he sells these as spares. It will be in my next order to him - probably once his waisted wheel bearings are back in stock. It sometimes baffles me to see people pay way over the odds for a D & S kit on Ebay when the same kit can be had from Andrew for far less.
I also started work on a couple of refrigerated vans over Christmas. One is the second of a pair I bought from Bygone Wagons in Australia. The other comes from Ebay and is advertised as an 'LNER Fish Van' though it clearly is not.
The Bygone wagon doesn't seem to be listed any more. It came as a kit and quite cleverly designed too. However the execution was not as good, as I knew from building the first one. This time I cut all the strapping off while the sides were in the flat. I'll make a new roof as well. The print was done on a filament printer and it shows. There's quite a bit of sanding and filler to get rid of the striations and for such as the roof it's easier just to replace. I also made a new underframe as I have my doubts about the robustness of the 3D printed one and the brake gear was crude. I'd had pointed out to me that the V hangers on these vans (Diagram 21) are not the usual offset ones the LNER used, but unusually (possibly uniquely) are symmetrical and also mounted on the outside of the solebar. There's still a way to go with this one.
The second van is in a different league in terms of quality of print. It's really excellent as these go. However, what is printed is a mixture of imagination and misinformation. Diagram 21 is the closest resemblance, but I wouldn't put it more strongly than that. The body is the right size, but that's about all: the end stanchions should be T section steel, the end vents are too flat, both ladders are on the same side (they should always be on the left as you look at the end) and the vacuum pipes are represented as a kind of raised curve flat against the end. As I went on I found more and more wrong with it. The underframe is timber instead of steel and the brake gear a long way from the LNER's asymmetrical vacuum brake design.
I replaced this completely although it did mean I ended up with a small gap round the base of the sides which I will try to fill with plastic strip.
All in all it's been much more work than I anticipated. Hopefully once painted, weathered and mixed into the rest of the perishables rake on Grantham they won't stand out so badly.
-
- GNR C1 4-4-2
- Posts: 719
- Joined: Tue Nov 27, 2012 8:59 am
- Location: South Australia
Re: West End Workbench
Nice to see you working on these Jonathan. I need to get around to making at least one of the timber underframe Dia 20s from one of the Dia 21 kits I have from Amanda (Bygone wagons). I'll probably end up making new ends to make it easier to make the lower end ventilators.
Andrew
Andrew